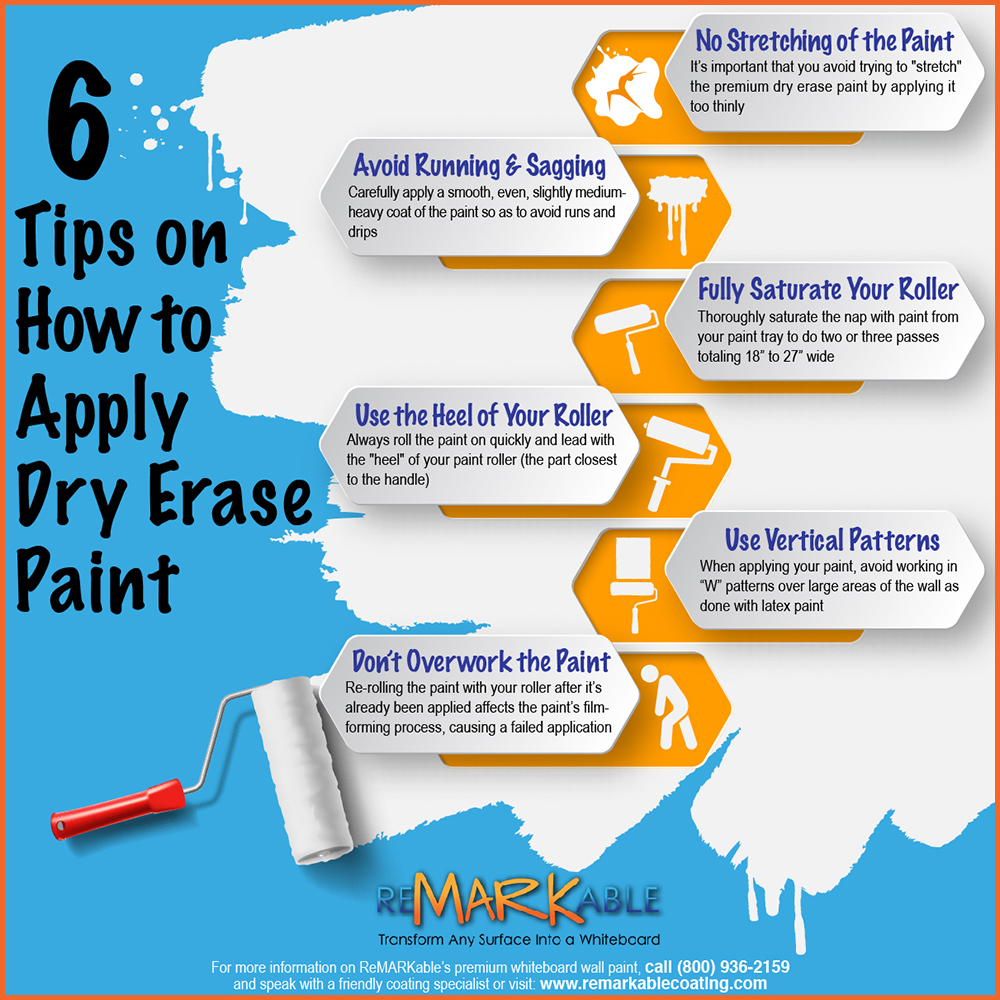
6 Tips on How to Apply Dry Erase Paint
Applying top-quality dry erase paint differs from the way traditional latex wall paint is applied. It involves specific techniques to ensure you achieve a perfect installation and experience ten or more trouble-free years of regular use when your dry erase surface is properly erased and maintained. Some significant factors to consider when making your application include the following: (1) avoid trying to “stretch” the product by applying it too thinly; (2) don’t apply the paint too heavily to avoid running and sagging; (3) fully saturate your paint roller each time you dip it into your roller tray; (4) lead with the heel of your roller (the part closest to the roller frame) as you apply the coating to your surface; (5) apply the coating in a vertical pattern going from the bottom to the top of your surface and vice versa all the way across your area; and (6) don’t overwork the product by attempting to go back and re-roll over sections that have already been coated, as this will compromise the coating’s natural film-forming process, causing a botched application that will require recoating.
No Stretching of the Dry Erase Paint
You must avoid trying to “stretch” the premium dry erase paint by applying it too thinly. This will result in a failed application with an irregular, patchy-looking surface that’s difficult to write on and erase and must be recoated. ReMARKable is a type of coating and not a paint, and it needs to sit on top of the substrate in a uniform, even coat all over and not sink into the surface as ordinary latex house paint is designed to do. Thus, it is unsuitable to have some areas of your wall covered with more product and some areas with less, as might be the case with latex paint. When this happens, tiny crevices or low spots will appear all over the finished surface, where dry erase marker ink will collect and be challenging to remove.
Also, avoid working too far out in front of yourself by leaving unpainted spaces between painted areas and then coming back and trying to fill in the unpainted places. With premium dry erase paint, you will want to keep your painted areas right next to each other and overlap about two to three inches as you move along the wall with your roller, in vertical passes from the bottom to top and then from top to bottom across your surface, maintaining a wet edge as you go. This is important because if you apply the coating too thinly, it will affect the film-forming process of the dry erase coating and create an unusable surface.
Avoid Running and Sagging
Do not apply the dry erase paint too heavily, or you will cause sagging, running, and bubbling to occur, resulting in a failed application that will be irregular in terms of smoothness and challenging to write on and erase, thus requiring recoating. Carefully apply a smooth, even, slightly medium-heavy coat of paint to avoid runs and drips. Due to its chemical makeup, premium dry erase paint is designed to have a built-in self-leveling capability, so after application, if you wait about 45 minutes to an hour, you’ll notice that the freshly coated surface has evened itself out and has a smooth, regular look overall.
When mixing the dry erase paint, mix just enough to cover the area you plan to coat so you’re not tempted to use too much material.
Fully Saturate Your Roller
For best results, use a good-quality nine-inch microfiber paint roller with a ¼” to 3/8” nap, and thoroughly saturate the nap with dry erase paint from your paint tray to do two or three passes totaling 18” to 27” wide and then quickly move on to the next section. Apply a medium-heavy coat of the paint to the wall in a vertical up-and-down motion, overlapping from two to three inches with each pass to maintain a wet edge and thus preserve the coating’s film-forming capacity. As mentioned, avoid putting on too much material so that you produce runs, saggy areas, and bubbles. Also, avoid applying too little paint so the surface will look patchy and be difficult to write on and erase after it dries. Don’t be afraid to use ample dry erase paint with each pass of your roller, but don’t overdo it with too much material or skimp and put on too little. Apply the paint heavily enough to where you feel it won’t run or sag.
Use the Heel of Your Roller
Always roll the paint on quickly and lead with the “heel” of your paint roller (the part closest to the handle), applying a slight forward pressure toward the heel while continually and gently twisting the roller handle from left to right as you go. This technique will help ensure a smooth, even dry erase paint application. In professional painters’ terminology, this is called “licking” the side of your roller. Tilt slightly to the right side or heel of the roller, thus offloading any paint directly on the right edge of the roller, then do the same thing on the left side, smooth it all out, and move on to the next section of your wall.
Use Vertical Patterns
Avoid working in “W” patterns over large areas of your wall when applying your dry erase paint as you might do with traditional latex wall paint. It doesn’t matter with latex paint if you spread it thinly with a roller and then go back over it several times to apply more paint to an area. Instead, with dry erase paint, it’s best to roll the coating on smoothly and evenly, straight up and down in vertical patterns. First, start from the bottom of your designated area and roll up, then shift your roller to the right, overlapping your previous pass by about two to three inches, and then roll downward and repeat, going back up and back down until you’ve finished coating your entire surface. As mentioned, when rolling, be sure to work quickly and maintain a wet edge by overlapping each pass of your roller each time you go up or down the wall. Just apply some coating, let off with your roller, overlap, and then apply some more until you’ve completely covered your surface with a uniform coat of dry erase paint.
Don’t Overwork the Dry Erase Paint
Re-rolling or going over the dry erase paint with your roller after it’s already been applied to your substrate will most likely affect the paint’s film-forming process, causing a failed application and the need to recoat. Avoid overworking your dry erase paint! Just apply a single medium-heavy coating layer, and it will immediately start forming a film as you move along your surface. This film should not be disturbed or agitated by going back over any part of your wall that’s already been coated with whiteboard paint. It’s unnecessary to try to even out a section that looks irregular because our top-quality dry erase paint is specially formulated by our top chemists to be self-leveling. In other words, the painted surface begins to even itself and soften out right after the film starts to form, and this process continues as the coating cures.
Thus, in approximately 45 minutes to an hour, all the formerly uneven places you might have seen on your wall will have disappeared, and your wall will look perfectly smooth and even all over. This self-leveling feature makes premium dry erase paint unique, as there is no need to go back and try to smooth out irregular-looking places that you’ve already coated as you might do with ordinary latex or enamel wall paints.


![Giant Leaps Forward Require Big Spaces. [Leap Year Sale Event!]](https://www.remarkablecoating.com/wp-content/uploads/2016/02/Giant-Leaps-ForwardRequire-Big-Spaces-440x264.jpg)


![30% Off St Patrick’s Day Sale! [Details Inside]](https://www.remarkablecoating.com/wp-content/uploads/2016/03/Glorious-1-440x264.png)

![Drive Your Organization Into Openness and Watch it Expand [20% Off Whiteboard Paint]](https://www.remarkablecoating.com/wp-content/uploads/2016/04/Drive-Your-Organization-Into-Openness-and-Watch-It-Expand.-1-440x264.jpg)


![ReMARKable’s Winter Sale is Here! [25% Off + Free Shipping]](https://www.remarkablecoating.com/wp-content/uploads/2018/01/Red-Tag-Winter-Fashion-Facebook-Post-1-440x264.png)


![ReMARKable Summer Sale 2018 [28% Off Whiteboard Paint]](https://www.remarkablecoating.com/wp-content/uploads/2018/06/Blue-Simple-Line-Beach-Facebook-Post-1-440x264.png)


0 Comments