How Do You Make a Dry Erase Wall?
A top-quality dry erase wall is versatile and can be installed in various venues, including business offices, classrooms, homes, restaurants, libraries, retail shops, clinics, and hospitals. Once installed, a dry erase wall offers a vast surface for writing and drawing that can be used for doing business meeting presentations, conducting classroom lessons, posting household schedules, and countless other tasks. Dry erase walls are also perfect places to reveal your creativity through impromptu sketching, doodling, poetry writing, brainstorming, and other forms of expression.
If you’ve been thinking about applying dry erase paint to one or more of your walls, here are several essential steps to assure you a highly satisfactory dry erase wall outcome and many years of reliable service.
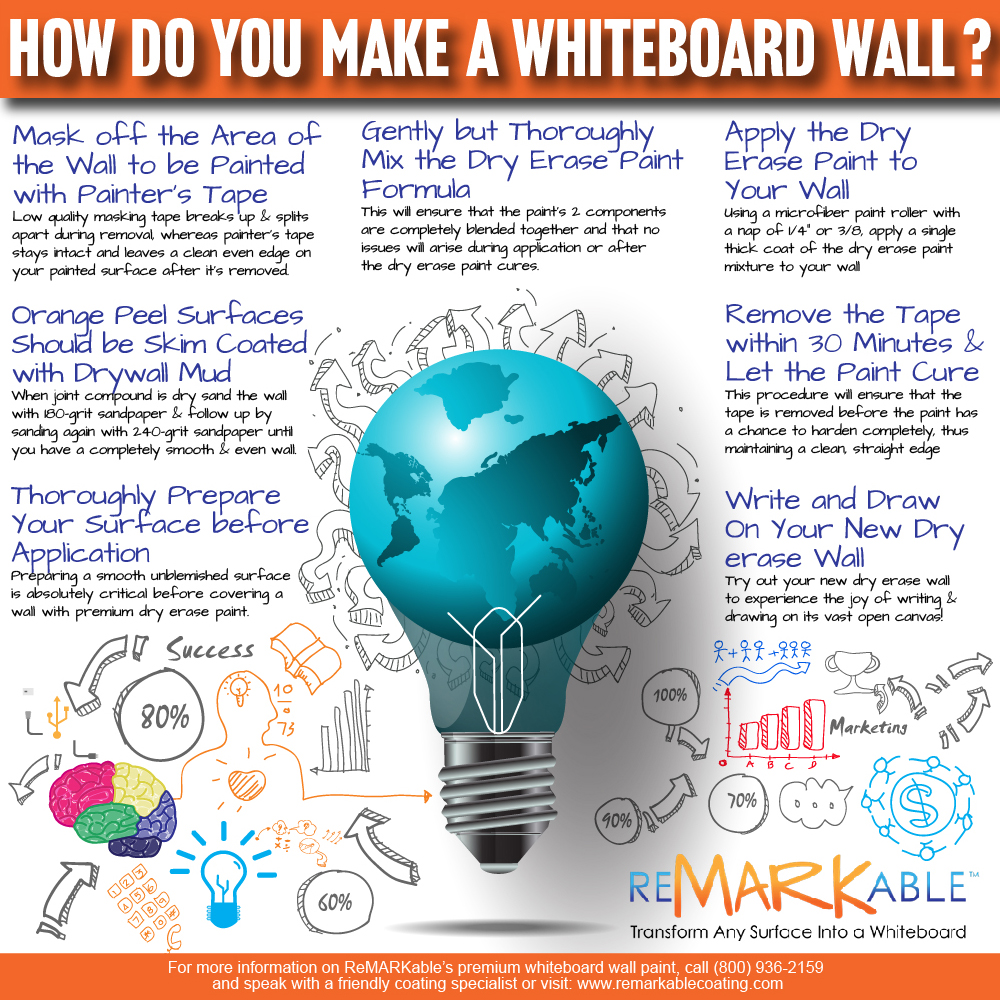
Thoroughly Prepare Your Surface Before Application
Preparing a smooth, unblemished surface before covering a wall with premium dry erase paint is critical. If you’re working with drywall, it’s essential to skim-coat the surface at least once, if not twice, in preparation for your dry erase paint application. And if the surface has been finished with the so-called “orange peel” texture, you’ll need to skim coat it with joint compound, also known as drywall mud, before applying the dry erase paint. This is so because when dry erase markers are used to write or draw on an orange peel-type surface, the marker ink settles in the tiny pits or low areas, resulting in an unsightly spotted appearance. In such a case, the markings also look irregular and less dark and distinct than they would appear on a perfectly smooth wall.
Orange Peel Surfaces Need to be Skim Coated with Drywall Mud
To prevent this issue, smooth your wall by putting on an ample layer of joint compound that will fill in all of the tiny peaks and valleys in the orange peel surface. Then, once the joint compound has dried, sand the wall with 180-grit sandpaper and follow up by sanding once again with 240-grit sandpaper until you arrive at a completely smooth and even surface all over the wall.
Next, after the orange peel texture and rough sections of joint compound have been eliminated, carefully wipe down the entire surface with a moistened microfiber cloth or mitt. Follow this up with another thorough wipe down with a dry microfiber cloth so your wall will be arid and suitable for applying a primer paint or our proprietary ReMARKable Tintable Base Paint. This product consists of a base coat and primer all in one so it does away with the need to apply separate a primer and base coat.
If you choose to use a primer and base coat of another manufacturer, first prime the surface with a good quality white primer and follow this up with an appropriate environmentally friendly base coat, preferably a high-quality satin or eggshell water-based enamel. If you plan to apply the paint over a dark-colored painted wall, you will have to prime the surface first with white primer.
Carefully Mask off the Area of the Wall to be Painted with Painter’s Tape
Using painter’s tape, mask off the area you want to turn into a dry erase surface. Look for a good quality brand of painter’s tape that provides superior seep-through protection. Regular masking tape, which is generally of poorer quality, tends to allow paint to bleed through its sides, leaving behind uneven edges when it’s removed. Lower-quality masking tape is also prone to breaking up and splitting apart during removal. In contrast, painter’s tape stays intact and leaves a clean, even edge on your painted surface after it’s removed.
To ensure you have a successful tape application before installing your dry erase paint, you can practice applying the tape to a section of molding or other surface until you can do it smoothly, evenly, and with the right degree of tension. Stretching the tape as you apply it before painting can cause air bubbles or puckering, which will cause the dry erase paint to seep under the edges of the tape and produce an irregular and unsightly appearance upon removal.
When you feel ready to apply the painter’s tape, carefully position the tape against an edge you want to cover and pull about ten inches of tape from the roll. Then, hold the tape roll tightly next to the wall with one hand and move the roll along as you apply the tape in a completely straight line. During this time, you should be pressing down on the tape with the index finger of your other hand. Finally, tear off the piece of tape that you’ve installed and use the same procedure to apply another length of tape to the next section, and so on, until you’ve masked off the entire area where you plan to apply the dry erase paint.
Thoroughly Mix the Dry Erase Paint Formula
Once everything is ready, carefully mix parts A and B of the dry erase paint formula for at least three minutes according to the kit’s instructions while using a slow, steady motion. This will ensure that the paint’s two components are thoroughly blended and that no issues will arise during application or after the dry erase paint cures. Avoid over-mixing the paint or mixing it too vigorously with a strong swirling motion, as this will cause the paint’s bubbling, which will lead to small pits on the finished surface after the paint cures. Such an irregular surface causes dry erase marker ink to easily collect in the low areas or valleys, thus creating an unsightly look and less distinct ink lines when writing and drawing.
Apply the Dry Erase Paint to Your Wall
Using a microfiber paint roller with a nap of 1/4″ or 3/8, apply a single thick coat of the dry erase paint mixture to your wall based on the procedure described in your paint kit’s instructions. During the application process, it’s important not to try “stretching” your dry erase paint by spreading it out and causing it to be applied too thinly. Doing so will result in an undesirable appearance for your dry erase and a surface that will only be possible to write on smoothly and erase cleanly.
Remove the Tape within 30 Minutes and Let the Paint Cure
Take off your painter’s tape within thirty minutes after you apply the dry erase paint. This procedure will remove the tape before the paint can harden completely, thus maintaining a clean, straight edge on your finished dry erase painted surface.
The freshly painted dry erase wall should be dry to the touch in six to eight hours, depending on your room’s ambient temperature and humidity levels. However, it is essential to wait a minimum of 48 hours before using the surface to allow the paint to cure completely and avoid creating any future issues with writing and erasing.
Write and Draw On Your New Dry Erase Wall
Try your new dry erase wall to experience the joy of writing and drawing on its vast open canvas! Use only high-quality low-odor dry erase markers, and unleash your innate creativity by expressing yourself in large, easy-to-see text and drawings that can be readily erased when new thoughts and images arise. Once you’ve completed installing your dry erase wall, the possibilities for using the surface are endless and are only limited by the size of your imagination.
For example, suppose you’ve applied the dry erase paint to a wall in your business office. In that case, it will provide a handy communications center for you and your team to hold brainstorming sessions, posting reminders about upcoming staff meetings, writing messages about new office policies, and various other tasks.


![Giant Leaps Forward Require Big Spaces. [Leap Year Sale Event!]](https://www.remarkablecoating.com/wp-content/uploads/2016/02/Giant-Leaps-ForwardRequire-Big-Spaces-440x264.jpg)


![30% Off St Patrick’s Day Sale! [Details Inside]](https://www.remarkablecoating.com/wp-content/uploads/2016/03/Glorious-1-440x264.png)

![Drive Your Organization Into Openness and Watch it Expand [20% Off Whiteboard Paint]](https://www.remarkablecoating.com/wp-content/uploads/2016/04/Drive-Your-Organization-Into-Openness-and-Watch-It-Expand.-1-440x264.jpg)


![ReMARKable’s Winter Sale is Here! [25% Off + Free Shipping]](https://www.remarkablecoating.com/wp-content/uploads/2018/01/Red-Tag-Winter-Fashion-Facebook-Post-1-440x264.png)


![ReMARKable Summer Sale 2018 [28% Off Whiteboard Paint]](https://www.remarkablecoating.com/wp-content/uploads/2018/06/Blue-Simple-Line-Beach-Facebook-Post-1-440x264.png)


0 Comments