How do you make a homemade whiteboard?
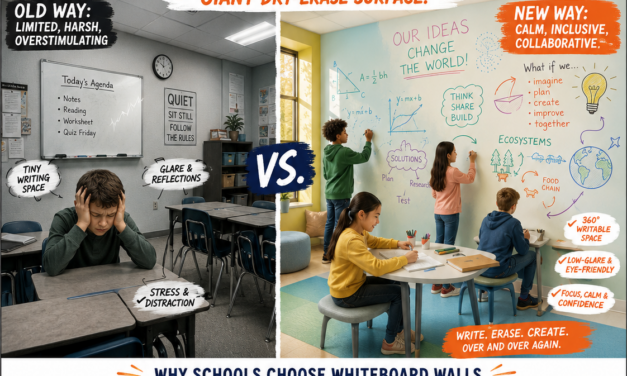
A large whiteboard wall is an ideal medium for generating and organizing business and educational information, presenting creative ideas and images, and engaging in other forms of expression. However, standard framed whiteboards are often costly and are also hard to maintain and non-recyclable, so they not only consume your precious time, money, and energy but also harm the environment by having to be dumped in landfills after they become unusable. Thus, to assist your budget and help save maintenance time and the environment, it makes good sense to create a do-it-yourself whiteboard for your office, home, organization, or small business that is cost-effective, easy to write on, erase, and clean, and is also eco-friendly.
A homemade Whiteboard Wall for the Home
Many parents who homeschool their children regularly employ visual aids, and a whiteboard is one of the best possible tools to use for teaching purposes, as it allows both parents and children to interact through writing and drawing during lessons and provides an open area for the free expression of creative ideas and images. However, since traditionally framed whiteboards are often expensive and also hard to keep up, creating a dry erase surface for yourself with a high-quality, durable coating is a “no brainer” to use today’s terminology. And when planning the kind of whiteboard you want, it’s essential to choose one that will best suit your family’s finances and your children’s learning needs.
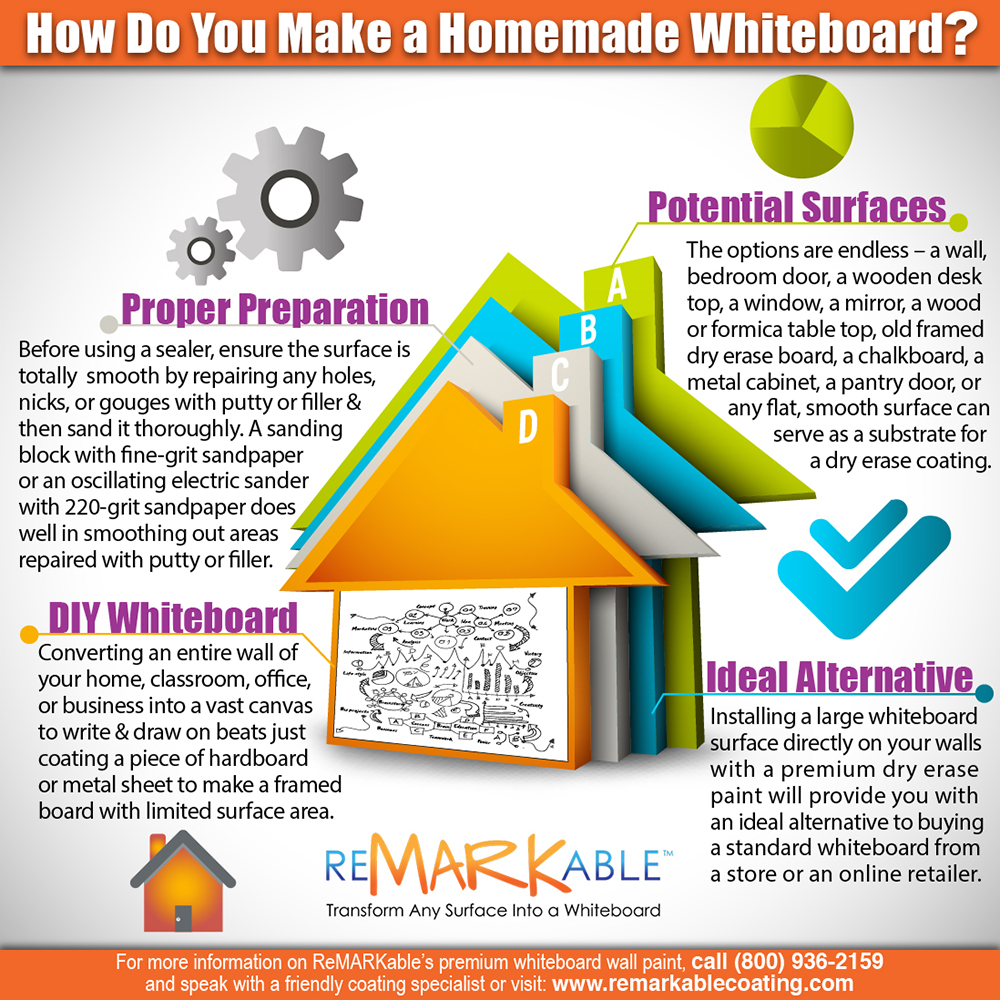
Creating a do-it-yourself whiteboard allows you to make notes, teach your kids at home, brainstorm ideas for projects, write memos, and generally make your life more manageable at little cost. For these reasons, installing a massive whiteboard surface directly on your walls with ReMARKable dry erase paint will provide you with an ideal alternative to buying a standard whiteboard from a store or an online retailer. However, suppose you’re used to the familiar look of a traditional whiteboard hanging on the wall and feel inspired to make one. In that case, you can also apply our dry erase coating to a tempered hardboard panel or other material and add a wood or aluminum frame, thus creating a whiteboard that is highly durable and easy to write on and erase. In addition, using hardboard and wood for the board will make it completely biodegradable and thus more eco-friendly. On the other hand, if you need a magnetic whiteboard on which to hang notes, drawings, and other items, you can cover a steel sheet with our top-quality coating and then add a frame made of wood, aluminum, or another material.
A DIY Whiteboard Wall is More Effective Than a Homemade Framed Whiteboard
In terms of available writing and drawing space and ease of access for everyone to use, converting an entire wall of your home, classroom, office, or business into a vast canvas to write and draw on beats just coating a piece of hardboard or metal sheet to make a framed board with limited surface area. Whichever option you choose, however, you’ll only need to apply a single layer of our premium dry erase coating to achieve an attractive and highly durable surface that’s easy to write on and erase and that will give excellent service for ten-plus years before needing a recoat.
Potential surfaces to turn into a whiteboard
Regarding the types of surfaces on which you can create your homemade whiteboard, the options are endless – a wall, a bedroom door, a wooden desktop, a window, a mirror, a wood or Formica tabletop, an old framed dry erase board, a chalkboard, a metal cabinet, a pantry door, or any other flat, smooth surface can serve as a suitable substrate for our dry erase coating. The standard refrain about our premium coating is that it can convert any smooth surface into a whiteboard. However, whatever surface you choose needs to be prepared carefully before the coating goes on; otherwise, you’ll experience poor adhesion to the substrate and issues with writing, erasing, and cleaning.
Proper Whiteboard Wall Preparation is Essential
One type of surface that’s easily converted into a dry erase board is wood, which will serve as an example of how to properly prepare for and apply the whiteboard coating to a substrate. In relation to wood surfaces, the two types to choose from are raw natural wood and already sealed wood. Raw wood contains porous grain that must be sealed before applying a primer, so the first step is to put on a high-quality clear wood sealer. But before using the sealer, ensure the wood’s surface is entirely smooth by repairing any holes, nicks, or gouges with wood putty or wood filler and then sand it thoroughly. A handheld sanding block with fine-grit sandpaper or an oscillating electric sander equipped with 220-grit sandpaper works well in smoothing out areas repaired with wood putty or filler.
Once the repaired areas are sanded, you can begin putting on the clear wood sealer. As you apply the sealer, it will soak down into the wood and raise the grain, thus making the surface rough to the touch. For this reason, you’ll need to sand the sealed wood after it dries thoroughly. Since good quality wood fillers dry hard, it will be hard to sand the sealed surface by hand. So, it’s preferable to use an oscillating electric sander again, beginning the job with medium-grit sandpaper and then following up with 180- or 220-grit paper until the surface is completely smooth.
Next, to fully seal the wood, you have two choices. The first is to roll on two coats of our ReMARKable Tintable Base Paint, which provides outstanding adhesion to the substrate. We strongly suggest that you use this high-quality base coat and primer all in one. Applying it will save you the time involved in using a separate primer and base coat and in waiting for the primer to dry before you can install the base coat. With the Tintable Base Paint, you’ll need to wait three to four hours between coats. No special primer is necessary. After the second coat of the base paint is applied, you’ll need to wait at least 24 hours to roll on our premium whiteboard coating. Complete instructional videos on how to install the coating are contained on our official website.
Otherwise, you can use a primer that’s appropriate for wood, and then once the primer has dried, roll on two layers of satin or eggshell water-based enamel as a base coat. Again, after the second coat of the base paint is applied, please wait at least 24 hours and then roll on our premium whiteboard coating. As mentioned, easy-to-follow instructions for installing the coating are provided in videos on our official website.
Suppose you want to install a quality whiteboard coating on a desk or other piece of furniture that’s already treated with varnish or another coating. In that case, you should patch any holes with wood putty or filler, lightly scuff the surface with 220-grit sandpaper, make sure it’s perfectly smooth and free of dirt and lumps, and then apply our quality base paint/primer or a different primer and two coats of a quality satin or eggshell base paint as described above. Before purchasing the base paint, you’ll need to check the ingredients to make sure it contains no chemicals that will react adversely with our dry erase coating, such as anti-foaming agents and rheology or flow modifiers. For details on all the chemicals to avoid in a base paint, consult the answer to the fourth question in our official website’s FAQ section.
Before rolling the whiteboard coating onto a piece of furniture, we strongly recommend that you position the piece on a tabletop or some other elevated surface so that you can apply the coating in a vertical up-and-down pattern. This method is advised because the proprietary formula of our dry erase coating includes a special self-leveling chemical agent that functions best when the coating is installed on a vertical surface.


![Giant Leaps Forward Require Big Spaces. [Leap Year Sale Event!]](https://www.remarkablecoating.com/wp-content/uploads/2016/02/Giant-Leaps-ForwardRequire-Big-Spaces-440x264.jpg)


![30% Off St Patrick’s Day Sale! [Details Inside]](https://www.remarkablecoating.com/wp-content/uploads/2016/03/Glorious-1-440x264.png)

![Drive Your Organization Into Openness and Watch it Expand [20% Off Whiteboard Paint]](https://www.remarkablecoating.com/wp-content/uploads/2016/04/Drive-Your-Organization-Into-Openness-and-Watch-It-Expand.-1-440x264.jpg)


![ReMARKable’s Winter Sale is Here! [25% Off + Free Shipping]](https://www.remarkablecoating.com/wp-content/uploads/2018/01/Red-Tag-Winter-Fashion-Facebook-Post-1-440x264.png)


![ReMARKable Summer Sale 2018 [28% Off Whiteboard Paint]](https://www.remarkablecoating.com/wp-content/uploads/2018/06/Blue-Simple-Line-Beach-Facebook-Post-1-440x264.png)


0 Comments