
Six Steps to Mixing Whiteboard Paint
A number of key characteristics distinguish both the clear and white versions of high-quality whiteboard coating from conventional types of paint, such as interior and exterior house paint. First, the whiteboard coating consists of a two-component formula that has to be carefully hand-mixed and applied in accordance with the instructions that accompany the application kit. Second, the whiteboard coating has a so-called “pot life,” or a specific time period during which it can be successfully used after the two components are mixed together. Third, the formula should not be shaken as might be done with conventional paints as this will cause bubbling, which leads to small pits on the finished surface and eventual problems with writing, erasing, and maintenance.
While mixing whiteboard paint may appear to be a simple job, the process can have a powerful impact on the performance and durability of the finished surface. Improper blending of the components can result in an incomplete chemical reaction between them, and in turn to diminished coating quality. By contrast, properly performed mixing will deliver a coating with the greatest chance of performing as intended. Every multi-part coating is designed by its manufacturer to be mixed and applied according to specific guidelines. Thus, carefully following the relevant specifications for coating preparation will enhance the odds of achieving ideal performance, looks, and reliability.
With this in mind, the following are six important steps to take when mixing the two components of premium whiteboard coating so as to ensure yourself a properly blended product and a durable, easy-to-use whiteboard coated surface that will last for many years of normal use.
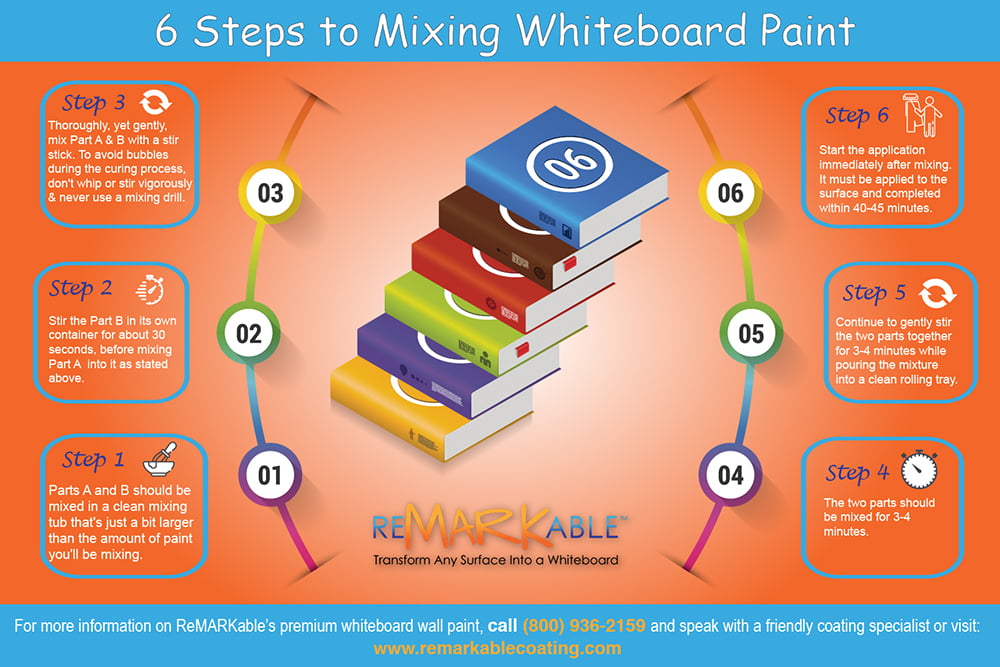
Step 1 –
Parts A and B should be mixed in a clean mixing tub that’s just slightly larger in volume than the amount of paint you plan to use. Make sure that the tub is completely free of dirt and debris so that no tiny lumps, lines, or divots appear on the coated surface after the coating cures. Also, for a proper application, the ambient room temperature where the coating’s components are to be mixed and applied should be between 65°F and 85°F. Temperatures outside of this range could adversely impact the effective blending of the components and the application of the coating after mixing. In addition, the mixing ratio should be 2:1 –containing one (1) part A with two (2) parts B.
Step 2 –
If you’re using the white version of the coating, stir part B, a water-based dry-erase resin, in its own container for about 30 seconds before pouring, adding, and folding part A, a water-based dry-erase hardener, into part B. The process of stirring part B by itself first for the white version of the coating is important because you want to make sure that the ingredients in part B are uniformly distributed throughout the liquid before mixing it with part A, thus guaranteeing that the chemical interaction between part A (hardener) and part B (resin) will happen as intended.
Step 3 –
After part A is added to part B, it’s important to thoroughly but gently mix the two parts together with a stir stick. Remember that proper mixing of multi-component coatings such as our top-quality clear, and white products is vitally important because the two parts are designed to react in a specific way with each other when combined. If the components are not well mixed, this chemical reaction will not occur as expected, resulting in diminished performance or even failure of the whiteboard coated surface after curing. In such a case, the surface may look to be properly cured and to show no major signs of improper blending. However, the surface’s appearance and ability to be easily written on and erased will be reduced due to an incomplete chemical interaction of the components.
Also, to eliminate the possibility of the coating’s failure from imprecise or incomplete mixing, you should pay close attention to the tools used and the instructions provided with your paint kit. With many other types of coatings on the market today, mixing whiteboard paint is done with a power mixer or an electric drill with a mixer attachment to ensure that the materials are uniformly blended. However, in the case of premium whiteboard coatings, hand mixing with a stir stick is the only technique that should be used. To avoid creating bubbles in the formula when mixing by hand, remember to avoid whipping or stirring the product vigorously.
Bubbles in the mixture lead to the emergence of minute depressions in the finished surface after curing. In turn, this causes problems with writing and erasing because dry erase marker ink settles into the depressions and is hard to remove. As a result, unattractive spots all over the coated surface will collectively create a cloudy-looking appearance and make the surface hard to write on, erase, and maintain.
Step 4 –
The two parts should be thoroughly mixed for three to four minutes. Multi-part coatings such as our premium clear and white products are comprised of multiple separate constituents that need to be mixed together in a specific ratio to produce a usable coating. In the case of the whiteboard coatings, the proper ratio is the above-mentioned 2:1. As the ingredients are blended, a so-called “cross-linking” chemical reaction takes place that allows the separate parts to combine and form a complex compound called a polymer. If proper mixing of the components does not occur in the ratio specified by the application instructions, an inadequate whiteboard coated surface will be the result, and recoating will be necessary.
Step 5 –
Continue to gently stir the two parts together while pouring the resulting mixture into a clean paint-rolling tray. As with the mixing tub, make sure that the rolling tray is completely clean so as to avoid any specks of dirt or debris from getting into the coating mixture and affecting the writability, erasability, and look of the whiteboard coated surface after it cures. Remember, unlike regular house paint, premium whiteboard coating cannot be left in the rolling tray while you take an extended break during application because you’ll need to adhere to the time frame dictated by the coating’s “pot life” discussed in the next section.
Step 6 –
Start the application immediately after mixing the two components and pouring the mixture into the rolling tray. The coating must be applied to the surface, and the application must be completed within the 40- to 45-minute time frame mentioned in the application instructions. This is important because the coating has a so-called “pot life,” also known as a “working time,” which is the period starting from when the parts of a multi-part paint or coating are thoroughly mixed to the point when the mixture begins to congeal and becomes unusable. Stated a different way, pot life is the amount of time a multi-part coating/paint stays in a liquefied state so that it can be applied without causing issues.
With most standard types of paint, which don’t require the mixing of components and thus have no pot life, it’s not a problem to stop and take an extended break during the painting process. However, with premium whiteboard coating, application should be started as soon as the two parts are thoroughly combined and finished within the limits of the coating’s 40- to 45-minute pot life. After this period, the coating will start to gel and become ineffectual. Consequently, it’s important to plan your time judiciously to make effective use of the coating. Closely study the application instructions, especially in mixing whiteboard paint to make sure you know how to install the whiteboard coated surface in the most efficient way possible, and you will have a high-quality canvas on which to write and draw for ten-plus years of normal use.


![Giant Leaps Forward Require Big Spaces. [Leap Year Sale Event!]](https://www.remarkablecoating.com/wp-content/uploads/2016/02/Giant-Leaps-ForwardRequire-Big-Spaces-440x264.jpg)


![30% Off St Patrick’s Day Sale! [Details Inside]](https://www.remarkablecoating.com/wp-content/uploads/2016/03/Glorious-1-440x264.png)

![Drive Your Organization Into Openness and Watch it Expand [20% Off Whiteboard Paint]](https://www.remarkablecoating.com/wp-content/uploads/2016/04/Drive-Your-Organization-Into-Openness-and-Watch-It-Expand.-1-440x264.jpg)


![ReMARKable’s Winter Sale is Here! [25% Off + Free Shipping]](https://www.remarkablecoating.com/wp-content/uploads/2018/01/Red-Tag-Winter-Fashion-Facebook-Post-1-440x264.png)


![ReMARKable Summer Sale 2018 [28% Off Whiteboard Paint]](https://www.remarkablecoating.com/wp-content/uploads/2018/06/Blue-Simple-Line-Beach-Facebook-Post-1-440x264.png)


0 Comments