
Proper Taping and Masking Techniques for Whiteboard Paint
Before applying quality whiteboard coating, it’s important to make sure that the surface where you’ll be doing the installation is precisely taped off on all the necessary sides with low-tack tape, also known as painter’s tape, rather than with standard masking tape, which is not as durable and is more difficult to apply and remove. In this way, you can help to prevent problems with your application and with wicking or seeping of the coating under the tape. Painter’s tape seals tightly onto a surface but is easy to remove cleanly and leaves behind no residue, even when it’s pressed with force onto a surface.
Painter’s tape is a variety of pressure-sensitive tape made with a thin kind of crepe paper that’s strong but easy to tear, and an easy-to-release pressure-sensitive chemical adhesive. By contrast, regular household masking tape is made of a weaker type of paper and has a lower-quality adhesive. Thus, for whiteboard coating applications, painter’s tape is suggested for use over standard masking tape because painter’s tape is specifically designed to be used with top-quality paints or coatings, and is easier to install and take off than masking tape.
Both painter’s tape and masking tape have a crepe paper backing, but to inhibit the occurrence of splitting during removal, painter’s tape is typically made with a stronger kind of backing than that found on regular masking tape. This sturdier backing also allows painter’s tape to be more easily taken off in a single piece when a painting or coating job has dried. Additionally, because painter’s tape is specially manufactured for use in applying paints or coatings, it is resistant to wrinkling and warping when used with these types of products, allowing for the creation of clean lines even after being in place for several days.
Select the type of painter’s tape that’s best suited to the kinds of surfaces to be taped off. Regular types of painter’s tape are typically blue in color but may come in other shades such as purple or green. Also, extra-sticky varieties of painter’s tape are available in paint stores, home-improvement stores, online, and from other sources. This type of tape is useful when applying the premium whiteboard coating to areas adjacent to irregular surfaces such as stucco or “orange peel” textured walls, which are challenging to apply tape to.
When installing the painter’s tape, you can take the following steps to ensure a proper, tight, leak-proof application and clean lines when the tape is removed after curing of the whiteboard coating:
1. As a test, apply several inches of the painter’s tape to the surface that you plan to mask off, then lightly tug on the tape to see how well it adheres. If the tape doesn’t stick very well, try using a different type of tape with a higher degree of adhesion. As mentioned, “high-stick” or extra-sticky types of painter’s tape, are available from many sources.
2. Practice applying the tape to a surface until you can do it smoothly, evenly, and with the proper amount of tension. Stretching the tape as you apply it may result in air bubbles or puckering, which in turn will ultimately lead to the whiteboard coating bleeding under the edges of the tape and causing an unsightly appearance.
3. Place the tape precisely against the edge you wish to cover, then pull approximately ten inches of tape off of the roll. Next, keep the roll tight against the wall with one hand, and use the roll as a guide to apply the tape in an absolutely straight line. Press down all along the tape’s length with your other hand’s index finger. Finally, tear off the tape you’ve applied and then use the same technique to apply another length of tape to the subsequent section, and so on, until you’ve masked off the entire area where you plan to apply the whiteboard coating.
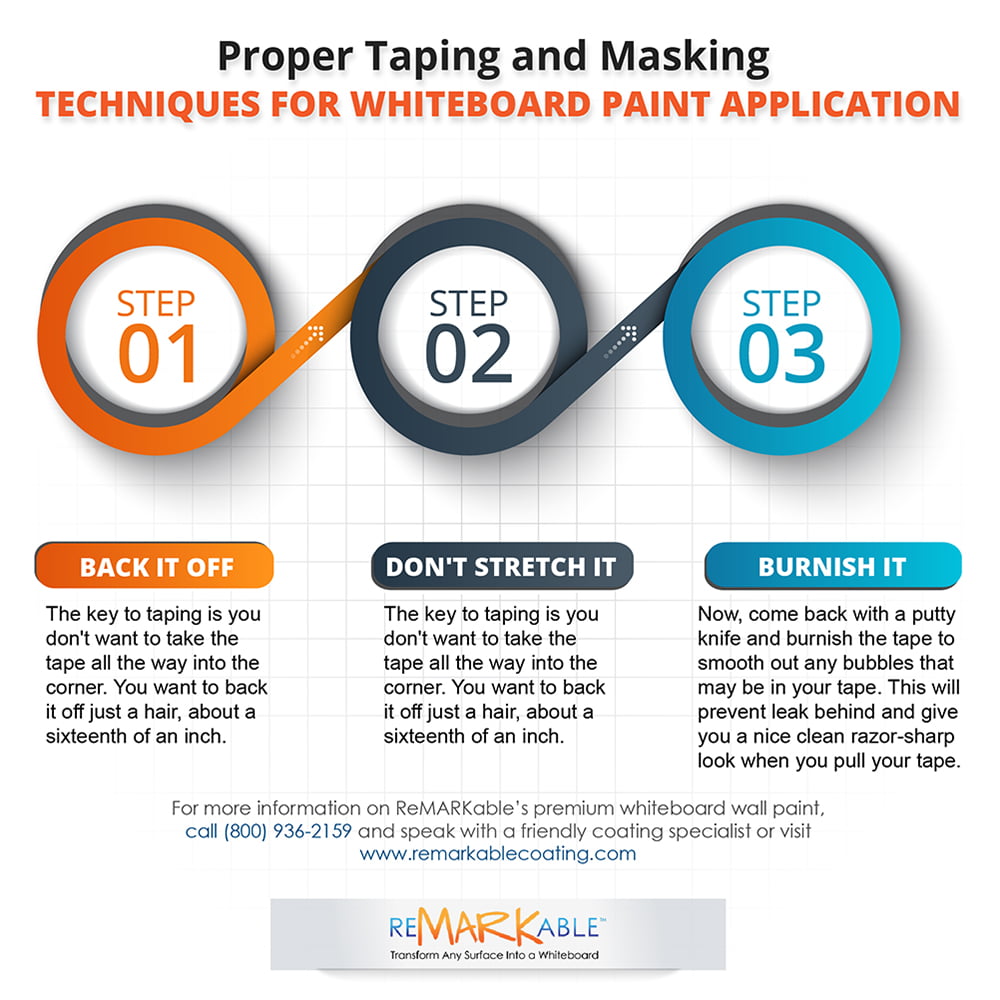
Back it off
When performing the procedure described above to tape off the area where you will apply the coating, one of the keys to a successful and accurate tape installation is to avoid taking the tape all the way into the corners of the adjoining walls, instead, you want to back the tape off just a hair, about a sixteenth of an inch.
Make it Clean
Also, as is the case when applying premium whiteboard paint, it’s critical to avoid leaving any dust or dirt on the surfaces where the painter’s tape is installed. So, before starting to tape off the area to be coated, you should carefully wipe down the moldings, light fixtures, and other places where the tape will be applied. A thorough wipe down with a dampened microfiber cloth or mitt is all that is typically required to achieve a thorough cleaning before applying painter’s tape. However, if the surfaces are greasy or especially dirty, you’ll have to wash them off with a microfiber cloth, water, and an environmentally friendly detergent solution, such as TSP-PF (phosphate-free), available at home improvement centers and paint retailers. Even the highest quality painter’s tape will not properly adhere to a dirty or greasy surface.
After that, you should wait for the surface to fully dry before beginning your tape application; otherwise, the tape won’t adhere well, and you’ll end up having to apply more tape later. Tape not adhering to a surface is actually a common problem encountered by both professional and inexperienced painters, and moisture is one of the most typical reasons. If you need to have your surface dry quickly, you can use a fan or a hairdryer to speed up the process. Besides making the surface moisture free, it’s important to check for dampness in the atmosphere where you’re applying the tape because moist or humid air might also cause the tape to not stick properly. If it seems humid in the room, open up the windows and doors to allow the air to move around and thus reduce the moisture level before the tape application.
Don’t Stretch it
Avoid the temptation to stretch the painter’s tape as you apply it to your surfaces. Stretching the tape while you install it can result in air bubbles or puckering to occur, which in turn will lead to the whiteboard coating bleeding under the tape’s edges and causing an unsightly appearance. To avoid this problem, practice applying the tape several times until you can do it evenly and with the right amount of tension to make it smooth and even all along its length.
Burnish the whiteboard coating tape
Now come back with a flexible putty knife and burnish the painter’s tape to smooth out any bubbles that may have occurred as you were installing the tape. This will prevent the whiteboard paint from seeping behind the tape and give your surface a nice clean, razor-sharp look when you have pulled off all the tape. Seal the edges of the tape by running the putty knife along the side of the tape that’s nearest to the surface on which you plan to apply the whiteboard coating. Press the putty knife so that it’s flat against the tape, but only apply pressure to the very edge of the tape. Avoid applying so much pressure that the painter’s tape crinkles or tears apart, and you have to apply another layer of tape. After you apply the tape, make sure to press down on the edge to seal it. Otherwise, paint is going to seep under the edge of the tape. As mentioned, a flexible putty knife is ideal for this purpose. Start at one end of your tape application and pull the blade all along the tape while applying pressure downward. Slightly tilt the putty knife’s blade so that you’re applying pressure right along the very edge of the tape.


![Giant Leaps Forward Require Big Spaces. [Leap Year Sale Event!]](https://www.remarkablecoating.com/wp-content/uploads/2016/02/Giant-Leaps-ForwardRequire-Big-Spaces-440x264.jpg)


![30% Off St Patrick’s Day Sale! [Details Inside]](https://www.remarkablecoating.com/wp-content/uploads/2016/03/Glorious-1-440x264.png)

![Drive Your Organization Into Openness and Watch it Expand [20% Off Whiteboard Paint]](https://www.remarkablecoating.com/wp-content/uploads/2016/04/Drive-Your-Organization-Into-Openness-and-Watch-It-Expand.-1-440x264.jpg)


![ReMARKable’s Winter Sale is Here! [25% Off + Free Shipping]](https://www.remarkablecoating.com/wp-content/uploads/2018/01/Red-Tag-Winter-Fashion-Facebook-Post-1-440x264.png)


![ReMARKable Summer Sale 2018 [28% Off Whiteboard Paint]](https://www.remarkablecoating.com/wp-content/uploads/2018/06/Blue-Simple-Line-Beach-Facebook-Post-1-440x264.png)


0 Comments