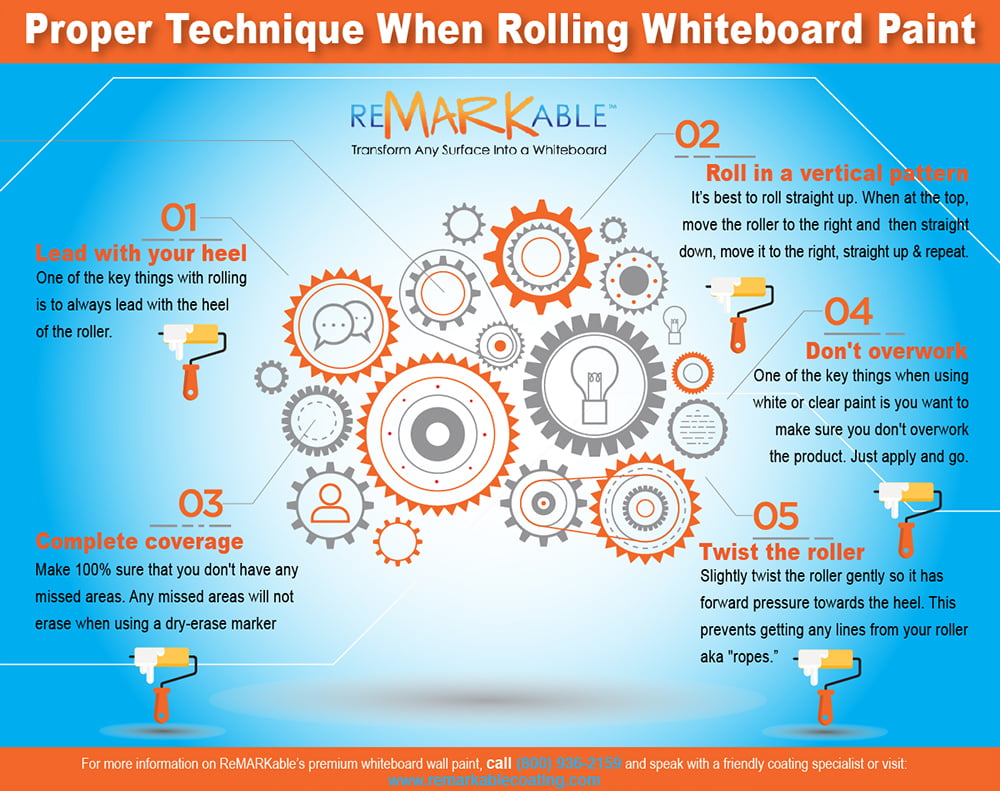
Proper Technique When Rolling Whiteboard Paint
Premium whiteboard coating should be installed using a good-quality nine-inch microfiber paint roller sleeve with a 1/4″ or 3/8″ nap. When rolling whiteboard paint, It’s a good idea to de-lint the sleeve by wrapping two-inch masking tape around it in a spiraling pattern from top to bottom. After you’ve covered the whole roller sleeve, carefully remove the tape to extract any excess lint that could affect the quality of the sheen on the whiteboard coated surface once it’s cured. After you’re done removing the masking tape, all the excess lint will have been eliminated from the roller sleeve’s nap. This step should be completed before mixing parts A and B of the whiteboard coating. Also, remember to steer clear of foam roller sleeves or any other types of synthetic roller covers because using them would make you apply the coating too thinly, thus resulting in an unsuitable finished surface after the coating cures.
Another essential part of achieving a successful whiteboard coating application is creating a perfectly smooth substrate beforehand. The smoother and more uniform your wall is, the better it will look, and the easier it will be to write on and erase after the whiteboard coating cures. To achieve a flawless surface, you’ll have to eliminate any irregularities such as scratches, dents, and divots, no matter how tiny they may be. In this way, you can make sure that all writing and drawing done on the finished whiteboard wall will look crisp and uniform and that erasing can be done without producing any missed spots.
For the purpose of sanding, it’s good to get a drywall pole sander and give the wall a thorough going over with 200-250 grit paper, thus ensuring that you’ll have a completely smooth surface before you begin the coating procedure. Then after checking for the smoothness of the surface, wipe off your wall with a moist microfiber cloth or towel and let the surface dry completely before applying the whiteboard coating.
Lead with the Heel
After mixing parts A and B of the coating, you have approximately 40 to 45 minutes to apply the coating before the mixture begins to congeal and become unusable. While applying the coating, one of the key aspects of a proper rolling technique is to always lead with the heel of the paint roller, while applying mild forward pressure toward the heel. Also, be sure to maintain a wet edge on the coating by cutting in with a two-inch sponge paintbrush as you move along the wall. This type of brush functions particularly well for cutting in the floor, ceiling, and corners of the room as you coat the wall section by section. To start off, cut in the first section of the wall to be coated, then apply a medium to heavy layer of whiteboard coating on that part. Next, cut in another section of the wall, roll on another medium to heavy coat, and so on across the whole wall, overlapping about one-quarter of a roller width each time, until you complete the application.
Roll in a Vertical Pattern
Like most people, you’re likely to have used paint rollers in the past, with different levels of success. With regular kinds of paint, such as interior or exterior house paint, you may have just jumped right in and begun rolling, developing your own application style as you went along. Or if you followed the paint manufacturer’s instructions saying to apply their product in a specific pattern, you probably applied a large amount of paint in a “W” pattern before going back and rolling the paint out over the entire surface. However acceptable, this approach may be with ordinary paint, it’s not acceptable with premium whiteboard coating, which requires a smooth, even vertical pattern for proper application to produce an attractive, durable, and easily written on finished surface.
To start off on rolling whiteboard paint, it’s best to begin at the bottom of the wall and gently roll vertically or straight up. When you reach the top of the wall, move the roller to the right approximately three-quarters of a roller width and then roll straight down. Continue to apply the coating up and down the wall in this manner, from floor to ceiling, moving over about three-fourths of a roller width each time, so that you always overlap your preceding stroke about one-fourth of a roller width. Repeat this procedure across the wall until the entire surface is evenly coated. When you reach the corner of the room for your last stroke, roll the coating on as close as you can get to the adjacent wall without touching it.
Complete Coverage
Make 100% sure that you don’t have any missed areas on your surface, because you won’t be able to properly write on or erase missed places once the coating has cured. Just stay focused on the application according to the above-mentioned guidelines, and your finished whiteboard surface will look perfect and provide you with many years of trouble-free use and enjoyment.
Also, don’t try to go back and roll over an area again after the initial layer of coating is applied. It’s essential to avoid trying to rework or recoat an area after it’s already been coated, as doing so will disrupt the film-forming process of the coating as it dries and cures. The practice of reworking is common among painters when applying ordinary indoor house paint but should be avoided with the premium whiteboard product, which is really a coating, not a type of paint, and so has different properties from paint. When reworking is done with the whiteboard coating, the result is an irregular and unsightly finish that’s hard to write on and erase easily. So, if a little bit of whiteboard coating is left after your application is complete, resist the urge to add more coating and use the leftover amount to coat a small surface like a desktop instead.
Don’t Overwork the Dry-Erase coating
As mentioned, a key factor to keep in mind when applying the premium whiteboard coating is to avoid reworking or overworking. Just evenly and gently apply a single layer of the coating to one section, then immediately go on to the next and avoid going back to re-roll. Also, remember not to “stretch” the coating by putting it on too thinly to try to cover more area, as this will result in an inferior whiteboard surface with an irregular appearance that’s hard to write on and erase. Alternatively, it’s also important to avoid putting the product on too heavily, as this will cause drip marks to appear after the coating dries. It’s OK to apply substantial amounts of the coating, but don’t forget to catch any drips or runs that happen during the application process. Attempting to fix drips by rolling back over them at the end of the application can lead to a failed whiteboard surface and subsequent issues with writing, erasing, and appearance. So, keep an eye out for runs and drips while applying the coating and remedy them just as they happen.
Twist the Roller during Application
Slightly and gently twist the roller back and forth as you move along with your application of whiteboard paint so that the roller has forward pressure towards the heel. Also, don’t press too hard when you’re putting on the coating. When rolling whiteboard paint, use only a moderate amount of pressure on the roller because too much force will cause a bead, or “rope” to form along the edge, while too little pressure can cause your arm to get tired. At the end of every stroke, lightly raise the roller away from the wall to avoid producing a noticeable edge, and overlap about one-quarter of a roller length to start the next roller pass. Following these tips will keep your roller movements smooth while you coat and will result in an excellent whiteboard coated surface.


![Giant Leaps Forward Require Big Spaces. [Leap Year Sale Event!]](https://www.remarkablecoating.com/wp-content/uploads/2016/02/Giant-Leaps-ForwardRequire-Big-Spaces-440x264.jpg)


![30% Off St Patrick’s Day Sale! [Details Inside]](https://www.remarkablecoating.com/wp-content/uploads/2016/03/Glorious-1-440x264.png)

![Drive Your Organization Into Openness and Watch it Expand [20% Off Whiteboard Paint]](https://www.remarkablecoating.com/wp-content/uploads/2016/04/Drive-Your-Organization-Into-Openness-and-Watch-It-Expand.-1-440x264.jpg)


![ReMARKable’s Winter Sale is Here! [25% Off + Free Shipping]](https://www.remarkablecoating.com/wp-content/uploads/2018/01/Red-Tag-Winter-Fashion-Facebook-Post-1-440x264.png)


![ReMARKable Summer Sale 2018 [28% Off Whiteboard Paint]](https://www.remarkablecoating.com/wp-content/uploads/2018/06/Blue-Simple-Line-Beach-Facebook-Post-1-440x264.png)


0 Comments