
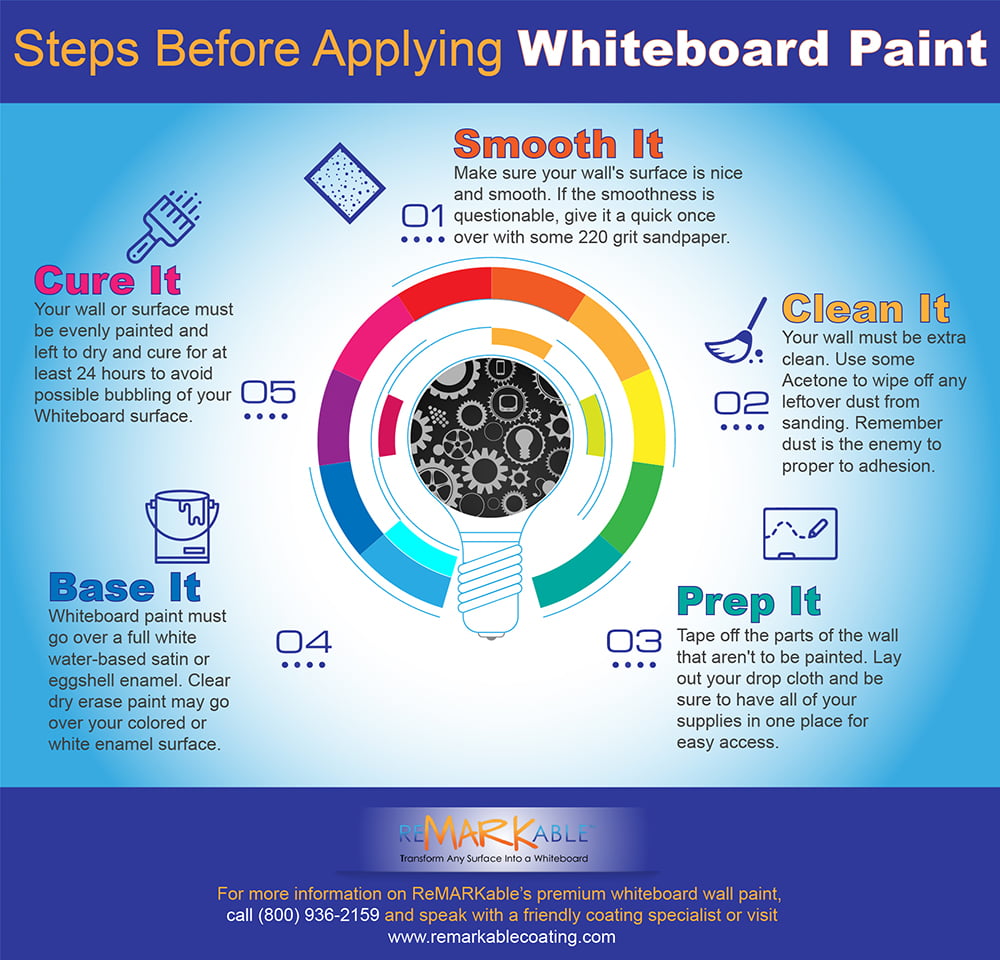
Steps Before Applying Whiteboard Paint
Before applying our quality whiteboard paint, you’ll need to complete some prep work, including smoothing your wall with sandpaper to ensure that your finished whiteboard surface can be effectively written on and erased; thoroughly cleaning the sanded surface to guard against problems such as lifting off of the base paint; masking off the parts of the wall where you don’t plan to apply the base paint; applying two coats of base paint to ensure a fully opaque surface for your whiteboard paint application; and letting the base paint dry for at least 24 hours.
Smooth Your Wall
Make sure your wall’s surface is nice and smooth. If the smoothness is questionable after checking it, give the wall a quick sanding with some 220-grit sandpaper once you fill in any dents and holes with spackling compound. It’s important to make sure your surface is perfectly smooth and even, because, after your base paint and whiteboard paint and dry, you won’t want to have high and low areas where dry erase marker ink collects in the low areas. This will cause tiny dots to appear on your whiteboard surface that are hard to erase, thus compromising its quality and possibly requiring a recoating.
To sand your wall, it’s handy to use a pole sander, a wide manual sander that’s connected to a long thin handle and used for smoothing large areas such as ceilings, walls, and floors. If you choose to use a pole sander, take the following steps: (1) attach your sandpaper or pre-cut sanding sheet to the working end of the tool, known as the sander head, by using the clamps at either end; (2) firmly grip the tool’s handle; (3) sand the part of your surface that you plan to apply paint to until it’s perfectly smooth to the touch.
Clean Your Whiteboard Wall
Your wall must be extra clean before you start to apply your base paint. Use plain water or some acetone or denatured alcohol to wipe off any dust that was leftover from sanding. Remember, dust is the arch-enemy of effective adhesion of base paint and whiteboard paint to a surface, so make sure you clean every bit of dust and debris from your sanded wall before applying the base paint. Bits of dust form a barrier on a surface when you try to apply a paint or coating to it, causing lifting of the finish, loose areas, bumps, an irregular appearance, and other issues. So after you’re finished sanding, thoroughly wipe down your surface with a microfiber cloth and water or alcohol, and let it dry completely before starting your prep work.
Prep Your Whiteboard Wall
Use masking tape or quick-release painter’s tape to mask off the parts of your wall that you don’t plan to paint. Painter’s tape is better for this purpose because it’s made with a tougher backing than general-use masking tape to prevent it from coming apart. This feature also makes painter’s tape much easier to take off in a single piece after the painting is completed, so using it can help to save you time and energy. However, when removing the tape you should do so slowly and carefully and make sure that your whiteboard painted wall is completely dry so that you don’t damage the newly coated surface.
After masking you should lay down painter’s drop cloths or other types of covers to protect your floors and furniture from stray whiteboard paint drips. Being biodegradable, canvas, or paper drop cloths are the most eco-friendly options for this job. Plastic and paper drop cloths tend to slip around under foot traffic, so it’s a good idea to apply masking tape around the edges to secure these types of coverings to the floor. You can also secure your drop cloths to your furniture and office equipment so that the cloths stay in position, thus avoiding paint seeping through the edges or dripping onto previously covered spots if the cloths are accidentally bumped off while you’re working. Finally, be sure to put all of your painting supplies in one place for easy access while applying the base paint and whiteboard coating.
Base Your Whiteboard Wall
The white version of our premium whiteboard paint needs to go over a true white satin or eggshell waterborne enamel base coat. However, clear whiteboard paint may go over either a colored or white waterborne enamel base. The perfect base coat to use with our whiteboard coatings is our proprietary tintable base paint/primer. After many years of research, testing, and development, our chemists created this high-quality product specifically to serve as the ideal base paint for our premium whiteboard coatings. Being water-based, low in odor, low in volatile organic compounds (VOCs), and free of chemical additives like anti-mildew agents and polyvinyl acetate (PVA) (which react poorly with our whiteboard paints), our base paint/primer is the logical choice for use under our whiteboard coatings.
Otherwise, as mentioned above, if you choose to apply a different base coat, it needs to be a true white satin or eggshell water-based enamel. When choosing an alternative base paint you’ll need to make sure that it contains no antimicrobials, rheology (flow) modifiers, or several other additives mentioned in the fourth item on our website’s FAQ page entitled “How do I prepare my surface before applying ReMARKable?” These chemicals can have harmful interactions with our whiteboard paints, resulting in bubbling, peeling, and other problems that will impact the quality and durability of your finished surface, making it hard to write on and erase. Call our customer support team to get a list of acceptable alternative base paints that can be used with our whiteboard coatings. Or you may consult with the staff at your local paint store to find any waterborne satin or eggshell enamels they carry that are free of these ingredients.
It’s recommended that you apply two coats of tintable base paint/primer so that you can be sure of completely opaque coverage over your entire surface, waiting a minimum of three hours between coats. You can use the following standard wall painting techniques when applying the base paint. After you’ve finished painting the outer edges of the wall by hand with a brush, use a 9” microfiber roller to paint the remainder of the wall. The ideal method to use is to apply the base paint in an alternating M-shaped or W-shaped pattern, rolling repeatedly over a section until it’s fully covered. You can then move to the adjoining part of the wall and repeat the same pattern. Finally, after applying the two coats of base paint, you’ll need to let them dry for a minimum of 24 hours before installing our premium whiteboard coating on top.
Cure Your Whiteboard Wall
In contrast to the way you applied the tintable base paint/primer in M-shaped or W-shaped patterns, when installing our whiteboard paint you’ll need to roll the coating on in a series of straight vertical passes from the top to the bottom of the wall, and then from bottom to top, going from one section of the wall to the next, overlapping a little each time, until you’ve covered the entire surface.
. Then let the coating cure for at least 48 hours to avoid possible bubbling of the whiteboard surface. Remember to change your paint roller sleeve when you apply our whiteboard paint to avoid using the same one you used for the base paint. After 24 hours you can apply another coat of whiteboard paint if needed and then wait 48 hours for both coats to cure. If no second coat is needed, the total drying time is just 48 hours. At this point, you’ll be able to use your newly painted whiteboard wall to write and draw as much as you like with low odor dry erase markers.
As long as your application was done according to the easy-to-follow instructions that came with your paint kit, you can be assured that your whiteboard surface will last for at least ten years of steady use when regularly cleaned with a microfiber cloth, and occasionally maintained with a microfiber cloth and water or alcohol. It’s important to never use harsh household or industrial cleaners, abrasive pads, textured paper towels, or any other harsh liquids or materials on your whiteboard painted walls.


![Giant Leaps Forward Require Big Spaces. [Leap Year Sale Event!]](https://www.remarkablecoating.com/wp-content/uploads/2016/02/Giant-Leaps-ForwardRequire-Big-Spaces-440x264.jpg)


![30% Off St Patrick’s Day Sale! [Details Inside]](https://www.remarkablecoating.com/wp-content/uploads/2016/03/Glorious-1-440x264.png)

![Drive Your Organization Into Openness and Watch it Expand [20% Off Whiteboard Paint]](https://www.remarkablecoating.com/wp-content/uploads/2016/04/Drive-Your-Organization-Into-Openness-and-Watch-It-Expand.-1-440x264.jpg)


![ReMARKable’s Winter Sale is Here! [25% Off + Free Shipping]](https://www.remarkablecoating.com/wp-content/uploads/2018/01/Red-Tag-Winter-Fashion-Facebook-Post-1-440x264.png)


![ReMARKable Summer Sale 2018 [28% Off Whiteboard Paint]](https://www.remarkablecoating.com/wp-content/uploads/2018/06/Blue-Simple-Line-Beach-Facebook-Post-1-440x264.png)


0 Comments