
How is Whiteboard Paint Different from Regular Paint?
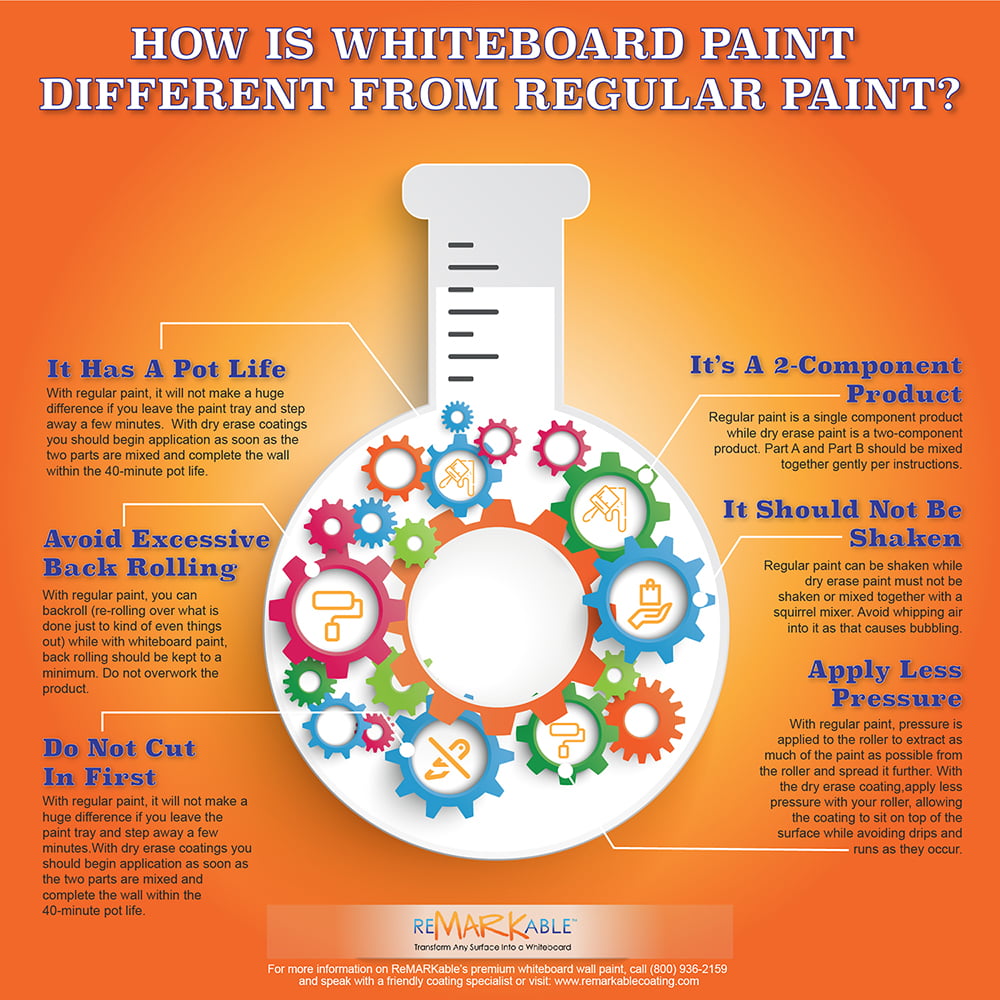
Introduction: Several important qualities differentiate top-quality whiteboard paint from ordinary types of paint such as interior wall paint and exterior house paint. First of all, whiteboard paint is composed of a two-part formula that needs to be carefully mixed by hand and applied according to the instructions supplied with the product packaging. Second, your whiteboard coating has a pot life, or a limited time period during which it’s usable after the two parts are mixed together. Third, the formula should not be shaken as you might do with conventional paints. And finally, when applying your whiteboard coating you’ll need to use just a light pressure with your paint roller, cut in as you go along with the application instead of beforehand, and avoid back rolling or re-rolling over areas that have already been covered.
It is a Two-part Product
Regular paints such interior wall paint and weather-resistant exterior house paint are single-component products that may be mixed vigorously to blend their ingredients, while whiteboard paint is a two-component coating consisting of Parts A and B, which should always be mixed together gently per the instructions that come with each of our whiteboard paint kits. The emphasis here is on gently, because vigorous mixing by hand or with a power drill and mixing attachment will cause bubbling to occur, and in turn have highly detrimental effects on the finished whiteboard surface. Bubbling leads to the appearance of tiny cavities on the coated surface after drying, and this will then lead to poor writability and erasability, because dry erase marker ink tends to settle in the cavities and be difficult to remove, producing an unsightly dots that together create a shadowy-looking appearance.
Instead of vigorous blending with a squirrel mixer or by hand, parts A and B of premium whiteboard paint should be mixed using a hand-held stirring stick for approximately three minutes until the parts are thoroughly blended. At this point you will have a period of approximately 40 to 45 minutes, called the “pot life” of the coating, to apply it to your designated surface.
Whiteboard Paint Has a Pot Life
Pot life, also called useable life or working time, may be defined as the period starting from when the parts of a multi-part paint or coating are thoroughly mixed to the moment when the mixture is no longer useable. In other words, pot life is the length of time that a multiple-part coating stays at a low enough viscosity to be applied effectively to a surface. With regular paint, which doesn’t have a pot life, it won’t make a huge difference if you start applying it for a while and then leave your paint tray during the painting process to step away for a few minutes. With whiteboard coatings, however, you should begin the application process as soon as the two parts are thoroughly mixed and finish covering your surface within the span of the product’s 40-45-minute pot life. After this time the coating will begin to gel or coagulate and become ineffective. As a result, you’ll need to plan your time wisely so as to make appropriate use of the product. Read the application instructions carefully to make certain that you know exactly how to install your whiteboard surface in the most efficient way possible.
It Should Not Be Shaken
Unlike regular paint, which can be shaken in its container to mix up the ingredients, such as pigments, binders, and solvents, the two components of quality whiteboard paint must never be shaken or mixed together forcefully with a squirrel mixer. Also, in blending by hand, avoid an overly energetic motion with your stirring stick to mix parts A and B. Too quick an action will whip air into the coating and create bubbles, which will have a detrimental effect on the sheen of your cured whiteboard surface, causing pores to appear where dry erase marker ink will collect and become visible as tiny dots. By slowly stirring parts A and B of the paint formula by hand for three minutes, you can keep from producing bubbles and causing issues with the application process and the usefulness and look of the whiteboard surface after it cures.
Avoid Excessive Back Rolling
With regular interior paint or exterior house paint, you can back roll; that is, re-roll over what has just been covered with a paint roller to firmly and evenly press the paint that was previously applied onto the surface of the wall. When doing so, the roller fills in all the tiny holes, cracks, and crevices with paint to smooth out the surface. While this practice is acceptable and even helpful when applying standard house paints, with whiteboard paint, back rolling should be kept to a minimum and completely avoided if possible. In other words, do not overwork the product, as this will cause damage to the coating’s water-resistant film and ultimately affect the quality, toughness, and lifespan of your cured whiteboard surface. Just roll the paint onto the wall using light pressure with your roller, making smooth, even vertical passes in successive sections from ceiling to floor and then from floor to ceiling, overlapping about 30% on each pass while cutting in with a two-inch foam paintbrush as you move from section to section.
Apply Less Pressure
When applying regular paint, it’s normal procedure to put a lot of pressure on the roller to extract as much of the paint as possible, spread it further on the surface, and fill in small indentations and holes. With a quality whiteboard coating, however, it’s important to apply only a light amount of pressure with your roller, allowing the coating to rest easily on top of the surface while you eliminate drips and runs with your roller as you go along. This is because premium whiteboard paint is not really a kind of paint but a coating that requires a different mode of application than you might have used in the past with conventional paints. Comparable to paints, coatings are applied to a wide range of surfaces through a variety of methods, but the difference lies in the fact that high-quality coatings such as ReMARKable require the use of specific techniques in both mixing and installation if success is to be achieved, and a long-lasting, highly erasable surface ensured. Thus, a major difference between regular paint and premium whiteboard coatings is the light pressure that needs to be used with a roller when applying the coatings, allowing them to attain a completely smooth, uniform quality when it dries that guarantees you a tough, impervious finish, and easy writability and erasability for many years.
Do Not Cut in First
With regular paint, it will not make a huge difference if you leave the paint tray in the middle of an application and step away for a few minutes. However, with quality whiteboard coatings you need to begin the application as soon as the two parts of the formula are mixed, and don’t stop until you finish covering your wall within the 40-45-minute pot life, while cutting in, preferably with a two-inch foam brush, as you move along from section to section, overlapping about 30% each time until you reach the end of the surface. Cutting in while rolling on the whiteboard paint helps to maintain a wet edge so that the coating is applied evenly and the product’s endothermic film is maintained throughout the application process. If you try to cut in along the edges of your entire surface first, and then fill in the rest of the area later, as you would with regular wall paint, a good water-resistant film will not be created, resulting in an uneven sheen on your surface and subsequent problems with writing and erasing after it dries.


![Giant Leaps Forward Require Big Spaces. [Leap Year Sale Event!]](https://www.remarkablecoating.com/wp-content/uploads/2016/02/Giant-Leaps-ForwardRequire-Big-Spaces-440x264.jpg)


![30% Off St Patrick’s Day Sale! [Details Inside]](https://www.remarkablecoating.com/wp-content/uploads/2016/03/Glorious-1-440x264.png)

![Drive Your Organization Into Openness and Watch it Expand [20% Off Whiteboard Paint]](https://www.remarkablecoating.com/wp-content/uploads/2016/04/Drive-Your-Organization-Into-Openness-and-Watch-It-Expand.-1-440x264.jpg)


![ReMARKable’s Winter Sale is Here! [25% Off + Free Shipping]](https://www.remarkablecoating.com/wp-content/uploads/2018/01/Red-Tag-Winter-Fashion-Facebook-Post-1-440x264.png)


![ReMARKable Summer Sale 2018 [28% Off Whiteboard Paint]](https://www.remarkablecoating.com/wp-content/uploads/2018/06/Blue-Simple-Line-Beach-Facebook-Post-1-440x264.png)


0 Comments