How to Remove Permanent Marker from Your Whiteboard Wall
Introduction: If you or one of your team members inadvertently uses a permanent marker on your whiteboard painted wall, the easiest and best method for removing the permanent ink is to use a dry erase marker as a cleaning tool, followed by a wipe down with a microfiber cloth or mitt. If this technique fails to do the job, alcohol, vinegar or an eco-friendly cleaning solution may be tried.
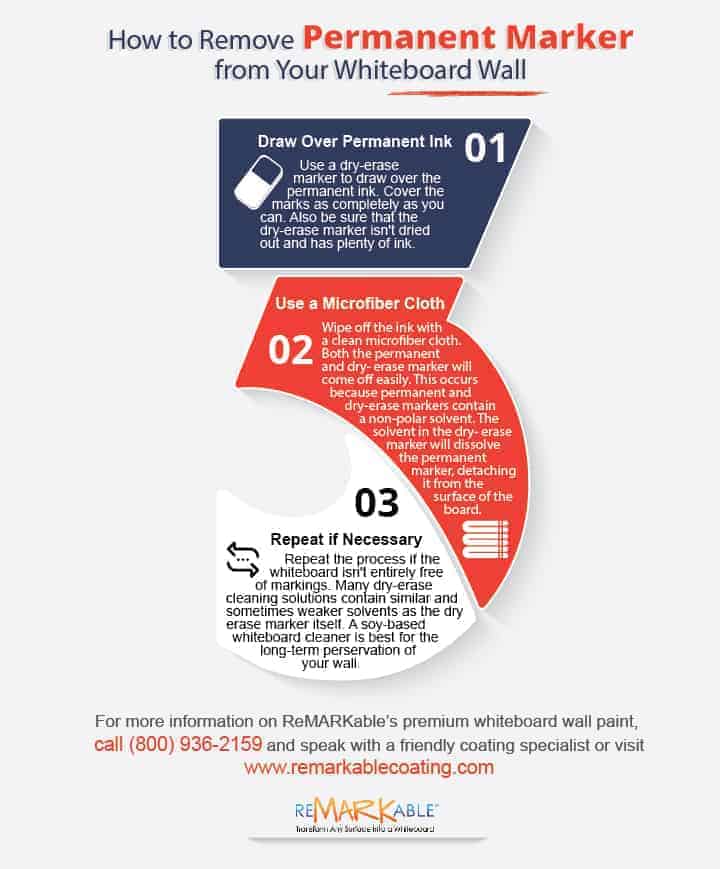
Draw over the permanent marker ink
The simplest way to remove permanent marker ink from a whiteboard painted wall is to fight marker with marker; that is to say, use a dry erase marker to thoroughly scribble over the permanent marker ink, making sure to cover the area as completely as possible by making a solid block of dry-erase ink over the permanent ink. You can use any color of dry erase marker for this purpose, but make sure that you cover all of the permanent ink that’s on your surface. By using this procedure you should be able to loosen up all of the permanent marker ink from your whiteboard wall. Also, be sure that the dry erase marker you’re using hasn’t dried out and still has plenty of ink left in it before you start scribbling over the permanent ink.
Use a microfiber cloth
Wait a few seconds after applying the dry-erase ink and then wipe off the entire area with a clean microfiber cloth while the ink is still damp. Both the permanent ink and the dry erase marker ink should come off easily because both permanent markers and dry erase markers contain a similar solvent known to chemists as a “non-polar solvent.” The ink in dry erase markers is thus very much like the ink in permanent markers, being composed of color pigments, a chemical solvent, and a compound called a “release agent.” The major difference between dry-erase markers and permanent markers is the type of release agent used in their ink formulas. In permanent markers the release agent is an acrylic compound that helps the ink’s pigment to adhere to a surface; whereas, in dry erase markers the release agent is a slick silicone compound that allows the ink to just sit on top of a surface and thus be wiped away easily.
In other words, the release agent in dry erase markers makes their ink slippery, so as to keep the markers’ colored pigment from directly contacting a surface. For this reason, markings made with dry-erase markers can be readily wiped off of any non-porous surface. Also, the solvent in these types of markers, which is typically some kind of alcohol, causes their ink to dry quickly, helping the ink to remain loosely attached to the surface without being absorbed into it. So, dry erase marker ink is easy to wipe off, because after it dries the ink just sits on the surface. The solvent in a dry erase marker will thus dissolve permanent marker ink, detaching it easily from your whiteboard wall.
Clean your microfiber cloths properly
It’s important to always use a clean microfiber cloth or mitt and not a standard whiteboard eraser for wiping your whiteboard painted surface because the chemical makeup of a whiteboard surface is different from the composition of materials like melamine or porcelain that are used to coat traditional framed whiteboards, where erasers are safe and appropriate to use. In addition, whiteboard erasers have tiny lengthwise slits that tend to collect dry erase marker ink, and this can lead to smearing and smudging on your whiteboard coated surface.
Microfiber materials have their greatest effect when they’re used dry, or with water alone. So, to avoid clogging up your materials with chemicals, wash your microfiber cloths, mitts, and towels only in water with no fabric conditioner, soap, or laundry detergent. To make sure that you’re doing things correctly, follow the washing guidelines suggested by the manufacturer.
So that your microfiber cloths get completely clean, wash them thoroughly either in your washing machine or by hand. If you choose to wash them in the washing machine, it’s best to keep the cloths separate from other items, but if you need to include them in a mixed load of laundry, you should wash them only with other synthetic fabrics that don’t produce lint. For this reason, you should avoid washing microfiber with cotton materials, since cotton consists of short, fine fibers that separate easily from a fabric’s surface and attach themselves to other laundry items. Wash your microfiber cloths in only cool or warm water with no detergent, and after washing, air-dry the cloths or dry them at no heat or low heat in an automatic dryer.
Hand washing is generally the best and least complicated way to clean microfiber materials, and as mentioned above, when doing so use no detergent, soap, or fabric softener. Just soak the dirty cloths in cool or warm water for a while, and agitate them by hand to loosen up all the ink and dirt. Then fully rinse the cloths and allow them to air dry before using them to clean your whiteboard wall.
If you choose to dry your microfiber cloths in an automatic dryer, make certain to keep the heat setting at no heat or low heat. Air drying your cloths will not only make them last longer but also avoid having them attract loose lint and other particles that are typically present in tumble dryers and environments with high heat conditions. It’s also important not to mix the cloths with other non-microfiber laundry items while drying, again to avoid lint, and don’t iron your microfiber cloths because the heat produced from ironing will make them much less useful for cleaning.
Possible use of cleaning solutions
If the procedure of covering the permanent ink with dry-erase ink and wiping it off doesn’t work, you may want to try using an eco-friendly water-based cleaning solution that is able to remove ink, and then immediately wipe the surface off with a damp microfiber cloth to remove any residue from the solution as quickly as possible. Rubbing alcohol or vinegar might also be effective in removing permanent marker ink from your whiteboard painted surface, but again it’s crucial to use water and a clean microfiber cloth to wipe the liquid off immediately after it’s applied. Making use of a cleaning solution, alcohol, or vinegar in this way should not affect the erasability or permeability of the area you’re cleaning if you wipe down your surface quickly. It’s essential not to leave the residue from any of these cleaning agents on the surface for any length of time. You also need to remember not to use solvent-based or abrasive cleaners, as they can compromise the finish of your whiteboard painted wall, resulting in easier staining and smudging and reduced erasability in the future.
Although these methods are not guaranteed to work in every case, and we normally don’t recommend using cleaning products other than our proprietary cleaner on our whiteboard surfaces, it’s worth trying them out before going to the trouble and expense of sanding off the permanent marker stains and recoating your surface with whiteboard paint.
Repeat if necessary
You may need to repeat one of these methods until the staining from the permanent ink is fully removed. It may require several attempts to remove the permanent marker ink completely. Many dry erase marker cleaning solutions contain solvents that are similar to or weaker than the solvents found in dry erase markers, so using markers to fight markers may actually be more effective than cleaning solutions in this case. If you’re successful at removing the permanent marker ink, its best to use an environmentally friendly water-based cleaner such as ours for the long-term maintenance and preservation of your premium whiteboard painted wall.


![Giant Leaps Forward Require Big Spaces. [Leap Year Sale Event!]](https://www.remarkablecoating.com/wp-content/uploads/2016/02/Giant-Leaps-ForwardRequire-Big-Spaces-440x264.jpg)


![30% Off St Patrick’s Day Sale! [Details Inside]](https://www.remarkablecoating.com/wp-content/uploads/2016/03/Glorious-1-440x264.png)

![Drive Your Organization Into Openness and Watch it Expand [20% Off Whiteboard Paint]](https://www.remarkablecoating.com/wp-content/uploads/2016/04/Drive-Your-Organization-Into-Openness-and-Watch-It-Expand.-1-440x264.jpg)


![ReMARKable’s Winter Sale is Here! [25% Off + Free Shipping]](https://www.remarkablecoating.com/wp-content/uploads/2018/01/Red-Tag-Winter-Fashion-Facebook-Post-1-440x264.png)


![ReMARKable Summer Sale 2018 [28% Off Whiteboard Paint]](https://www.remarkablecoating.com/wp-content/uploads/2018/06/Blue-Simple-Line-Beach-Facebook-Post-1-440x264.png)


0 Comments