
Items to Check When Taking Photos or Video of Your Dry Erase Wall
A rewarding and practical way to conclude a meeting, a school lesson, or any other activity where you use a premium dry erase wall to develop and share ideas is to make digital images of the wall’s contents to study and distribute to others. The idea of preserving the contents of a vertical writing surface by taking photos of it isn’t new; the practice dates back to the time when blackboards were in widespread use. One famous photo shows the contents of a blackboard that Albert Einstein used in Nottingham, England. Another photograph of blackboard contents is housed at the Oxford History of Science Museum in the UK.
Although taking pictures of writing surfaces like chalkboards and whiteboards has a long history, the introduction of dry erase painted walls in recent years has added a new dimension to this practice. More specifically, the large size and open-ended nature of a dry erase wall allows for much more content to be produced at any given time than would be possible on a chalkboard or a traditional whiteboard. For this reason, the following article will present some techniques to help you take clear photos of your dry erase wall’s contents after a team or client meeting, a school lesson, or some other activity. Knowing how to accurately photograph the text and drawings on your wall can make a big difference in your ability to preserve all of your valuable data for future reference and use in project development, lesson planning, or the like.
Taking Pictures of a Dry Erase Wall Can be Challenging
Have you ever had to take and send pictures of your dry erase wall after an important meeting or class session? Or do you ever have to perform this task in your home workplace or home school after a virtual meeting or lesson? If so, you may find that it’s not easy to get a good clear photo in such cases. The snapshot’s written contents often wind up being challenging to read or even illegible, and the visuals may look blurry and undecipherable. At times you may not realize how poor the images’ quality is until after you’ve left the room; then, you have to run back to try to take a better picture before the wall gets erased. Such experiences may make you wish there were a better way to take quality photos of your dry erase surface.
Despite these challenges, taking pictures of a dry erase wall with a smartphone or digital camera works better than using elaborate and costly electronic whiteboards and can be accomplished in seconds by anyone with basic camera skills. When they’re well-executed, images of your wall produced after meetings or school lessons provide you and your team members or students with a high-resolution color record of the sessions’ outcomes, and the digital pictures neatly capture the dynamics and essence of the discussions or lessons without the hassle of operating complex digital gadgets.
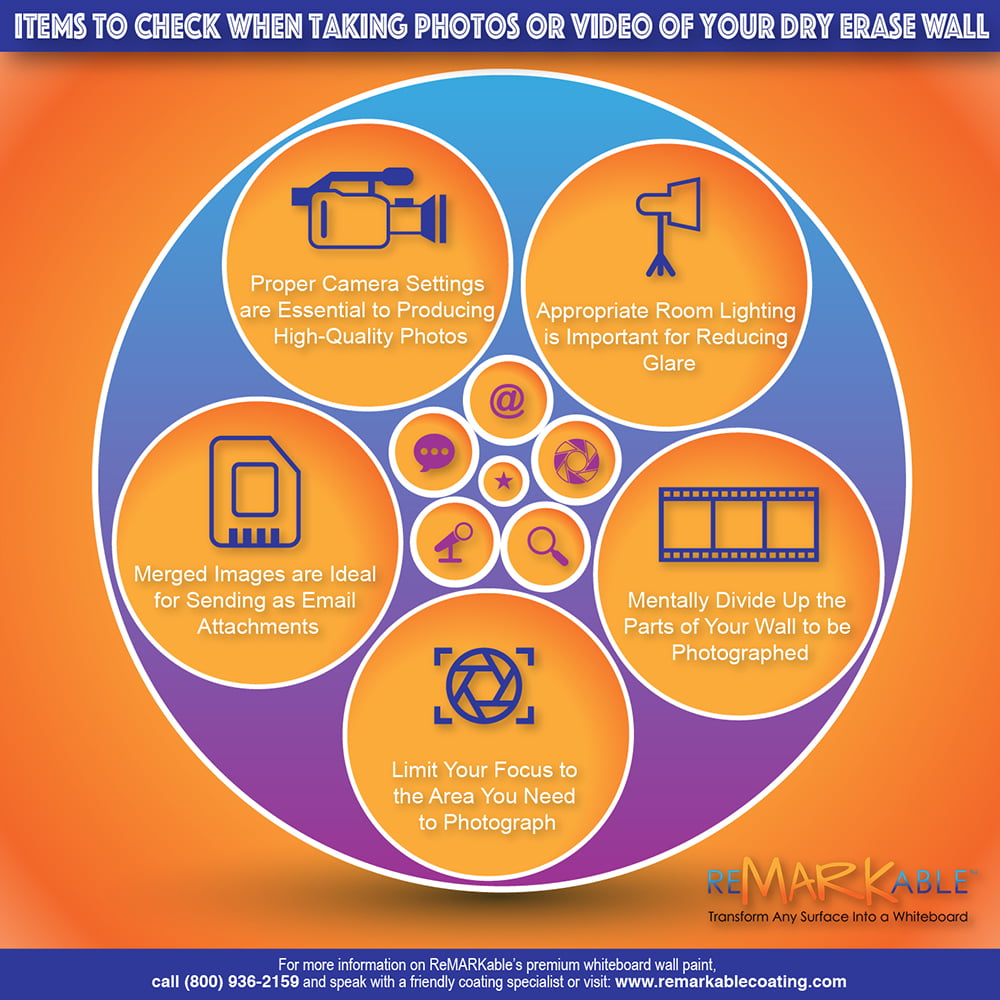
Proper Camera Settings are Essential to Producing High-Quality Photos
Be sure to have your camera set so that the lens is lined up with the middle of the section of the dry erase wall you’re planning to photograph. You want to position your camera so that the frame is filled with the contents on that section; you may want to leave a tiny bit of area remaining around the edges that you can crop out later. The ISO and aperture of your digital camera are critical to obtaining clear, crisp, and readable images of your dry erase painted wall’s text and drawings.
In digital cameras, the acronym ISO refers to the quality that film speed measures on analog film cameras. The higher the ISO number, the more sensitive the film is to light and the coarser the image that’s produced will be. In the case of digital cameras, because you want to make very crisp images, you should use a low ISO number. Photos that are taken in studios are typically shot using an ISO of 100.
Your camera has an f-stop on the aperture that adjusts the amount of light that’s allowed to pass through the lens by causing the opening to get larger or smaller. The higher the f number, the less light is allowed to pass through the camera lens. With a digital single-lens reflex (DSLR) camera, the optimum range for taking photos of dry erase wall contents is from f-8 to f-11. An additional tip is to set the timer on your camera to the four- or five-second mark so that when you press the shutter button, you won’t produce a wobbly or shaky effect in your pictures.
Appropriate Room Lighting is Important for Reducing Glare
Lighting is an essential element in producing a clear, crisp image with a DSLR or other type of digital camera or with a smartphone. Lighting affects not only a picture’s brightness or darkness but also its overall tone, feeling, and ambiance. For these reasons, you need to control and manipulate the light in the environment in order to get the best luminosity on your dry erase wall so that the text and visuals can be easily seen and understood by viewers.
You might also need to adjust the lighting in the room. Digital cameras and smartphones generally don’t require a great deal of light to record images, so you might try turning off the lights in the room before taking pictures to allow the natural light in the surroundings to produce the luminosity you’ll need. Doing this will reduce the level of glare created on the wall, which can often cause written content to be fuzzy or even unreadable in photos taken of dry erase painted walls.
Mentally Divide Up the Parts of Your Wall to be Photographed
Due to the large size of a dry erase painted wall, it’s necessary to take photos of its contents on a section-by-section basis so that the text will be readable and the drawings will be plainly visible to viewers. For this purpose, you should use your mind’s eye to divide your dry erase wall into manageable photo-ready panels that will be of the right size when you go about taking pictures of a meeting’s or a lesson’s results. Mentally segregate the wall into a lengthwise grid of boxes or panels that will fit into the frame of a smartphone’s camera or a digital camera. It may be helpful to include notes within the panels before snapping the pictures to provide details about the contents.
Limit Your Focus to the Area You Need to Photograph
To get the best resolution, compose your photo so that the only image that shows up in the camera’s viewfinder is the section of your dry erase wall that contains the text and/or visuals that you want to record. In other words, don’t leave a large amount of wall space showing around the area with the desired content. After you’ve taken all the pictures you need, it may be helpful to use image-editing software to enhance the contrast of your images. And if line color is not an issue, you can try decreasing the color depth of your images to only black and white.
Merged Images are Ideal for Sending as Email Attachments
It will be ideal if you have software or camera hardware available that will allow you to merge several photos together. If so, you can take really close-up shots. Then generate a poster-sized picture in which the detail can be easily seen, but that can still be reduced with any variety of packaged photo software. You may use Photoshop or some other graphics editing software to rotate the image and fix the skewing that has occurred. Then use a photo-stitching program to join the different shots together to create a single panoramic image for use as attachments to emails.


![Giant Leaps Forward Require Big Spaces. [Leap Year Sale Event!]](https://www.remarkablecoating.com/wp-content/uploads/2016/02/Giant-Leaps-ForwardRequire-Big-Spaces-440x264.jpg)


![30% Off St Patrick’s Day Sale! [Details Inside]](https://www.remarkablecoating.com/wp-content/uploads/2016/03/Glorious-1-440x264.png)

![Drive Your Organization Into Openness and Watch it Expand [20% Off Whiteboard Paint]](https://www.remarkablecoating.com/wp-content/uploads/2016/04/Drive-Your-Organization-Into-Openness-and-Watch-It-Expand.-1-440x264.jpg)


![ReMARKable’s Winter Sale is Here! [25% Off + Free Shipping]](https://www.remarkablecoating.com/wp-content/uploads/2018/01/Red-Tag-Winter-Fashion-Facebook-Post-1-440x264.png)


![ReMARKable Summer Sale 2018 [28% Off Whiteboard Paint]](https://www.remarkablecoating.com/wp-content/uploads/2018/06/Blue-Simple-Line-Beach-Facebook-Post-1-440x264.png)


0 Comments