How to Make Your Own Dry Erase Wall Calendar


Having a well-designed, aesthetically pleasing dry erase painted wall calendar can be extremely useful and enjoyable for you and your family members, whether for a home office, for a home school environment, or simply for general household use. In helping you to plan ahead, a spacious and convenient dry erase wall calendar can keep you organized and prepared for virtual meetings in remote work, lessons for your home school classes, family gatherings, holidays, and more. Making your calendar semi-permanent through the application of tape such as high-quality washi tape, masking tape, or electrical tape allows you to avoid having to redraw the calendar grids periodically when the ink fades on a calendar made by hand with a dry erase marker. Following the simple steps outlined below will help to make the task of creating your own dry erase wall calendar easy, enjoyable, and trouble-free. In addition, keeping yourself organized with a large, highly visible, and well-designed wall calendar will help give you a sense of calm amidst the challenges of your busy daily schedule.
First, Thoroughly Clean the Surface of Your Dry Erase Wall Calendar
When applying premium dry erase paint, dust is the archenemy of adhesion, and the same applies to applying tape to your finished dry erase surface. For this reason, it’s essential to wipe off all old dry erase marker ink residue and dust from your wall with a microfiber cloth so that your tape can stick properly. If you want to be extra careful, you might even use an eco-friendly whiteboard cleaner and a microfiber cloth to thoroughly wipe down your wall before attempting to apply the tape for your calendar.
Planning a Design for Your Whiteboard Wall Calendar is Important
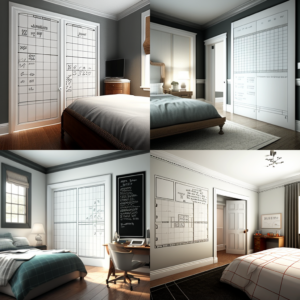
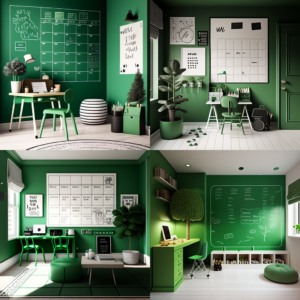
Plan a design for your calendar. What type of calendar do you want — weekly, bi-weekly, or monthly? Do you want it to have a horizontal or vertical orientation? Also, plan the size and spacing of your grids to correspond with how much area you think you’ll need to post information and appointments for each day on the calendar. Having the massive surface of a dry erase wall to work with, you can create large enough spaces between the grid lines on your calendar for multiple entries to be written down at once and easily viewed. This feature makes a dry erase wall calendar much superior to standard paper calendars or whiteboard calendars, which have small boxes with little room to write the necessary entries for any given day.
Choose a Theme to Make Your Dry Erase Wall Calendar More Engaging to View and Work With
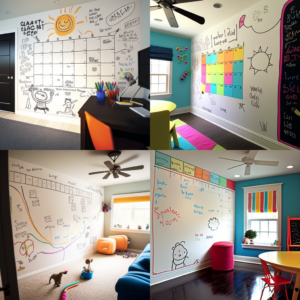
Choose a suitable theme for your calendar design to add to its aesthetic appeal and make it more fun to view and work within your home office, home school environment, or household. In this way, your dry erase wall calendar will be similar to traditional paper calendars, which have specific themes that give them visual appeal and provide a sense of continuity for users throughout the year. Possible themes include the four seasons, woodland animals, dogs, sports, pop music, holidays, and environmental conservation.
Select a Functional Type of Date Display
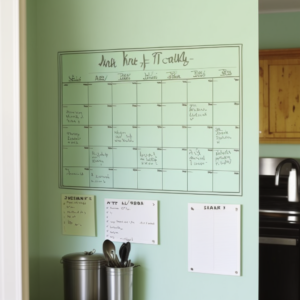
The date display on most calendars simply consists of a table or grid containing seven columns for the days of the week and five to six rows for the weeks of the month, depending on when the first day falls in any given month. But, of course, you should also include a blank line at the top of the calendar for writing in the names of the months and another line for the current year. Besides, you might want to include a few lines made with thin strips of tape within the date boxes to aid in posting multiple appointments on jam-packed days.
Use Washi Tape or another Attractive Type of Tape to Create Your Whiteboard Wall Calendar
When making your calendar, you can use colored electrical tape, colored masking tape, or washi tape, a unique type of high-quality tape made of Japanese rice paper that comes in a wide variety of colors, patterns, and designs, including solid color, pastel, floral, glitter, and gold. Being made of paper, washi tape is an eco-friendly biodegradable option if you want to help keep more plastic from entering the environment through the use of electrical tape. Once you have chosen the type of tape you want to use, you can apply the tape based on your calendar design template. First, measure and cut the tape to the specific length you want each side of your calendar grid to be. Next, use a ruler or yardstick to place hash marks at the correct locations corresponding to the corners of the calendar. Then stretch the tape from one hash mark to the other and smooth the tape down evenly all along its length with your fingertips. Continue in this way to create the four sides of your calendar. Also, measure out and make hash marks for all of the date boxes inside the calendar, then make the boxes with your tape and ruler until you’ve completed your calendar.
Carefully Clean up the Edges of Your Dry Erase Painted Wall Calendar
Gently cut off any excess tape remaining on the various parts of your calendar with scissors or a razor knife so that all loose ends are cleaned up and the lines on the outside edges and date boxes look perfectly smooth, straight, and even. Be careful not to pierce the surface of your dry erase wall when doing the trimming. You can use your ruler or yardstick and a razor knife to make sure that your edges are as straight as possible when trimming. Making the calendar look as clean and attractive as you can will help motivate you to use it regularly and inspire you to complete the activities you post for each day.
Decorating Your Whiteboard Painted Wall Calendar Will Add an Artistic Touch
You can now decorate your calendar to correspond with your chosen theme. Suppose you chose the four seasons as a theme, for example. In that case, you can apply colorful cardboard cutouts related to the four seasons on the four corners of your calendar or place them at various other locations along the edges of the calendar. For spring, traditional items such as flowers and birds are appropriate. For summer, the sun and a beach umbrella might be fun to add; for fall, some yellow and orange autumn leaves; and for winter, some snowflakes and snowmen.
A Dry Erase Wall Calendar Eliminates the Need for Many Texts and Emails
After you’ve decorated your calendar, you can go ahead and write in the current month and the days of the month in the appropriate boxes and populate your calendar with the essential details you need to keep track of, such as appointments, meeting times, and holidays. Then, like a colossal family message board, your dry erase wall calendar will offer a convenient medium for you and the other members of your household to share your schedules with one another. In this way, you can avoid the need to send texts or email messages about your whereabouts at various times of the day, week, or month. Finally, not everyone likes the idea of using digital calendars to keep track of their daily activities. So, if you’re the kind of person who prefers using a pen and a notebook to list and schedule your activities, you can take a giant leap forward in this regard and create a dry erase wall calendar for your everyday use. Also, if you’re into blogging, you can include an editorial calendar or publishing schedule in your dry erase wall calendar to help remind yourself of the ongoing feature articles for your blog. Scheduling the topics for the month in your blog content calendar will help you stick to the agenda you set for yourself and keep on top of it.


![Giant Leaps Forward Require Big Spaces. [Leap Year Sale Event!]](https://www.remarkablecoating.com/wp-content/uploads/2016/02/Giant-Leaps-ForwardRequire-Big-Spaces-440x264.jpg)


![30% Off St Patrick’s Day Sale! [Details Inside]](https://www.remarkablecoating.com/wp-content/uploads/2016/03/Glorious-1-440x264.png)

![Drive Your Organization Into Openness and Watch it Expand [20% Off Whiteboard Paint]](https://www.remarkablecoating.com/wp-content/uploads/2016/04/Drive-Your-Organization-Into-Openness-and-Watch-It-Expand.-1-440x264.jpg)


![ReMARKable’s Winter Sale is Here! [25% Off + Free Shipping]](https://www.remarkablecoating.com/wp-content/uploads/2018/01/Red-Tag-Winter-Fashion-Facebook-Post-1-440x264.png)


![ReMARKable Summer Sale 2018 [28% Off Whiteboard Paint]](https://www.remarkablecoating.com/wp-content/uploads/2018/06/Blue-Simple-Line-Beach-Facebook-Post-1-440x264.png)


0 Comments