
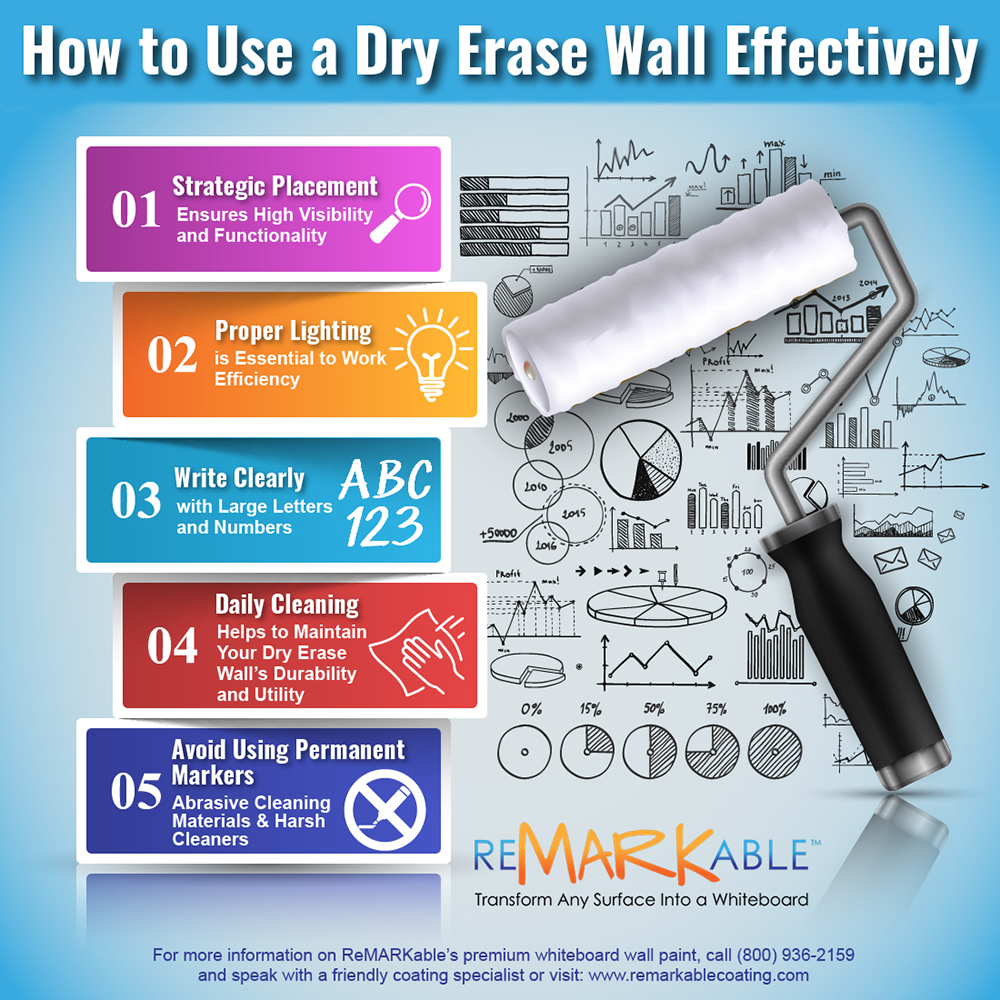
How to Use a Dry Erase Wall Effectively
Dry erase painted walls can be highly useful tools for communication and recreational use in business offices, classrooms, private homes, and a host of other venues. Their virtually limitless amounts of surface area allow you to write in large letters and make drawings that are clearly visible from a distance. Also, the vast, open canvas of a dry erase wall offers new and exciting possibilities for interaction and creative expression in business, education, engineering, and other fields. However, to get the best results from using your dry erase wall, it’s essential to consider the following factors related to location and use.
Strategic Placement Ensures High Visibility and Functionality
Install your dry erase painted wall in a highly visible part of the room where you plan to use it. In this way, as many team members as possible will be able to see the writing and images you produce, and your communications will be easier to access and more productive. In business offices, potential sites for a dry erase wall include conference rooms, meeting rooms, employee break rooms, hallways, and entryways. All of these areas are likely to either get a lot of foot traffic or be used often by team members for group interactions. The greater the visibility your dry erase wall has, the greater its usefulness will be for all types of team functions.
These may include activities like brainstorming sessions, new employee training sessions, project status meetings, and team-building meetings. In any such gathering, it’s essential that everyone involved be able to get a good view of the wall from where they’re located in the room. So, make sure to choose a spot to apply your dry erase paint that will still be easily seen even if the furniture is moved around or other changes are made to the room’s layout.
Also, if you install your dry erase wall in a high-traffic area like a long hallway, you will provide a huge writing surface for many people to use. There all of your team members can easily write and draw at the moment when bright new ideas come to their minds. Then others can write input and suggestions for changes or additions in an endless cycle of creative inspiration.
Proper Lighting is Essential to Work Efficiency
Make sure that your room has sufficient lighting so that you can utilize your dry erase wall to the greatest possible effect. Install the dry erase paint on a wall that’s near windows or below several overhead lights. Lighting has a powerful impact on people’s attitude toward work and their general level of productivity and organization. When you try to work efficiently on your dry erase wall, operating in muted or insufficient lighting will make the job more difficult and frustrating than it needs to be.
Adequate lighting in the workplace has been found to contribute positively to job performance. For example, proper interior lighting can lead to faster job completion, lower failure rates, greater safety, fewer accidents, reduced absenteeism, and greater employee well-being. In addition, it turns out that cooler light like that produced on a sunny day stimulates workers to be more industrious. Several studies have also shown that sunlight can have numerous benefits for our physical and mental health. Exposure to natural light is particularly helpful for employees who are cooped up in offices throughout the day. Natural light, especially sunlight generated in the morning and evening hours, has been found to reduce depression and elevate workers’ mental state, energy level, focus, and efficiency.
In view of these facts, it’s a good idea to install your dry erase wall in an area that has large enough windows or skylights to let the natural light flow into the room freely during the day. Then, as you and your team members go about writing and drawing on your wall, you’ll feel more energized and inspired. On the other hand, if no area with sufficient natural light is available in your workplace, make sure to choose a location for your wall that has abundant artificial lighting. One way or another, to use your dry erase surface with optimum visibility and efficiency, it’s important to have enough light. Otherwise, operating in the space can result in eye strain, lethargy, and low energy when your team uses your dry erase wall for any length of time.
Write Clearly with Large Letters and Numbers
When writing on your dry erase painted wall, it’s best to produce text with large enough letters and numbers so that others can view it from a distance without straining their eyes. This is especially important in spaces like large school classrooms, business conference rooms, and university lecture halls so that students, team members, or others in all parts of the room can easily see what you write. Unfortunately, after years of experience writing on small surfaces like traditionally framed whiteboards and flip charts, many people find that writing in small-sized font has become a habit. But with a dry erase wall, surface size is not an issue. So, if you habitually write in small letters, work on changing your style and start writing in larger lettering that everyone in the environment can easily see and understand.
Daily Cleaning Helps to Maintain Your Wall’s Durability and Utility
At the end of each work day, make sure to clean your dry erase wall with a microfiber cloth dampened with water or an eco-friendly whiteboard cleaner. Doing so will ensure that the wall will remain bright and attractive and perform well for many trouble-free years of normal use. Microfiber fabric is recommended as the ideal cleaning device for dry erase walls. This is so because of microfiber’s remarkable capacity to capture and hold onto even the tiniest of dirt and dry erase ink particles, as well as bacteria.
The incredibly tiny asterisk-shaped fibers that makeup microfiber cloth give it this exceptional capacity to clean virtually any surface. The crevices between the fibers are so minute that no types of dirt particles or bacteria can escape after contact with the cloth. For this reason, microfiber materials are the best possible tools you can use on your dry erase painted wall for both everyday erasing and periodic maintenance.
Avoid Using Permanent Markers, Abrasive Cleaning Materials, and Harsh Cleaners
It’s important not to use writing or cleaning tools that can possibly harm the surface of your dry erase painted wall. For instance, avoid writing or drawing with permanent markers. Writing with a permanent marker on a dry erase painted wall will produce ink marks that can’t be removed with the usual cleaning method, namely, a good wiping with a moistened microfiber cloth. Instead, to eliminate permanent marker ink from a dry erase painted wall, you’ll need to completely cover the permanent ink marks with dry erase marker ink, which contains a solvent that can dissolve the permanent ink stains. Then the stained area has to be quickly wiped down with a dry microfiber cloth.
Also, make sure to avoid cleaning your wall with harsh chemicals or with, paper towels or with abrasive erasers, cloths, or pads. Due to the high-grade components and advanced production methods that go into making premium dry erase paint, walls coated in the paint are extremely durable and stain resistant. However, regular cleaning with a microfiber cloth and water or an eco-friendly whiteboard cleaner helps to maintain a perfect writing surface.
You can use a water-based cleaner such as our proprietary cleaning product that’s specially made to remove dirt and dry erase marker ink from whiteboards and dry erase painted surfaces. However, avoid using any type of cleaner that contains strong chemical ingredients, such as ammonia or chlorine bleach. These substances can permanently harm the sheen, resilience, and erasability of your dry erase painted wall and result in the need to repaint the surface.


![Giant Leaps Forward Require Big Spaces. [Leap Year Sale Event!]](https://www.remarkablecoating.com/wp-content/uploads/2016/02/Giant-Leaps-ForwardRequire-Big-Spaces-440x264.jpg)


![30% Off St Patrick’s Day Sale! [Details Inside]](https://www.remarkablecoating.com/wp-content/uploads/2016/03/Glorious-1-440x264.png)

![Drive Your Organization Into Openness and Watch it Expand [20% Off Whiteboard Paint]](https://www.remarkablecoating.com/wp-content/uploads/2016/04/Drive-Your-Organization-Into-Openness-and-Watch-It-Expand.-1-440x264.jpg)


![ReMARKable’s Winter Sale is Here! [25% Off + Free Shipping]](https://www.remarkablecoating.com/wp-content/uploads/2018/01/Red-Tag-Winter-Fashion-Facebook-Post-1-440x264.png)


![ReMARKable Summer Sale 2018 [28% Off Whiteboard Paint]](https://www.remarkablecoating.com/wp-content/uploads/2018/06/Blue-Simple-Line-Beach-Facebook-Post-1-440x264.png)


0 Comments