How to Turn a Wall Into a Whiteboard Wall
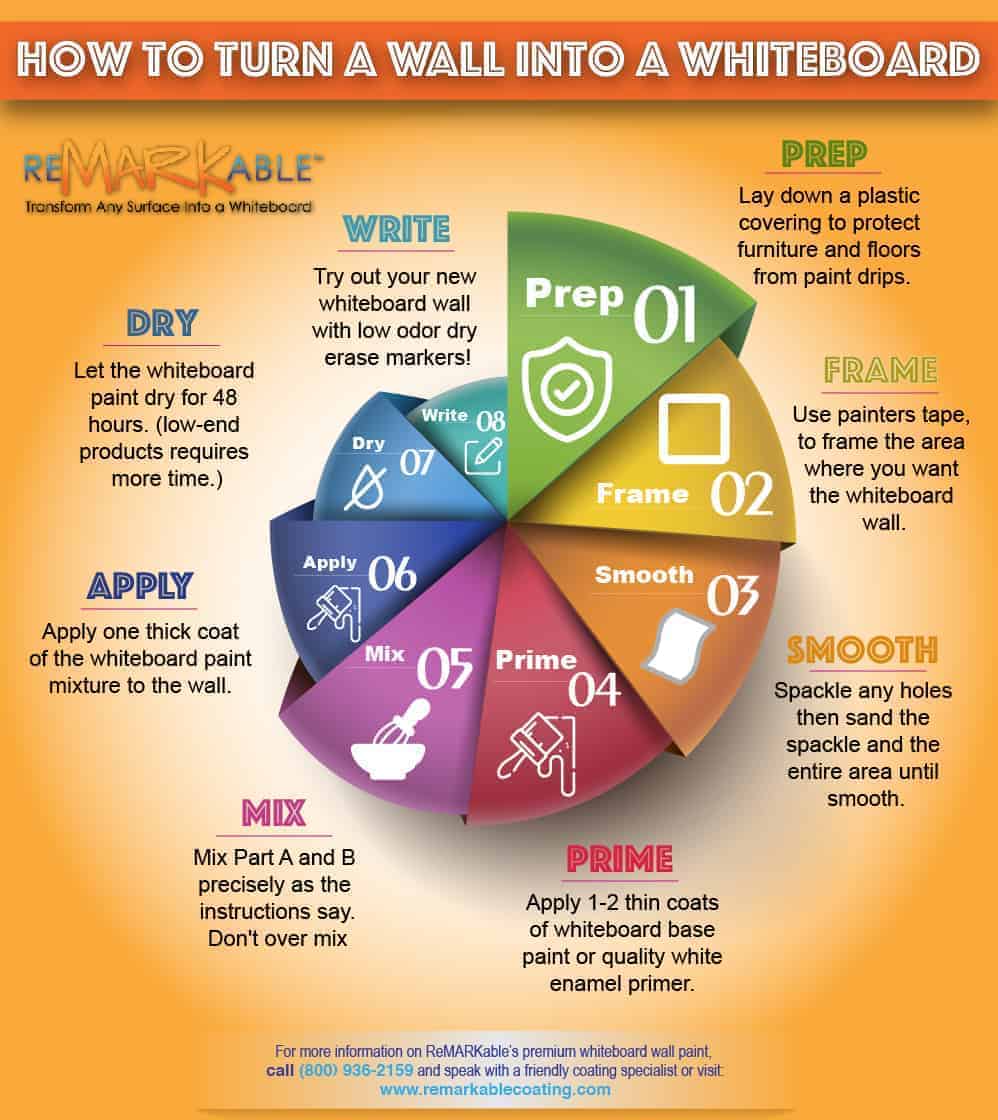
Introduction: Converting one or more walls in your office, classroom, clinic, or other venue into a whiteboard wall coated surface involves taking several essential steps that will ensure you a highly satisfactory outcome: preparing your surface; framing the area where you plan to install your whiteboard coating; making sure your surface is smooth; applying a primer and/or base coat; correctly mixing the two parts of your whiteboard coating formula; carefully applying the coating; letting your coated surface dry thoroughly; and making effective use of your whiteboard coated surface.
Prep Your Whiteboard Wall
In any kind of work project such as applying a whiteboard coating, painstaking preparation is the best way to achieve a successful outcome. Your first step in this process should be to vacuum your floors thoroughly before you spread drop cloths or coverings to keep dust and small bits of debris from getting caught beneath the cloths and scuffing your floors. Then lay down painter’s drop cloths or other coverings to protect your floors and furniture from paint drips. Canvas painter’s drop cloths or paper drop cloths are the best options from an environmental standpoint because they’re biodegradable and thus eco-friendly. Plastic and paper drop cloths have a tendency to skid around when you walk on them, so it’s important to use masking tape to secure these types of coverings to the floor around the edges. Also, to ensure that your drop cloths remain fully draped over your furniture and office equipment, firmly secure them with masking tape as well. Otherwise, your whiteboard paint might seep through the edges of the cloths or drip over the previously covered area when the cloths are accidentally bumped off or blown off by the wind.
Frame Your Whiteboard Wall
Use quick-release painter’s tape to carefully frame the area where you’re planning to install your whiteboard painted wall. Apply painter’s tape so that you’re able to paint all the way to the floor line without letting any paint overlap onto the floor. To keep the tape from coming apart, certain brands of painter’s tape are manufactured with a sturdier backing than you’ll find on general-use masking tapes. These sturdier kinds of tapes are also easier to take off in a single piece after you’re finished painting so they save time and energy. However, you’ll need to be meticulous during the process of tape removal, making sure your whiteboard paint is fully dry so as not to spoil the appearance of the surface.
Smoothen Your Whiteboard Wall
Cover any holes or dents in your wall with spackling compound then sand the spackled spots and the rest of the area with 200 to 250 grit sandpaper until your whole surface is completely smooth to the touch. If your wall has a textured or so-called “orange peel” surface you’ll need to sand it smooth because if left as it is before applying our whiteboard coating, the result will be a surface covered with tiny cavities in which dry erase marker ink will collect and then be difficult to completely remove. You might want to use a drywall pole sander for this project because these tools are perfect for sanding large areas such as raw drywall and painted walls prior to applying a primer, a base coat or a top coat. Pole sanders are available online or at most home improvement stores.
Prime Your Whiteboard Wall
If necessary, apply one or two coats of our quality ReMARKable Tintable Base Paint or a high-quality water-based satin or eggshell enamel before installation of your whiteboard painted wall. Our proprietary Base Paint is highly recommended before applying our white or clear whiteboard coating. This premium primer and base paint in one is the result of years of investigation into the ideal formula to serve as an undercoat for our whiteboard paints. Thus, using it will allow you to avoid bubbling and other issues that might arise when installing our coatings. Since it’s a primer and base paint in one formula, and was specifically developed to work in synch with our top coat paints, it will save you the time and energy required to apply a separate primer, and guarantee excellent bonding of our whiteboard coatings to your surface.
Certain satin or eggshell water-based enamels can function as base coats as well, but some others may not be usable with our paints because they contain certain chemicals that resist bacteria, foam, and mildew, as well as other ingredients that could have adverse reactions with our coatings. Thus, to avoid potential problems with your application such as bubbling and peeling, it’s recommended that you use our proprietary base paint/primer. If you do choose to apply a paint other than our product as a base coat, you’ll need to use a satin or eggshell water-based enamel that contains either none or minimal amounts of these chemicals. You can contact our customer support representatives for specific details on which chemicals to avoid in your base paint.
Mix the Whiteboard Paint
Precisely mix part A and part B just as the instructions indicate, and avoid over mixing or mixing too vigorously with a strong swirling motion by hand or with an electric drill and stirring attachment, as these techniques will cause bubbling, which will in turn produce tiny cavities on your surface where dry erase marker ink will collect and be hard to erase, thus compromising its quality and appearance.
Apply the Whiteboard Paint
After your base coat is thoroughly dry and your whiteboard paint is well mixed, apply a single thick coat of the whiteboard paint mixture to the wall using a full-sized 9” microfiber paint roller sleeve with a nap of 1/4” or 3/8”. During application it’s important not to try “stretching” your whiteboard paint by spreading it out and causing it to be applied too thinly, as this will result in an undesirable look and a surface that will be impossible to erase cleanly.
Allow the Whiteboard Paint To Dry
Let the whiteboard paint dry for 48 hours. (Low-end products require more time.) Since our premium whiteboard coatings are low in both odor and in volatile organic compounds (VOCs), your team members can remain in the space where the paint is applied during the drying period without experiencing any discomfort or health hazards. This feature is in sharp contrast to the drying conditions of many of our competitors’ products, which require all occupants to leave the venue for three to seven days while their paints are curing due to the toxicity and strong odors of the fumes they emit.
Write On Your Whiteboard Wall
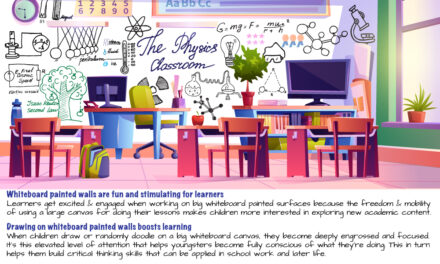
Try out your new whiteboard wall using high-quality low-odor dry erase markers, and unleash your creativity by expressing ideas in large easy-to-see text and drawings that can be readily erased when new thoughts emerge. The vast open-ended canvas of your new whiteboard painted wall will undoubtedly evoke more original thought than usual from your team regarding business plans, marketing strategies, budget proposals, or whatever other projects your company, school or organization has in the hopper.
When confronted with the spaciousness of whiteboard painted surfaces, people experience a sense of openness, dynamism, and inventiveness that can lead to a greater ability to free associate and come up with novel ideas in business, academics, health care, and countless other areas. Without feeling restricted by the limited writing and drawing area of an old-school framed whiteboard, you and your team members will no doubt develop both personally and professionally in ways you had never imagined.
Researchers from the University of Victoria in British Columbia have found that using vertical display surfaces such as whiteboard painted walls tends to encourage more face-to-face contact than usual among pairs of individuals (i.e., the pair look at each other’s faces more frequently). For managers such face to face communication can show your employees that you care, helping them to perform better. And in meetings with team members, a whiteboard coated wall will allow you to present large numbers of details at once, stimulating a stream of ideas from the others, and enhancing everyone’s creativity and drive.


![Giant Leaps Forward Require Big Spaces. [Leap Year Sale Event!]](https://www.remarkablecoating.com/wp-content/uploads/2016/02/Giant-Leaps-ForwardRequire-Big-Spaces-440x264.jpg)


![30% Off St Patrick’s Day Sale! [Details Inside]](https://www.remarkablecoating.com/wp-content/uploads/2016/03/Glorious-1-440x264.png)

![Drive Your Organization Into Openness and Watch it Expand [20% Off Whiteboard Paint]](https://www.remarkablecoating.com/wp-content/uploads/2016/04/Drive-Your-Organization-Into-Openness-and-Watch-It-Expand.-1-440x264.jpg)


![ReMARKable’s Winter Sale is Here! [25% Off + Free Shipping]](https://www.remarkablecoating.com/wp-content/uploads/2018/01/Red-Tag-Winter-Fashion-Facebook-Post-1-440x264.png)


![ReMARKable Summer Sale 2018 [28% Off Whiteboard Paint]](https://www.remarkablecoating.com/wp-content/uploads/2018/06/Blue-Simple-Line-Beach-Facebook-Post-1-440x264.png)


0 Comments