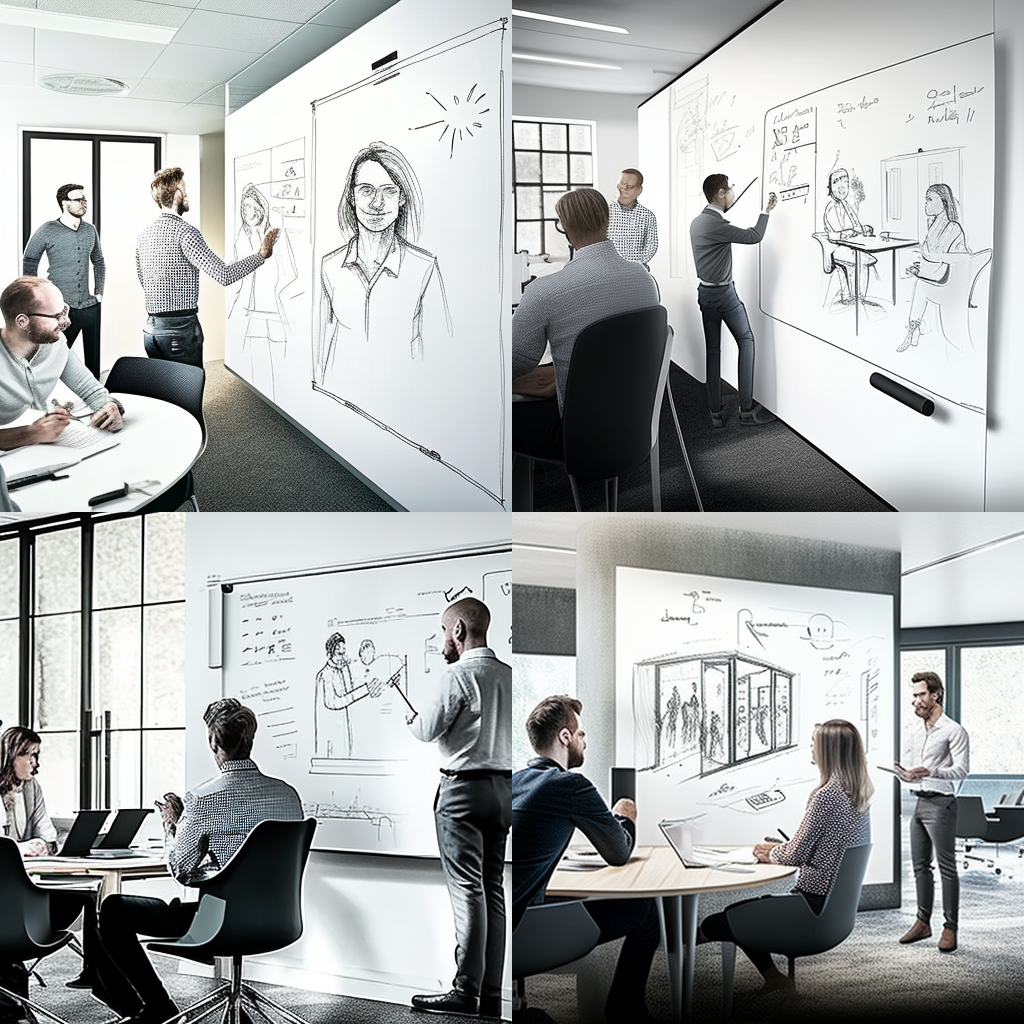
Drawing Tips and Tricks for Using Dry Erase Walls in Meetings
Nobody enjoys sitting through boring, long-winded office meetings or lengthy, rambling slide presentations, but there’s an alternative that can help your gatherings become more creative and engaging, namely, making skillful use of a dry erase painted wall. Writing and drawing on a dry erase wall are the ideal means to replicate what’s being said during a meeting and to help team members stay attentive to what you’re saying. In this way, the dry erase wall offers valuable assistance and becomes your ally and second voice in the meeting room as you present ideas and facts to your team members or clients.
No matter what you think about your skill at using a dry erase wall in meetings, the following are some ways to help you take your proficiency to a new level of sophistication and quality. When you show a strong command of a dry erase wall, you’ll gain greater confidence, get everyone on your team more engaged in your presentations, and earn more respect from colleagues and clients alike.
Slow Down the Pace as You Draw and Write
Drawing and writing on a dry erase wall during meetings is similar to giving a speech. If you rush the process, you’ll come off as lacking faith in your own ideas, produce undecipherable drawings, and make others feel bored and unsure about your ideas as well.
Just slow down the pace and remember to breathe as you draw and write. Spend a few extra seconds as you work, and be more deliberate in making each line. Doing so will make you feel more assured about what you draw and present during a meeting. Then when you demonstrate more self-confidence, others will, in turn, gain more faith in you and your proposals. They’ll also remember what you say for a more extended period of time. So, aim for drawings and lettering that are neater and more engaging than what you’ve produced in the past. If you do, you’re sure to notice a significant difference in the impact of your meetings.
Keep an Ample Supply of High-quality, Low-Odor Dry Erase Markers
Low-quality dry erase markers will do no justice to you and your ideas during meetings or at any other time. For this reason, it’s essential to choose markers that reflect your true merit. So, take the time to get quality markers that won’t run out of ink before the end of your next meeting. It’s likely that there’s a large retail outlet or office supply store near you that has a wide array of first-rate low-odor dry erase markers for sale at affordable prices. Many types of high-quality markers are also available online. When shopping for markers, if you choose the chisel-tip rather than the bullet-tip variety, you’ll produce thicker, bolder lines that create a better effect and are easier for your audience to see.
Practice Writing on Your Wall with Dry Erase Markers
This suggestion is related to the first tip discussed above. Strive to be more deliberate and meticulous when you write on your dry erase wall. What you write is like a visual recording of your voice on the wall that remains long after you leave the meeting room, so it’s worthwhile to put some effort into improving your lettering and drawing skills.
Of course, you don’t need to aim for fancy calligraphy with smooth, graceful characters and elaborate flourishes. But it’s important to always write in block letters (i.e., print) instead of using cursive script because printed words are much easier to read and understand than those done in cursive. In addition, a bit of precision goes a long way in displaying your personal character and self-confidence. Try practicing for a while on your dry erase wall before meetings, in both lowercase and capital letters, to hone your skill and prepare to make presentable lettering that your audience can easily see and understand.
Master the Skill of Producing Outline Text
Outline text consists of regular letters surrounded by one or more separate outer lines or outlined letters whose insides are entirely hollow. This style of lettering is quite popular these days. When used in moderation with a few titles during a meeting, it’s sure to command your audience’s attention and infuse some added life and energy into the proceedings with little effort required on your part. However, if you’re not confident about producing outline text, practice it for a while before your next meeting.
The best way to get proficient at outline text is to write a regular letter first, draw an outline around it, and then erase the original letter to produce an outline letter that’s hollow in the middle. It’s an especially good idea to master outline capital letters as they can be attention-grabbing devices when used sparingly in the right places.
Always Make Sure to Let the Marker Ink Dry after Drawing or Writing
One of the most helpful and convenient features of top-quality dry-erase markers is the fact that their ink is easy to erase. Once it’s dry, the ink can be wiped off completely, and you can use this to your advantage. The recommended erasing tool for premium dry erase walls is a microfiber cloth or mitt. Once you’ve allowed the ink to dry on the surface, use the microfiber fabric to help straighten out a line, clean up the edges on a figure, or even write text inside of a solid block of ink. Just make sure that you let the ink dry thoroughly before erasing, as wet dry erase ink leaves behind smudge marks if it’s wiped off too quickly. To help in the drying process, just blow air onto it, and it should dry almost immediately.
The fact that dry erase ink can be erased more or less instantly also means that the ink can be easily wiped off by accident. Someone unintentionally brushing up against your dry erase wall or your hand resting on a drawn image can wipe away part of your work. One way to avoid the latter problem is to use your pinky finger to stabilize your hand as you draw on the wall instead of using your entire hand. Doing so will minimize the amount of wall area you have to touch while drawing, thus helping to avoid wiping off some of your other content.
Practice Drawing a Small Set of Simple Icon-like Pictures
 Practice drawing a set of common icon-like images that you’re likely to be using repeatedly from meeting to meeting. Pictures like these act as visual metaphors that everyone on your team should be able to understand. And practicing sketching these pictures can hone your skills and make a drawing at your next meeting more engaging and reflective of your self-confidence. You may want to start with some images like the following:
· A target with an arrow in the bull’s eye (reaching a goal)
· A dark cloud with lightning coming from the bottom (a problem)
· Several boxes connected by arrows going in the same direction (a process)
· A mountain with a flag at the peak (reaching a goal)
· Two or more overlapping speech bubbles (a conversation)
· A padlock (security)
· A multi-story building (a company)
· A sign showing a road forking in two directions (options)
· A graph with an arrow going upward at an angle (improved profits).
Practicing drawing these types of images will take the pictures you produce on your dry erase wall to a new level and instill a greater feeling of self-assurance and energy into what you present during meetings with your team and clients. So, why not try them out during your next business gathering? You’ll be sure to notice a difference in the tone and energy in the room compared to previous meetings.


![Giant Leaps Forward Require Big Spaces. [Leap Year Sale Event!]](https://www.remarkablecoating.com/wp-content/uploads/2016/02/Giant-Leaps-ForwardRequire-Big-Spaces-440x264.jpg)


![30% Off St Patrick’s Day Sale! [Details Inside]](https://www.remarkablecoating.com/wp-content/uploads/2016/03/Glorious-1-440x264.png)

![Drive Your Organization Into Openness and Watch it Expand [20% Off Whiteboard Paint]](https://www.remarkablecoating.com/wp-content/uploads/2016/04/Drive-Your-Organization-Into-Openness-and-Watch-It-Expand.-1-440x264.jpg)


![ReMARKable’s Winter Sale is Here! [25% Off + Free Shipping]](https://www.remarkablecoating.com/wp-content/uploads/2018/01/Red-Tag-Winter-Fashion-Facebook-Post-1-440x264.png)


![ReMARKable Summer Sale 2018 [28% Off Whiteboard Paint]](https://www.remarkablecoating.com/wp-content/uploads/2018/06/Blue-Simple-Line-Beach-Facebook-Post-1-440x264.png)


0 Comments