
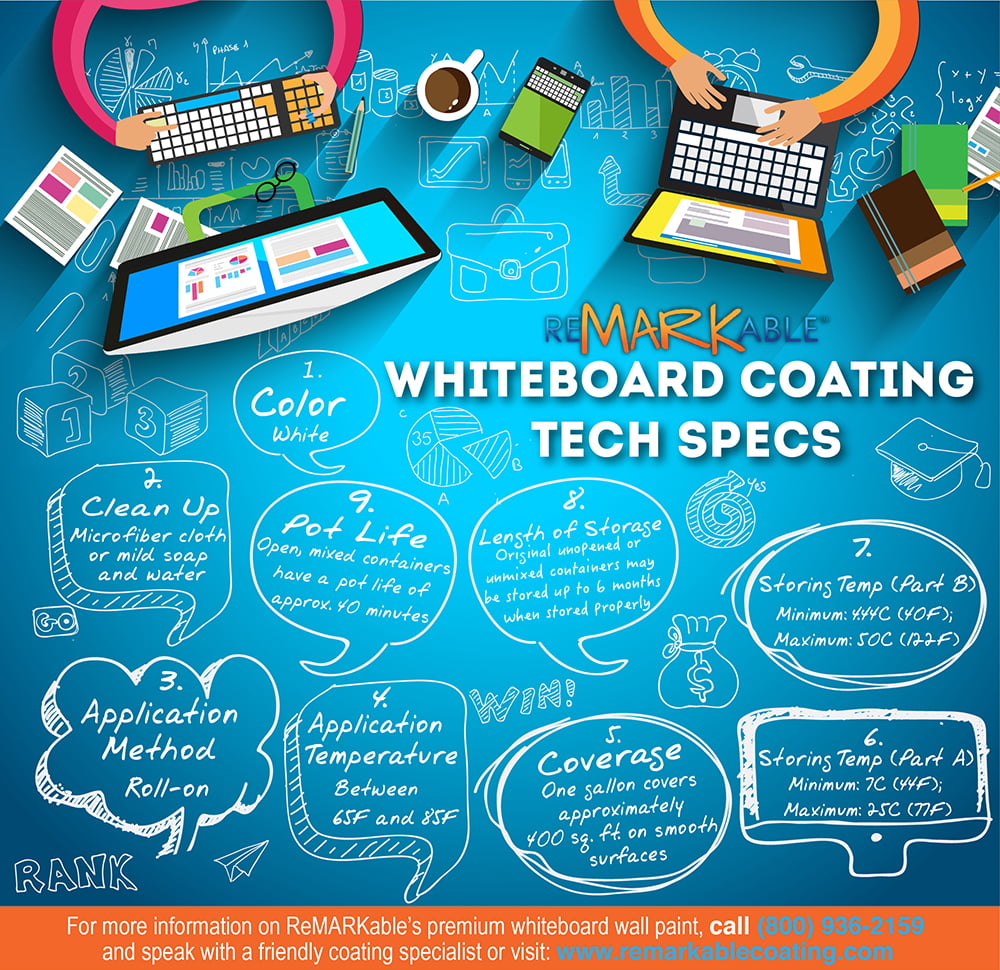
Whiteboard Coating Tech Specs
Both the clear and white varieties of ReMARKable whiteboard coating are the preeminent products of their kind on the market today. However, despite their high quality, it’s necessary to follow the simple-to-understand storage, application, and maintenance instructions that come with the coatings, or they will not look and perform as designed. The following are some practical suggestions on how to apply, store, and maintain the white version of the coating that will help you achieve the best results and create a writing surface that will serve you well for many years.
Color White
It is highly recommended that you apply the white version of premium whiteboard coating over our proprietary product, ReMARKable Tintable Base Paint, which is specifically formulated to work in synch with our whiteboard coatings. The white coating may also be applied over good-quality water-based enamels that produce a satin or eggshell finish; however, it’s important to avoid using base paints that include additives like flow modifiers, antimicrobial agents, polyvinyl acetate (PVA), and the other chemicals listed under question four, “How do I prepare my surface before applying ReMARKable?” in our website’s FAQ section.
These compounds can have adverse reactions with the coating and lead to bubbling and other issues that will affect the durability, erasability, and look of your whiteboard coated surface after application. Our knowledgeable customer support staff can give you the most current information on water-based enamels that don’t contain these additives and so would be appropriate to use as base coats with our whiteboard coating.
If you’re unsure about what type of paint is presently on your walls, it’s best to avoid guessing because the current paint may contain ingredients that could cause difficulties with your application. Instead, simply use our Tintable Base Paint under our white coating. In this way, you can be assured that your whiteboard coated surface will be free of issues caused by chemical reactions with inappropriate base coats, as Tintable Base Paint is specially formulated to work in perfect synchrony with both the clear and white versions of our high-quality whiteboard coatings.
Cleaning Up Whiteboard Paint
It’s important that you erase dry erase ink markings from your whiteboard coated surface with a microfiber cloth, towel, or mitt. Using regular dry ink erasers to remove markings from the wall can allow residual ink to remain because the slits in the felt surface of these erasers tend to gather ink over a short period of time. So, wiping your whiteboard coated surface with a standard eraser will simply spread the accumulated ink around instead of getting rid of your markings. For periodic maintenance, a microfiber cloth dampened with a mild type of soap mixed in water will effectively clean your whiteboard coated wall; however, a microfiber cloth and water are best to use to avoid soap residue staying on the surface. Remember, besides erasing your surface with a dry microfiber cloth after each use, you should do periodic thorough cleanings, and the surface will retain its durability and functionality through many years of use.
Application Method of Whiteboard Coating
Rolled On
To apply our premium whiteboard coating, use a high-quality microfiber roller cover that has a 1/4” or 3/8” nap. Before mixing parts A and B of the coating, wrap the entire roller sleeve with masking tape in a spiraling movement from one end to the other. Then carefully take off the tape to get rid of all excess lint, thus helping to guarantee a completely smooth and lint-free whiteboard coated surface after the coating dries. Once you’ve blended the two parts of the coating formula according to the instructions provided with the application kit, carefully roll the coating onto the wall one segment at a time in a vertical pattern, overlapping on each segment by a few inches, and cutting in with a two-inch foam brush as you move along on the wall. The “pot life” or time period when the coating is usable is approximately 40 to 45 minutes. After that, the coating will begin to dry and congeal, so plan your project well in advance to make sure you have enough time for the application before the thickening process starts, the coating congeals, and the product becomes unusable.
Application Temperature of Premium Whiteboard Coating
Premium whiteboard coating should be applied when the room temperature is from 65 to 85 degrees Fahrenheit (18.30 to 29.40 Celsius). This temperature range is important to keep in mind because it will allow the coating to be rolled on smoothly and evenly without the possibility of thickening or other issues occurring during application.
Whiteboard Coating Coverage
One gallon of high-quality white whiteboard coating will cover approximately 400 square feet on any smooth surface. Make sure you precisely measure the surface where you want to apply the coating because if the area ends up being bigger than the amount you have on hand, and you try to “stretch” the coating beyond the amount of square footage indicated on the container, you’ll have difficulties with your finished whiteboard surface, including poor erasability and an uneven look. For this reason, it’s essential to apply the amount of whiteboard coating you have only to the square footage it’s designed to cover. If you bought a 50-square-foot kit and attempt to coat a 60 square foot area, you’ll undoubtedly have problems. In such a situation, it’s preferable to purchase two 35-square-foot kits and put the coating on a little more thickly.
Storage Temperatures for Whiteboard Paint
While storing parts A and B of the whiteboard coating prior to application, you should be aware of the temperature of the room where the parts are kept. More specifically, the components should be held in a cool, dry, climate-controlled room that never gets extremely hot or extremely cold. When the room temperature gets too high or low, the length of time during which the coating is usable can be affected. Avoid storing parts A and B in a thin-walled garage or shed, and choose an indoor area that will stay at a steady temperature within the following ranges.
Storing Temperature for Part A
Part A of the whiteboard coating needs to be kept at a temperature no lower than 7C (44F) and no higher than 25C (77F).
Storing Temperature for Part B
Part B of the whiteboard coating needs to be kept at a temperature no lower than 7C (44F) and no higher than 25C (77F).
Length of Storage for Whiteboard Paint
Unopened containers or unmixed portions of premium whiteboard coating parts A and B can be kept up to six months without difficulty. Remember to note the expiration date is six months from your purchase date, as you could experience issues such as an overly thick mixture if the parts are combined beyond the suggested shelf life.
Whiteboard Paint’s Pot Life
“Pot life” is a term for the period when coatings or paints with more than one part are free-flowing and can be applied properly. This period starts right when the parts have been thoroughly mixed and ends when the mixture has gelled and can no longer be used. After mixing, top-quality whiteboard coating has a pot life of approximately 40-45 minutes, so immediately after you’ve mixed the components for the suggested three minutes, you’ll have to start applying the coating and be finished within that time frame. If you adhere to this timing and do the application in accord with the instructions, your top-quality whiteboard coated surface will remain durable and easy to write on and erase throughout its entire lifespan, with proper maintenance. However, if you go beyond the specified 40-45-minute pot life and keep applying the whiteboard paint, the cured surface will not be as durable and attractive as it should, and you’ll need to sand the surface and apply another coat.


![Giant Leaps Forward Require Big Spaces. [Leap Year Sale Event!]](https://www.remarkablecoating.com/wp-content/uploads/2016/02/Giant-Leaps-ForwardRequire-Big-Spaces-440x264.jpg)


![30% Off St Patrick’s Day Sale! [Details Inside]](https://www.remarkablecoating.com/wp-content/uploads/2016/03/Glorious-1-440x264.png)

![Drive Your Organization Into Openness and Watch it Expand [20% Off Whiteboard Paint]](https://www.remarkablecoating.com/wp-content/uploads/2016/04/Drive-Your-Organization-Into-Openness-and-Watch-It-Expand.-1-440x264.jpg)


![ReMARKable’s Winter Sale is Here! [25% Off + Free Shipping]](https://www.remarkablecoating.com/wp-content/uploads/2018/01/Red-Tag-Winter-Fashion-Facebook-Post-1-440x264.png)


![ReMARKable Summer Sale 2018 [28% Off Whiteboard Paint]](https://www.remarkablecoating.com/wp-content/uploads/2018/06/Blue-Simple-Line-Beach-Facebook-Post-1-440x264.png)


0 Comments