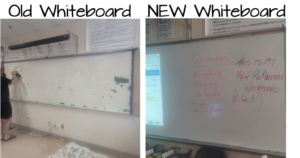
- Wipe all the ink from the surface.
- Mask area as needed
- Sand the entire surface lightly with 220 grit sandpaper to scuff and etch. Sanding will also help with any residual staining.
- Use paintable patching material to fill any holes, digits, or other repairs. Once the patch material is dry, sand the patched are to make it smooth.
- Apply a waterbed primer over the patched ares to seal the absorbent material.
- Apply 2 thin coats ReMARKable ™ Base Paint (wait 3-4 hours minimum between coats). The object is to adhere to the slick surface and provide a nice and smooth, evenly and solidly painted, white background. 1/4” nap roller for smooth surfaces is best. Wait at least 24 hours after final base coat.
- Apply one coat ReMARKable™ Whiteboard Paint with 3/8” nap microfiber roller. A 2” sponge brush may be used for “cutting in” the edges.
- Remove painters’ tape carefully 3-4 hours after application.
- Wait 48 hours for use with low odor dry erase markers and easy erase with microfiber cloth
*Refer to Instruction Sheet below for complete application instructions
https://www.remarkablecoating.com/wp-content/uploads/2021/04/ReMARKable_Instructions.pdf


![Giant Leaps Forward Require Big Spaces. [Leap Year Sale Event!]](https://www.remarkablecoating.com/wp-content/uploads/2016/02/Giant-Leaps-ForwardRequire-Big-Spaces-440x264.jpg)


![30% Off St Patrick’s Day Sale! [Details Inside]](https://www.remarkablecoating.com/wp-content/uploads/2016/03/Glorious-1-440x264.png)

![Drive Your Organization Into Openness and Watch it Expand [20% Off Whiteboard Paint]](https://www.remarkablecoating.com/wp-content/uploads/2016/04/Drive-Your-Organization-Into-Openness-and-Watch-It-Expand.-1-440x264.jpg)


![ReMARKable’s Winter Sale is Here! [25% Off + Free Shipping]](https://www.remarkablecoating.com/wp-content/uploads/2018/01/Red-Tag-Winter-Fashion-Facebook-Post-1-440x264.png)


![ReMARKable Summer Sale 2018 [28% Off Whiteboard Paint]](https://www.remarkablecoating.com/wp-content/uploads/2018/06/Blue-Simple-Line-Beach-Facebook-Post-1-440x264.png)


0 Comments