Clear Whiteboard Paint Tech Specs
Introduction: The clear and white versions of ReMARKable whiteboard paint are the finest products of their kind on the market today. However, our paints need to be handled, applied, and maintained according to our easy-to-follow instructions, or they will not look and function as they were designed to. Below are some recommendations on the application, storage, and maintenance of our clear whiteboard coating.
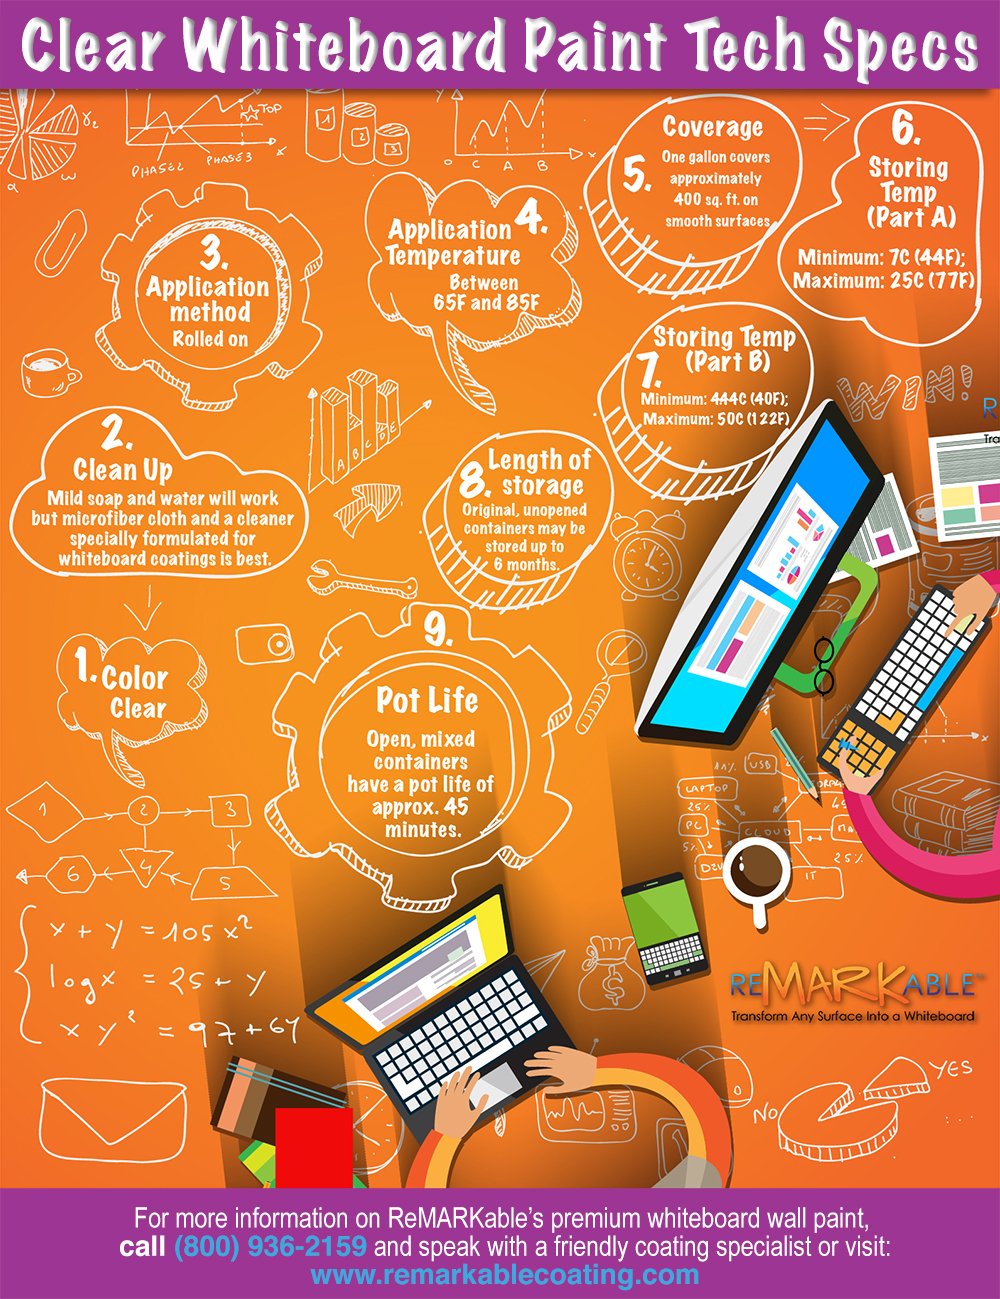
Color Clear
It’s strongly recommended that high-quality clear ReMARKable whiteboard paint be applied over our proprietary base paint/primer, which can be tinted with universal colorants to achieve any light or mid-toned color you like. It’s best to avoid darker colors for this purpose to allow your dry erase marker ink to be easily visible when you write or draw on the finished whiteboard surface. Our clear coating may also be applied over base coats comprised of water-based enamels with a satin or eggshell finish, but it’s necessary to avoid paints containing additives such as flow modifiers, antimicrobial agents, polyvinyl acetate (PVA), and several other chemicals that are presented in item four of our official website’s FAQ section titled “How do I prepare my surface before applying ReMARKable?” These compounds can adversely react with our coating, resulting in bubbling and other problems that can impact the durability, erasability, and appearance of your finished whiteboard surface. Our experienced customer support team can also provide you with up-to-date information on water-based enamel products that are free of these additives and so would be safe to use as base coats with our whiteboard paint.
If you’re not sure what type of paint is currently on your wall, it’s not advisable to engage in guesswork but instead, apply our tintable base paint/primer as a base coat under our clear coating. In this way, you can be assured that your finished surface will be free of issues caused by adverse interactions with other paints since our base paint/primer was specifically formulated to work in synch with our high-end whiteboard coatings.
Clean Up
It’s recommended that you remove dry erase marker ink from your whiteboard-coated wall with a microfiber cloth, mitt, or towel. Using standard whiteboard erasers to clean off your wall can leave ink on the surface because such erasers tend to accumulate ink within the slits in their felt surface, so rubbing your whiteboard wall with these kinds of erasers just spreads the accumulated ink around on the surface instead of removing it.
Mild soap and water will work for cleaning your whiteboard painted wall; however, to completely avoid any soap residue from remaining on the surface, using a good-quality eco-friendly cleaner specially formulated for whiteboard coatings is highly recommended. Spray a small amount of the cleaner on any stained areas you find and wipe the surface down with the microfiber cloth or mitt, followed by a water-dampened cloth. Then dry the surface thoroughly with a second microfiber cloth.
Household and industrial cleaning products such as abrasive pads, textured paper towels, cleaners with ammonia or bleach, or any other strong liquids or coarse materials can damage the whiteboard-coated surface and make it hard to write on and erase.
Following the maintenance steps above will help to keep your whiteboard surface spotless and easy to use during its entire lifespan of ten-plus years.
Application Method
Rolled On
Use a smooth, high-quality microfiber roller cover with a 1/4” or 3/8” nap to apply our premium whiteboard coating. Before starting to mix the two parts of the whiteboard paint for your application, carefully wrap the roller cover with masking tape in a spiral motion from one end to the other, making sure to cover the entire roller sleeve. Then slowly remove the masking tape to pick up all the excess lint from the roller, thus helping to ensure a smooth lint-free finish for your whiteboard surface. After you mix parts A and B of the paint formula per the instructions contained in your paint kit and in an instructional video on our website, roll the coating onto the wall one section at a time in a vertical direction, overlapping each section a couple of inches, and cutting in with a two-inch foam paintbrush as you go. You have about 40 to 45 minutes to apply ReMARKable to the surface before the paint starts to cure, so you’ll need to plan well. Otherwise, the whiteboard paint will begin to thicken, quickly congeal and become unusable.
Coverage
One gallon of our high-quality clear whiteboard paint covers approximately 400 square feet on smooth surfaces. Make sure to carefully measure the surface on which you plan to apply the paint because if your area turns out to be larger than the amount you purchased, and you try to “stretch” the paint beyond the square footage indicated on the container, you’ll experience difficulties with your finished whiteboard surface such as poor erasability and an irregular appearance. Thus, it’s crucial to apply the amount of whiteboard paint you have only to the square footage it’s meant to cover. If you purchased one of our 50-square-foot kits and try to cover a 60 square foot wall, you’ll run into problems. In such a case, it’s best to buy two 35-square-foot kits and apply the paint a little thicker.
Clear Whiteboard Paint Storage
While keeping the two parts of your whiteboard paint in storage before application, it’s important to keep in mind the temperature of the room where the paint is being held. Specifically, your paint should always be kept in a climate-controlled area, and the best place to store your whiteboard coating is in a cool, dry room that will never reach extremely hot or extremely cold temperatures. When the room temperature is too high or too low, the paint’s shelf life, the length of time during which the paint is still usable, may be affected. For instance, if your coating components are stored at below freezing (32°F) temperatures, the frigid air might cause them to gel or congeal, particularly after several periods of freezing and thawing. Alternatively, if the paint components are kept in extremely hot temperatures of higher than 110°F, skins or dry layers could form on the tops of the liquids, or the components might settle in the bottom of their containers and ultimately congeal over a period of time. It’s likely that your paint components will be exposed to such temperature extremes if you store them in your garage or tool shed, so choose a storage place indoors that you know will maintain a constant temperature within the ranges mentioned above.
In light of the above information, it’s good to remember the following ambient temperature guidelines to properly store parts A and B of your premium whiteboard paint.
Storing Temperature (Part A)
Part A of our top-quality whiteboard paint formula should be stored at a minimum temperature of seven degrees Centigrade or 44 degrees Fahrenheit and a maximum temperature of 25 degrees Centigrade or 77 degrees Fahrenheit.
Storing Temperature (Part B)
Part B needs to be stored at a minimum temperature of 4.44 degrees Centigrade or 40 degrees Fahrenheit and a maximum temperature of 50 degrees Centigrade or 122 degrees Fahrenheit
Length of Storage
Original unopened containers of our whiteboard paint parts A and B may be stored for up to six months with no problem, but it’s important to check the expiration date on your containers because you may experience issues with your application, such as increased viscosity if the parts are mixed and you try to use the paint beyond its suggested shelf life.
Pot Life
The term “pot life” refers to the time during which coatings or paints with multiple components are still in a free-flowing state and can be effectively applied to a surface. This period begins when the components are completely blended and ends when the paint or coating has congealed and can no longer be used. Open mixed containers of our whiteboard paint have a pot life of around 45 minutes, so right after parts A and B are mixed for three minutes, you’ll need to begin applying the paint immediately and be done with the job within that time period. If you abide by this timing and apply the whiteboard paint according to instructions, your top-quality whiteboard surface will possess the superior durability and easy writability, and erasability that it’s designed to have. On the other hand, if you exceed the coating’s specified 40-45 pot life and keep applying the product, the resulting surface will have decreased durability, writability, and erasability, and you’ll probably need to sand down your surface and recoat.


![Giant Leaps Forward Require Big Spaces. [Leap Year Sale Event!]](https://www.remarkablecoating.com/wp-content/uploads/2016/02/Giant-Leaps-ForwardRequire-Big-Spaces-440x264.jpg)


![30% Off St Patrick’s Day Sale! [Details Inside]](https://www.remarkablecoating.com/wp-content/uploads/2016/03/Glorious-1-440x264.png)

![Drive Your Organization Into Openness and Watch it Expand [20% Off Whiteboard Paint]](https://www.remarkablecoating.com/wp-content/uploads/2016/04/Drive-Your-Organization-Into-Openness-and-Watch-It-Expand.-1-440x264.jpg)


![ReMARKable’s Winter Sale is Here! [25% Off + Free Shipping]](https://www.remarkablecoating.com/wp-content/uploads/2018/01/Red-Tag-Winter-Fashion-Facebook-Post-1-440x264.png)


![ReMARKable Summer Sale 2018 [28% Off Whiteboard Paint]](https://www.remarkablecoating.com/wp-content/uploads/2018/06/Blue-Simple-Line-Beach-Facebook-Post-1-440x264.png)


0 Comments