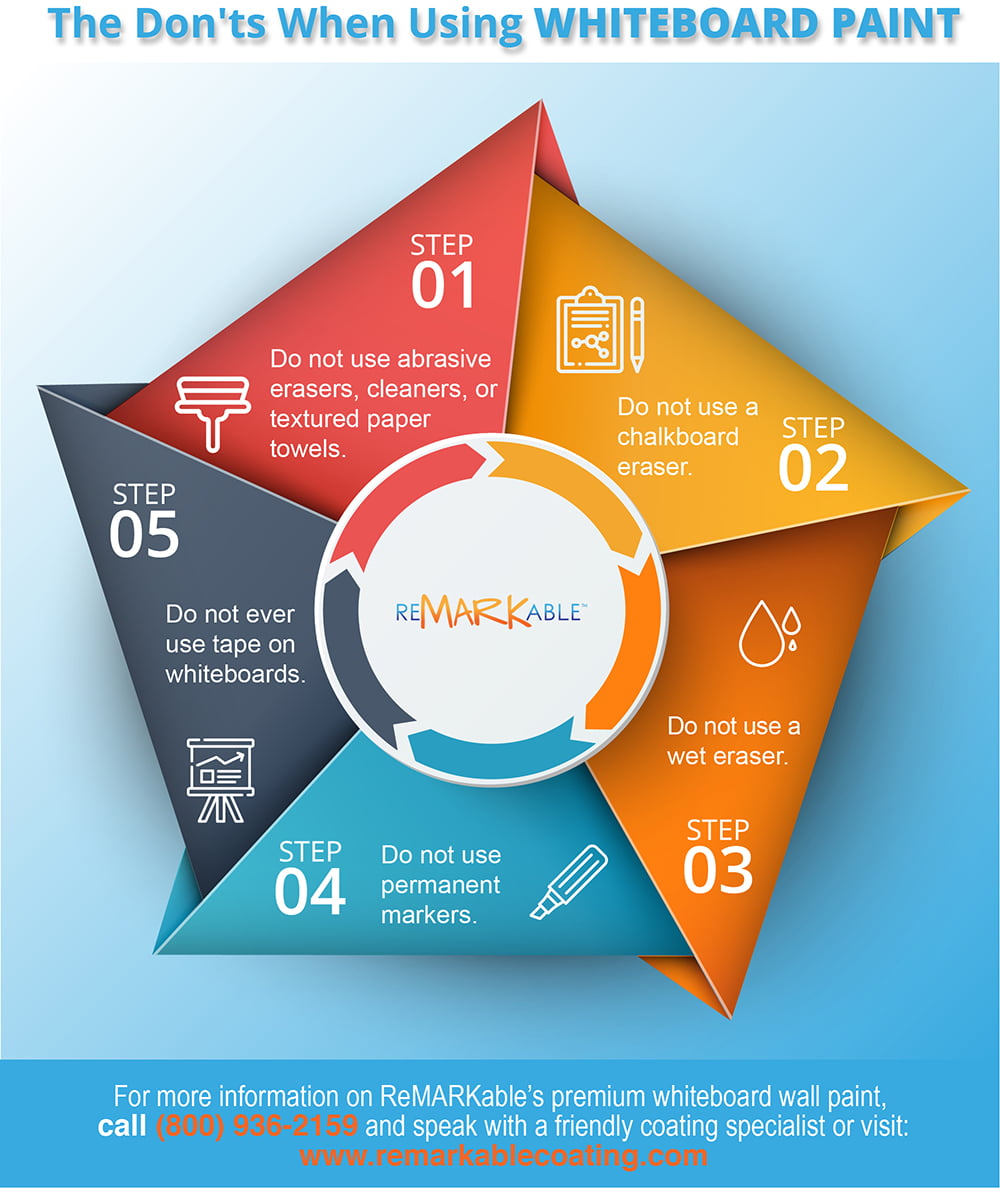
The Don’ts When Using Whiteboard Paint
Do not use abrasive dry ink erasers or coarse, granular materials such as textured paper towels or toilet paper
Doing so will cause minute scratches and imperfections on the surface that can make thorough erasing difficult if not impossible and tend to degrade the whiteboard coating’s fine glossy finish. Also, avoid trying to maintain your whiteboard painted wall with harsh cleaning products such as standard kitchen or bathroom cleaners, industrial cleaners, or cleaning solutions containing ammonia or isopropyl alcohol. Instead, always use a high-quality water-dampened microfiber cloth or mitt to clean and maintain your whiteboard coated wall. Microfiber fabric is highly effective in catching the tiniest of dry-erase ink and dirt particles, and unlike paper towels, it can be laundered and reused indefinitely.
Cloths consisting of microfibers are able to both clean and condition the whiteboard coated surface at the same time due to their unique construction, which includes many more fibers per square inch than cloth made of cotton or polyester. Because of the extremely small size of these fibers, microfiber cloths can trap dry erase marker ink, dirt and grime much more thoroughly and easily than conventional fabrics, leaving a whiteboard coated surface almost totally free of all foreign material. Thus, the surface becomes more easily written on and erased than if it were cleaned with a dry ink eraser or with a cloth made of other types of bulkier fibers such as cotton, wool, or polyester.
Do not use a chalkboard eraser on your whiteboard painted wall.
Chalkboard erasers, which are made of felt, are designed specifically for cleaning chalkboards, not whiteboards or whiteboard coated walls. These types of erasers don’t work well on premium whiteboard coated surfaces because dry-erase ink dust tends to collect and clog the felt on chalkboard erasers, and this can make your whiteboard coated surface dirtier than it was before you tried to erase it. Also, the fibers in the felt used in making chalkboard erasers are coarse and generally made of sheep’s wool, so they are many times thicker than the tiny fibers found in microfiber cloths, and are unable to pick up the fine particles of marker ink and dirt that microfiber fabric can remove. In addition, the abrasive nature of the felt found in chalkboard erasers makes them potentially unsafe to use on premium whiteboard coated surfaces due to their potential for scratching.
As a result, it’s highly recommended that you always use a microfiber cloth or towel and water to erase and maintain your premium whiteboard coated wall. As mentioned above, microfiber fabrics are naturally capable of latching onto the tiniest of ink and dirt fragments due to their minute size and the incredibly large number of fibers contained in each square inch of the material. However, it’s also important to remember to launder your microfiber cloths periodically so that they can maintain their amazingly precise cleaning ability.
Do not use a wet eraser on a whiteboard painted wall
Attempting to use a wet eraser to erase a premium whiteboard painted wall can cause streaking of the dry-erase ink markings on the surface and even result in serious staining that will be difficult to remove. The only wet material that’s safe to use for erasing a whiteboard coated wall is a microfiber cloth or mitt dampened with water, which can remove all traces of dry erase marker ink and leave the surface looking renewed, glossy, and ready to write on. It’s also recommended that you periodically clean the whiteboard surface with an environmentally friendly cleaner such as our proprietary brand, along with a microfiber cloth.
Do not use permanent markers on your whiteboard painted wall
Applying permanent marker ink to a whiteboard coated wall causes marks that can’t be removed with the method that’s normally recommended for erasing whiteboard coated surfaces; namely, a thorough wipe down with a moist microfiber cloth. Instead, to remove permanent marker ink from a whiteboard coated wall, it’s necessary to use a black dry erase marker or the darkest color of marker that you can find to completely cover the permanent ink markings with ink, which contains a solvent that is able to dissolve the stain. Remember to use a dry erase marker that has plenty of ink left in it so that you won’t run out while completely covering the permanent ink markings on the wall.
Give the inked-over area a few seconds to dry, then wipe off the permanent and dry erase ink with a clean microfiber cloth or mitt. Both the permanent ink and the dry erase ink should come off easily because both permanent and dry-erase markers contain a nonpolar solvent. Thus, the solvent in the dry-erase marker will dissolve the ink from the permanent marker, detaching it from the whiteboard coated surface. A common rule of thumb for finding out whether a solvent (in this case dry erase marker ink) will dissolve a given solute (permanent marker ink) is “like dissolves like.” Solvents consisting of polar molecules, such as water, can dissolve other substances made up of polar molecules, such as table salt; whereas, nonpolar solvents, like dry-erase marker ink, are able to dissolve other nonpolar substances like permanent marker ink.
If your first try at removing the permanent ink markings is not completely successful, repeat the process again. Many whiteboard cleaning products contain solvents that are weaker than those found in dry erase markers. Thus, for long-term maintenance and preservation of your whiteboard wall, it’s best to use a high-quality soy-based cleaner or other eco-friendly cleansers when possible.
Do not ever use tape on whiteboard coated walls.
Applying tapes such as electrician’s tape, cellophane tape, or masking tape to a whiteboard coated wall to hang memos, schedules, artwork, and the like will cause residue from the tape’s adhesive to remain on the coated surface, and this, in turn, will lead to problems with writing and erasing. Tape residue is often hard to remove from whiteboards and whiteboard coated walls and may require the use of substances such as household cooking spray, which can leave a residue and so have a damaging effect on a whiteboard coated surface. To remove the tape from a whiteboard coated wall, it’s necessary to slowly pull off as much of the tape as possible then wipe down the surface with a dry soft microfiber cloth or towel. Next, cooking spray needs to be sprayed on the areas of the whiteboard surface containing any remaining tape and tape residue, and another wipe down has to be done. Finally, a wet microfiber cloth should be used to do yet another wipe down.
To avoid this hassle and the wasted time and energy used in ongoing maintenance work, it’s best not to apply any tape to your whiteboard painted wall or dry erase wall. Instead, you can use GoodHangups, a unique and innovative magnetic system for hanging posters, prints, photographs, cards, notices, and the like on a whiteboard coated wall or other surfaces. With the GoodHangup system, no holes need to be drilled, and thus no damage is done to your whiteboard coated wall. GoodHangups are endlessly removable and reusable and will also not damage your artwork or other materials because they involve no adhesives to adhere to hung items. Using this system, you can hang materials on your whiteboard coated wall in seconds for countless uses in businesses, schools, private households, and other venues.
The magic of GoodHangups lies in the system’s patent-pending MagnaStickers, which are removable, continually reusable, magnetically receptive, and capable of turning whiteboard coated walls and almost any other surface like a wall, door, window, or mirror into a magnetic board. There’s no need for costly, size-specific frames, and when you want to remove and replace items, you can do it in less than three minutes’ time.


![Giant Leaps Forward Require Big Spaces. [Leap Year Sale Event!]](https://www.remarkablecoating.com/wp-content/uploads/2016/02/Giant-Leaps-ForwardRequire-Big-Spaces-440x264.jpg)


![30% Off St Patrick’s Day Sale! [Details Inside]](https://www.remarkablecoating.com/wp-content/uploads/2016/03/Glorious-1-440x264.png)

![Drive Your Organization Into Openness and Watch it Expand [20% Off Whiteboard Paint]](https://www.remarkablecoating.com/wp-content/uploads/2016/04/Drive-Your-Organization-Into-Openness-and-Watch-It-Expand.-1-440x264.jpg)


![ReMARKable’s Winter Sale is Here! [25% Off + Free Shipping]](https://www.remarkablecoating.com/wp-content/uploads/2018/01/Red-Tag-Winter-Fashion-Facebook-Post-1-440x264.png)


![ReMARKable Summer Sale 2018 [28% Off Whiteboard Paint]](https://www.remarkablecoating.com/wp-content/uploads/2018/06/Blue-Simple-Line-Beach-Facebook-Post-1-440x264.png)


0 Comments