
Surface Prep for Whiteboard Painted Walls
Introduction: Proper surface preparation is essential to achieving a successful application of our premium whiteboard wall coatings. This article addresses the major topics related to surface prep for whiteboard painted walls: appropriate base coat choice and application; ensuring a smooth surface; and the choice of suitable primers.
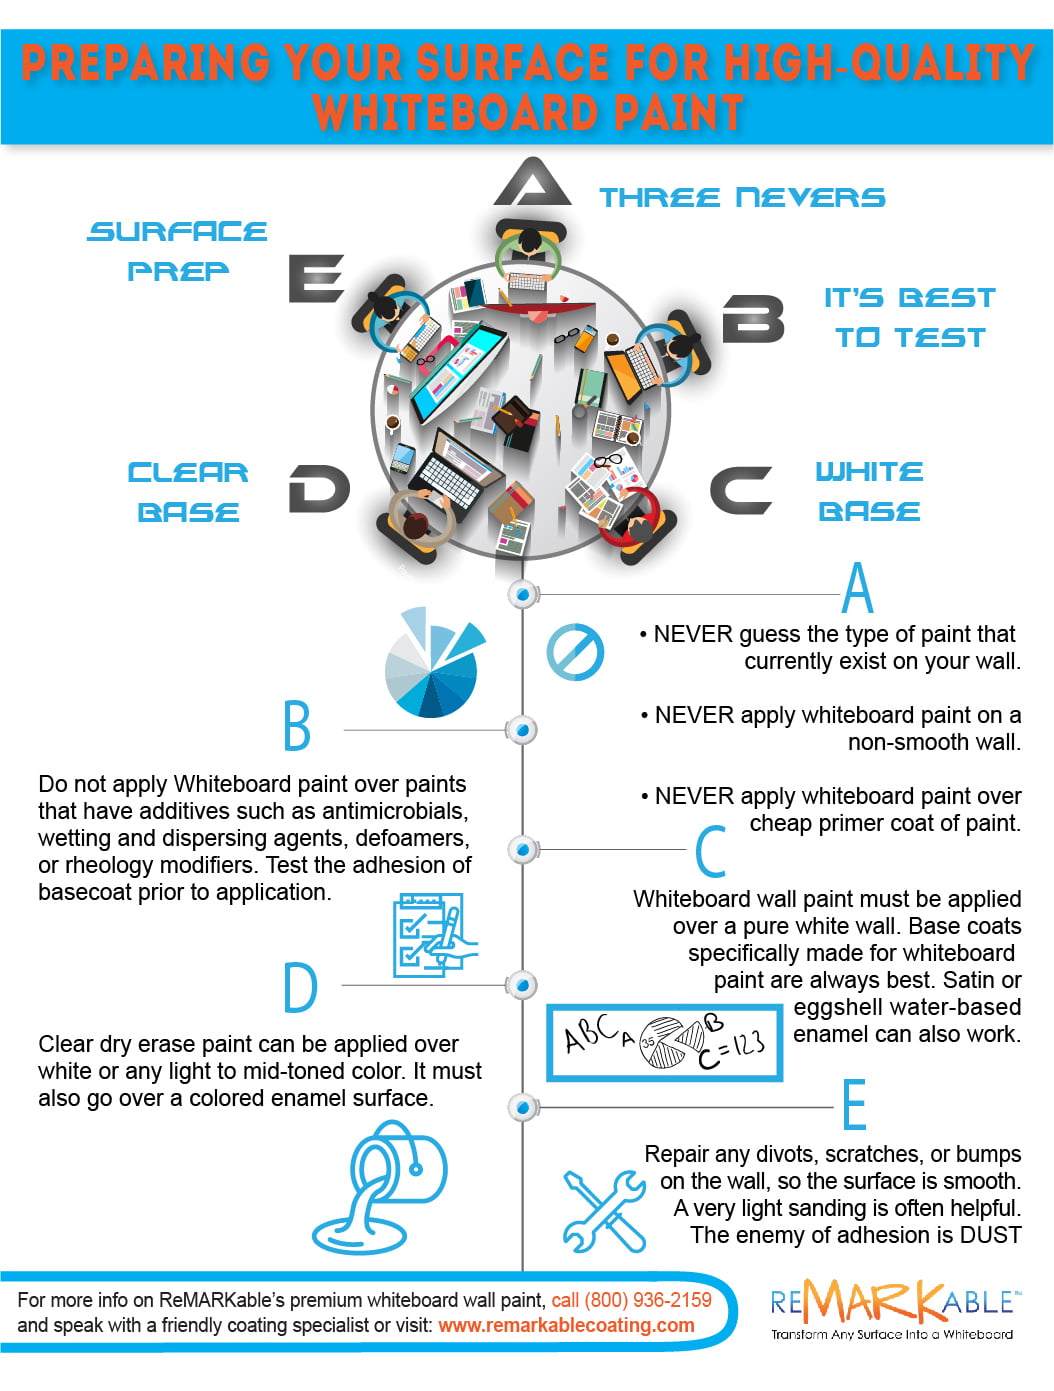
Three Nevers of Whiteboard Paint
1. Never guess about the type of paint that currently exists on your wall. If you don’t know exactly what it is then it’s best to go ahead and apply a base coat such as our proprietary base paint/primer to your surface to avoid potentially harmful chemical reactions between your current paint and our premium whiteboard coating.
2. Never apply quality whiteboard paint onto a non-smooth surface, because when you try to write on such a surface, whatever you’re writing with, such as a dry erase marker, will undulate, and you’ll experience ups and downs as you write. Then when you try to erase, your erasing cloth will tend to clean only the higher parts of the surface and miss the lower parts. The more wide open your texture is the easier your surface will be to clean. But if it has tightly spaced up-and-down areas or hills and valleys, like the surface of an orange peel, thousands of low points will be present on the surface, and when you erase across just the high points, thousands of little dots will appear in the low areas. As a result, you might assume that your surface is not erasing well, but the problem is actually your textured surface, where ink tends to settle in all of the low parts.
Thus, to ensure good erasability, your textured surface should be smoothed before installation of our quality whiteboard coating. You can do so by sanding out the texture or by applying a skim coat of finishing plaster to the surface. If you choose the sanding option you should put on gloves, a face mask, and safety glasses, then use 240-grit sandpaper to sand the orange peel texture until your wall is completely smooth. A hand-held tool called a pole sander is ideal for this job. With this device you can sand your textured wall more quickly than with sandpaper alone, as you’ll be able to cover larger sections of the surface at one time.
If you instead choose to apply a skim coat to your wall, use a textured foam roller for application and a squeegee to float the plaster. These tools are available at home improvement stores, as are pole sanders and various brands of finishing plaster. The application procedure is straightforward. Just roll the skim coat onto your wall in small segments, approximately a square yard at a time, so that the plaster stays wet until you begin to work on it with your squeegee. Then, going from ceiling to floor on your wall, use a squeegee to lightly float the surface of the plaster with a single smooth stroke. On the next stroke, go from floor to ceiling, once again smoothly floating the plaster with your squeegee. After you’re finished get rid of surplus plaster around light switches and the like with a paint scraper or putty knife.
To get your wall perfectly smooth, you’ll probably have to apply two layers of finishing plaster for your skim coat, letting the first coat dry completely before adding the second. Once the plaster is dry, the surface needs to be lightly smoothed with sandpaper before our proprietary base paint/primer or a regular primer is applied. To easily sand large areas of wall at a time, use the above-mentioned pole sander or a flat floor cleaner with a large sheet of sandpaper wrapped around it.
3. Never apply our quality whiteboard paint directly over a cheap primer because primers contain chemicals that cause off-gassing, the process by which gases escape while the primers are drying. This can damage your whiteboard surface as the gases seep out from the primer, causing small pores and an irregular appearance, thus adversely affecting erasability.
In some cases, however, it’s necessary to apply primer before putting on a base coat; for instance, if you’re planning to install our whiteboard paint on freshly installed drywall or on bare wood, you’ll need to apply a primer as a sealant because these types of surfaces are extremely permeable and can absorb a lot of the base coat, making it uneven and ineffective. However, you’ll need to carefully examine the ingredients of the primer you plan to use to ensure that it contains no polyvinyl acetate (PVA), a chemical that can react poorly with our base paint/primer. You’ll also need to check for the presence of antimicrobial agents, anti-mildew agents, and several other compounds that can negatively impact our base coat/primer. All of these chemicals are listed in the fourth item of the FAQ section on our company website. You can also get detailed information on this topic by calling our customer support team.
It’s Best to Test a Surface Before Applying Whiteboard Paint
As in the case of primers, avoid applying our premium whiteboard coating over base paints containing antimicrobial agents and other additives because these chemicals can compromise the quality of your finished whiteboard surface. To avoid this problem, it’s best to use our tintable base paint/primer as your base coat. If you decide to use another product, you’ll need to determine its exact ingredients so that you don’t expose our coating to any of these harmful substances. Check the label or ask your paint store staff for assistance in finding this information.
You’ll also need to test your base coat’s adhesion before applying our whiteboard paint. Two common techniques for doing so are the X-cut and the cross-hatch tape tests. To do the X-cut test use a tool with a sharp blade to make two cuts in the form of an X through the paint or coating down to the substrate. Then put masking tape over the X and quickly strip it off. Finally, check the area with the X-cut to see if the coating has come loose from the substrate. The cross-hatch test is usually done on surfaces with thinner layers of coating or paint. Again use a sharp blade, this time to make cuts in the shape of a cross-hatch. Then place masking tape over the cuts and rapidly remove it. After the tape is pulled off, check the cut to see if the coating has come off.
White Base Coat for Whiteboard Painted Walls
The white version of our whiteboard paint must be applied over a pure white wall. Base coats specifically made for whiteboard paints are always best. Some brands of satin or eggshell water-based enamel can also work; however, others may not. You’ll need to determine that your base paint doesn’t contain PVA or the other problematic ingredients mentioned above before attempting to use it under our premium whiteboard coating. You should also avoid applying a base coat with a flat or matte finish because these types of finishes are too absorbent for use with our whiteboard coatings. Finally, stay away from gloss or semi-gloss enamels because they may be too glossy or slick to work with our coatings and may need to be sanded before application of the top coat.
Clear Base Coat for Whiteboard Painted Walls
To allow your writing and drawing to be easily readable, the clear variety of our whiteboard paint may be applied over white or any light to mid-toned color, but the base coat must also be a water-based enamel that’s free of PVA and the other additives discussed earlier. Avoid colors such as black, charcoal gray, darker shades of blue, and the like. In general, when applying a clear glossy coating such as our clear whiteboard paint over dark colors, imperfections in your application technique will be magnified so that’s another reason to avoid using dark colors.
Surface Prep Before Applying Whiteboard Paint
Repair any divots, scratches, and bumps on the wall so that the surface is perfectly smooth. A light sanding is often helpful. Also, your surface must be thoroughly cleaned because dust is the enemy of adhesion; dust particles act like a barrier when you try to attach one layer of paint or coating to another, thus causing lifting of the finished surface, looseness, bumpy areas, colored spots if the dust is colored, etc. So after repairing the imperfections, just wipe your surface with a water- or denatured alcohol-dampened microfiber cloth, and avoid using a tack cloth, which can leave behind an oily residue.


![Giant Leaps Forward Require Big Spaces. [Leap Year Sale Event!]](https://www.remarkablecoating.com/wp-content/uploads/2016/02/Giant-Leaps-ForwardRequire-Big-Spaces-440x264.jpg)


![30% Off St Patrick’s Day Sale! [Details Inside]](https://www.remarkablecoating.com/wp-content/uploads/2016/03/Glorious-1-440x264.png)

![Drive Your Organization Into Openness and Watch it Expand [20% Off Whiteboard Paint]](https://www.remarkablecoating.com/wp-content/uploads/2016/04/Drive-Your-Organization-Into-Openness-and-Watch-It-Expand.-1-440x264.jpg)


![ReMARKable’s Winter Sale is Here! [25% Off + Free Shipping]](https://www.remarkablecoating.com/wp-content/uploads/2018/01/Red-Tag-Winter-Fashion-Facebook-Post-1-440x264.png)


![ReMARKable Summer Sale 2018 [28% Off Whiteboard Paint]](https://www.remarkablecoating.com/wp-content/uploads/2018/06/Blue-Simple-Line-Beach-Facebook-Post-1-440x264.png)


0 Comments