Using Dry Erase Walls in Problem-based Learning
Since the 1970s, problem-based learning (PBL) has been one of the most important instructional strategies teachers use from kindergarten to university. Medical educators in North America started the technique, which has since spread worldwide and across various grades and disciplines. Its potential to enhance student learning has been exploited to great effect, with many students reporting that PBL is a fun way to learn.
PBL is a student-centered teaching approach in which learners gain knowledge about various subjects through group activities to resolve open-ended problems. The problems provide the driving force that inspires the students to learn and develop vital academic and career skills such as critical thinking and project management. PBL is an active teaching technique that promotes maximum student involvement in learning. It requires teachers to energize learning scenarios by fostering cooperation among students to investigate, make decisions, and take action in response to a project’s challenges.
A Dry Erase Wall is Critical to Success in PBL
PBL also involves using a system of assessment that fosters awareness, reflexivity, and an analytical attitude in students, thus smoothing their progress toward deeper levels of scholarship. To engage in the process of cooperative work in applying PBL, dry erase walls are essential tool. When using the method in your classes, students should be organized into small groups to expand their collaboration skills. To minimize intra-group friction, urge the students to use the dry erase wall in an egalitarian way, where all participants have an equal chance to express their views and post their ideas without fear of criticism or reprisal.
What Are the Potential Benefits of Problem-Based Learning?
Over the years, several positive educational outcomes have been associated with PBL. More specifically, well-designed and executed PBL projects have been shown to enhance students’ skills in the following areas:
- Collaborative work
- Project management and group leadership
- Verbal and written communication
- Personal awareness and self-confidence
- Evaluation of group-related processes
- Thinking and working independently
- Critical thinking and assessment
- Explanation of ideas
- Self-directed education
- Application of course material to real-world situations
- Literacy in research and data gathering
- Cross-disciplinary problem-solving.
In light of these benefits, it’s evident that implementing PBL in the classroom is a highly effective instructional approach for students and teachers alike. A top-quality dry erase painted wall is a vital tool in implementing PBL projects.
Using Problem-Based Learning in the Classroom
In PBL, instead of following the traditional instructional pattern of presenting course material and then having students apply the knowledge they gained to solve problems, the problems are submitted first for the students to research and solve. PBL assignments may be brief, lasting for only a class period, or more complex and take an entire semester to complete. PBL generally involves collective effort, so it’s helpful to reserve part of your classroom schedule for getting students primed to work in groups and then give them enough time to complete their assigned PBL project.
Steps Involved in a Typical PBL Project
When doing problem-based learning activities, students have to complete these steps:
- Analyze the data provided by the teacher and clearly define the problem and the criteria for solving it.
- Survey what they already know about the issues involved in the problem.
- Establish what further information they need to learn and where they can get the data and tools required to solve the problem.
- Assess various possible methods for solving the problem.
- Go about solving the problem after choosing the best method(s)
- Provide a report on their conclusions to the teacher and class.
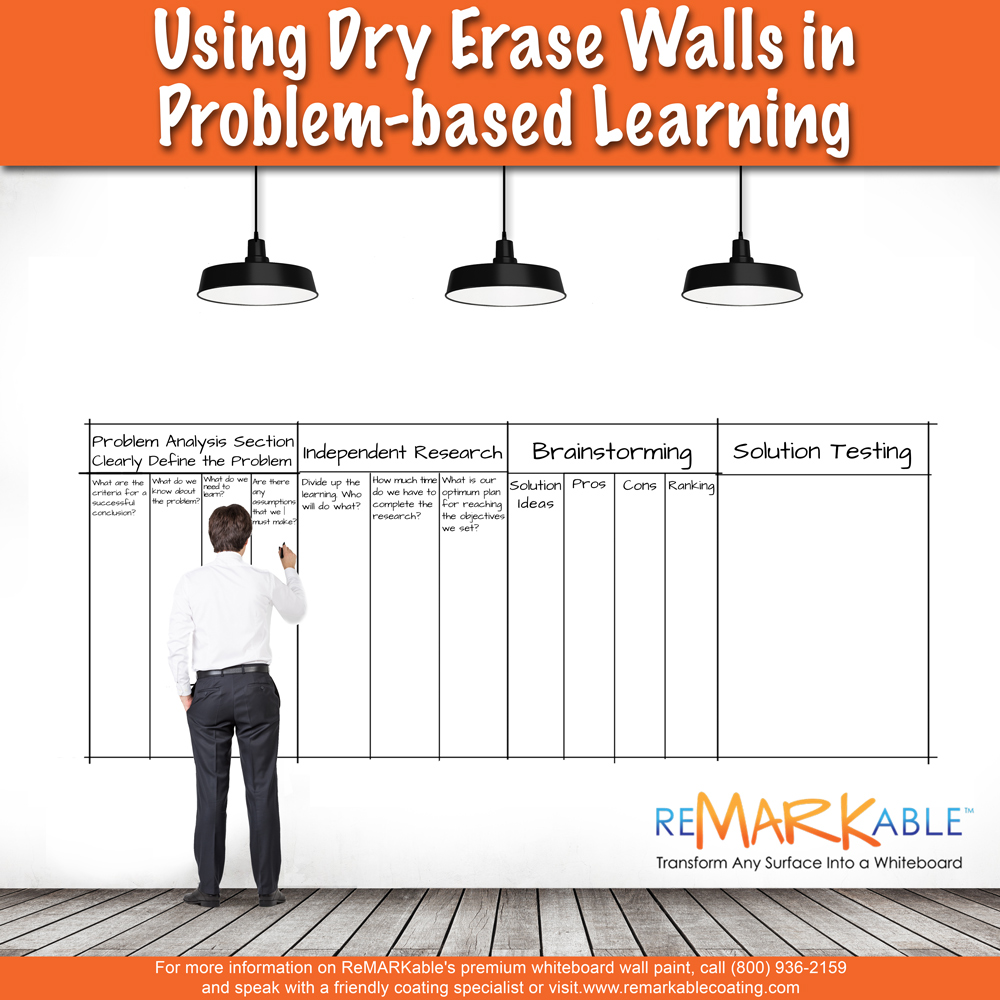
Using Your Dry Erase Wall for Problem-Based Learning
To use your dry erase wall as a tool for PBL projects, follow these procedures:
- Draw four large equal-sized sections on your dry erase wall with a dry erase marker and a ruler or yardstick.
- Within each section, create four vertical columns of equal size.
- As the header above the far left-hand section, called the “Problem Analysis Section,” write “Clearly Define the Problem.”
- At the top of the first column in this section, write “What are the criteria for a successful conclusion? (Here, the students determine the decisive factors for successfully solving the problem.)
- At the top of the second column, write “What do we know about the problem?” (Here, the students list the facts they know about the problem.)
- At the top of the third column, write “What do we need to learn?” (This question is what drives the PBL process.)
- At the top of the fourth column, write, “Are there any assumptions we must make?” (This question relates to any ideas that will skew the results of the problem-solving process one way or another.)
- Then move on to the second section on your wall, and as the header for this section, write “Independent Research.” (Here, the students set learning goals and divide the problem-solving tasks among themselves.)
- Draw three columns within this section.
- At the top of the first column, write “Divide up the learning. Who will do what?” (Here, the students write their names and the tasks they assign for themselves.)
- At the top of the second column, write, “How much time do we have to complete the research?”
- At the top of the third column, write, “What is our optimum plan for reaching the objectives we set?”
- Next, move to the third section on the wall and write “Brainstorming” as the header. (This section is used after the students independently research possible solutions to the problem and then come together again as a group.)
- Below this header, draw four columns marked “Solution Ideas,” “Pros,” “Cons,” and “Ranking.” (Here, the students brainstorm various solutions, discuss and record the pros and cons of the solutions, vote on the solutions, and then rank the solutions.)
- Finally, move to the fourth section on the wall and write “Solution Testing” as the header. (Here, the top-ranked solution is tested against the criteria for a successful solution listed earlier in the Problem Analysis section.)
After setting up your dry erase wall like this for a PBL session, generate a problem for your students to solve, ideally a real-world condition or circumstance similar to a challenge they may face in their present lives or their coming lives or careers. An example would be devising a new scheduling system for the students’ school.
Conducting the PBL Session with Your Dry Erase Wall
After the dry erase wall is set up with the required sections, headers, and columns, begin the PBL session by explaining the project’s preferred learning outcomes. What new knowledge might the students gain or new skills might they acquire as a result of participating in the project? Familiarize the students with the nature of group processes and have them do warm-up exercises so they can practice discussing and assessing their work and the work of their peers as part of the project.
Then, inform the students that the first step in solving any problem is problem analysis or clearly defining the problem. After discussing and establishing the precise nature of the problem they need to solve, the students can write it down in the column marked “Clearly Define the Problem.” Then they should follow the other steps of determining the criteria for a successful solution, deciding who will do what tasks, and so on. Depending on the nature of the project, it might be necessary for the students to assume various roles, such as those of government authorities, corporate executives, or the like.
The completed sections on the dry erase painted wall will record the problem-solving process for you and your students. For this reason, taking pictures of the sections for reference when doing related classwork and subsequent PBL projects is a good idea. Also, inform the group how you will evaluate and grade the assignment. Consider making the students conduct the self and peer assessments as part of their PBL project grade.


![Giant Leaps Forward Require Big Spaces. [Leap Year Sale Event!]](https://www.remarkablecoating.com/wp-content/uploads/2016/02/Giant-Leaps-ForwardRequire-Big-Spaces-440x264.jpg)


![30% Off St Patrick’s Day Sale! [Details Inside]](https://www.remarkablecoating.com/wp-content/uploads/2016/03/Glorious-1-440x264.png)

![Drive Your Organization Into Openness and Watch it Expand [20% Off Whiteboard Paint]](https://www.remarkablecoating.com/wp-content/uploads/2016/04/Drive-Your-Organization-Into-Openness-and-Watch-It-Expand.-1-440x264.jpg)


![ReMARKable’s Winter Sale is Here! [25% Off + Free Shipping]](https://www.remarkablecoating.com/wp-content/uploads/2018/01/Red-Tag-Winter-Fashion-Facebook-Post-1-440x264.png)


![ReMARKable Summer Sale 2018 [28% Off Whiteboard Paint]](https://www.remarkablecoating.com/wp-content/uploads/2018/06/Blue-Simple-Line-Beach-Facebook-Post-1-440x264.png)


0 Comments