
How to Turn a Chalkboard into a Dry-Erase Board
Old school chalkboards produce loads of messy allergy-inducing dust and are difficult to erase and maintain easily. Besides, text and drawings done on chalkboards are often hard to see clearly, especially if the boards haven’t been cleaned recently and old chalk dust has been allowed to collect on the surface. So, if your school or office still has a collection of old-fashioned chalkboards in place, it may be high time to upgrade to more modern, hygienic, and easy-to-use writing surfaces such as dry-erase coated walls.
Chalkboards are Being Phased out around the World
For the past several decades, chalkboards have experienced a steady and rapid decline in worldwide popularity due to the rise of dry-erase and dry-erase coated walls. Nowadays, few people in business, education, medicine, or other fields choose to use traditional chalkboards because they’re messy to use, spread chalk dust around a room when written on, and require continuous cleaning to stay presentable and useful. Also, many people are allergic to chalk dust, and sensitive electronic equipment can easily be damaged if chalk dust flies around a room, gets into the equipment’s casings, and adheres to internal parts such as motherboards and hard drives thus creating the need for costly repairs or replacements. For these reasons, schools, businesses, retail shops, and other establishments are now switching from using chalkboards to using low-maintenance, easily erased, healthy, and eco-friendly dry-erase coated surfaces for writing and drawing.
Steps to Converting Chalkboards into dry-erase Coated Surfaces
To save money and avoid having to remove their bulky, messy chalkboards, many institutions and companies are making the transition to a different writing surface by covering their existing chalkboards with top-quality dry-erase paint. If you wish to do so yourself, just follow the simple steps below, and you’ll have a brand-new writing and drawing canvas that’s durable, affordable, highly writable, easy to maintain, and attractive to the eye.
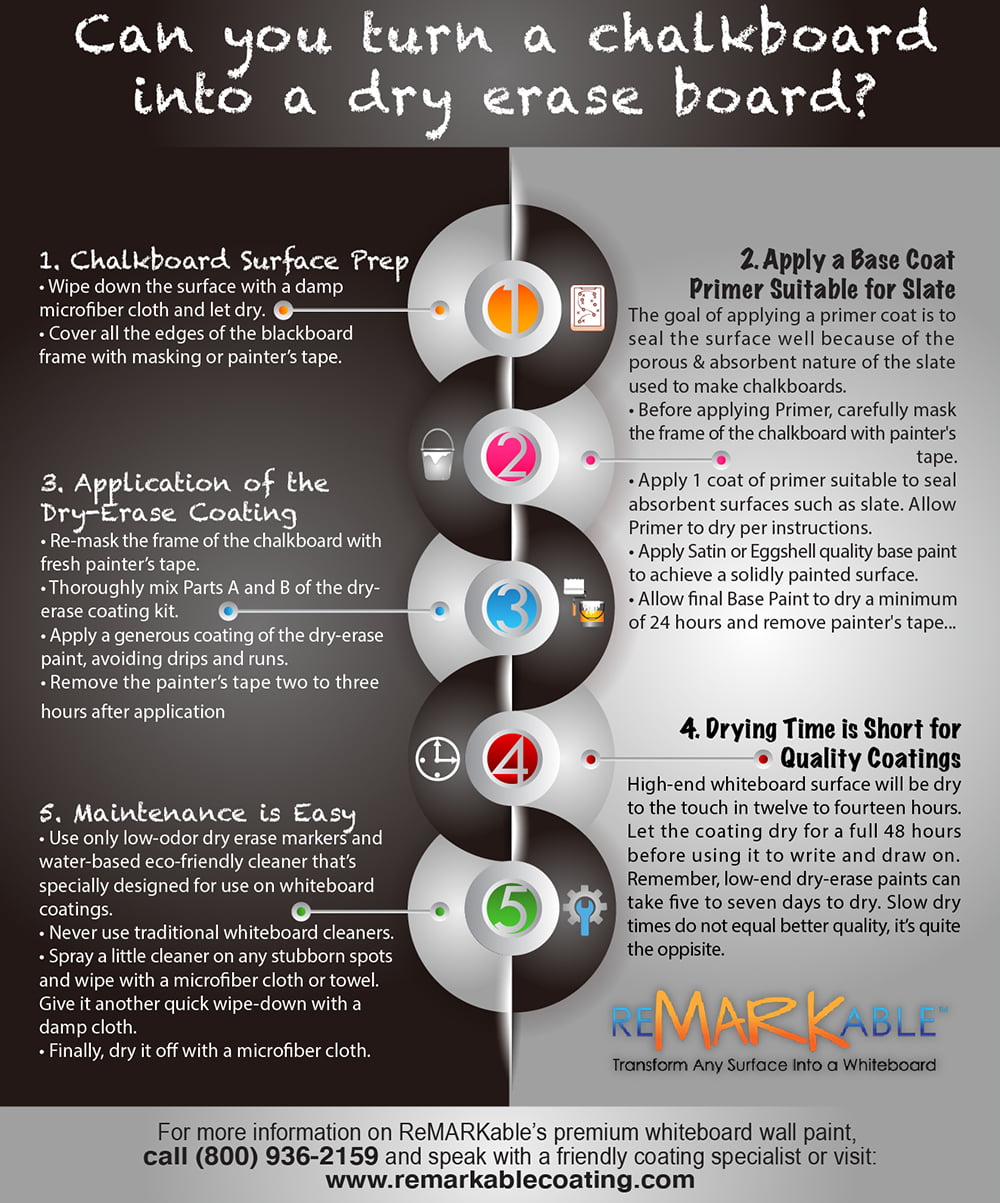
Chalkboard Surface Preparation
When applying our premium dry-erase paint to walls, proper surface preparation is essential to ensure adequate adhesion, and the same goes for painting chalkboards. Carefully preparing the chalkboard then applying a suitable primer and base coat will provide you with a sturdy, serviceable, and good-looking dry-erase coated surface that will last for ten-plus years of regular use without needing to be replaced.
Before applying a premium dry-erase paint to a chalkboard, we suggest you do the following prep work:
Thoroughly wipe down the surface with a damp microfiber cloth to remove all leftover chalk residue, dirt, and debris that may be present.
Let the chalkboard sit until it’s thoroughly dry to the touch.
Make sure the surface is 100% dust-free, as dust is the main enemy of adequate adhesion.
Carefully cover all the edges of the blackboard frame with masking tape or preferably painter’s tape, which is sturdier and easier to remove after painting without splitting apart.
Applying Dry-Erase Base Paint or a Primer Suitable for Slate
The next step is to apply a coat of base paint like ReMARKableTintable base coating or a coat of good-quality primer to your chalkboard. The goal of applying a primer coat is to seal the surface well because of the highly porous and absorbent nature of the slate used to make chalkboards. Instead of using a separate primer, we highly recommend that you coat the chalkboard with a couple of coats of ReMARKableTintable Base Paint, our top-quality proprietary product that consists of a primer and a base paint in one formula. Thus, you will save time, money, and energy by not having to worry about applying two different products, a primer, and a base coat, and then waiting for the primer to dry before applying the base coat.
• Make Sure Your Primer is Suitable for Use on Slate Surfaces
However, if you choose to use a primer paint other than ReMARKableTintable Base Paint, it’s okay as long as our premium dry-erase coating is not installed directly over the primer. Once the primer has sealed the surface, and the surface is dry, apply two coats of appropriate satin or eggshell water-based enamel. As mentioned above, slate is highly porous by nature, so it needs to be thoroughly covered with a quality primer that can fill all of the microscopic pores on its surface. The paint shop or home improvement store staff where you buy the primer can help you select the appropriate type for use on slate surfaces.
• Apply Painter’s Tape or Masking Tape to the Chalkboard Frame
Before applying the ReMARKableTintable Base Paint or primer, carefully mask the edges of the chalkboard with painter’s tape or masking tape, which needs to be removed two to three hours after the Base Paint or primer is applied. Allow the Tintable Base Paint or primer to dry for at least 24 hours.
Application of the Base Coat and Dry-Erase Coating
Then re-mask the frame of the chalkboard with fresh masking tape or painter’s tape. If you have applied the ReMARKableTintable Base Paint, you can go ahead and install the dry-erase coating after thoroughly mixing Parts A and B of the formula according to the manufacturer’s instructions supplied with your dry-erase painting kit. If you applied a primer made by a different company, you would now need to use a high-quality water-based satin or eggshell base paint before installing the dry-erase coating. In this case, let the base paint dry for at least 24 hours before installing the dry-erase coating. Remove the painter’s tape or masking tape two to three hours after application so the tape doesn’t get embedded in the paint and cause an unsightly, uneven-looking edge.
Drying Time is Short
Your newly coated dry-erase surface will be dry to the touch in just twelve to fourteen hours, depending on the ambient temperature and humidity of the room where it’s been applied. However, it’s recommended that you let the paint dry for a full 48 hours before using it to write or draw on. After the coating has thoroughly cured, use a dry microfiber cloth for erasing, and maintain your dry-erase coated surface through regular cleaning with a damp microfiber cloth. It would be best if you also did periodic wipe-downs with a microfiber cloth dampened with a water-based dry-erase paint cleaner like our eco-friendly proprietary dry-erase cleaner.
The Quick Drying Time Saves both Time and the Environment
The short dry time of our premium dry-erase paint helps you save precious time and energy by allowing you to write and draw on your newly refurbished surface more quickly than you could with low-quality epoxy-based dry-erase paints. In addition, because our eco-friendly paints are virtually odor-free and extremely low in volatile organic compounds (VOCs), your team will be able to continue working in the area where the surface is drying, thus eliminating the hassle of moving your office to a temporary location.
Maintenance is Easy
It’s best to use only low-odor dry-erase markers for writing and drawing on your new dry-erase coated surface so it can be easily erased with a microfiber cloth. Also, never use traditional dry-erase board cleaners on the surface and instead apply only a water-based eco-friendly cleaner that’s specially designed for use on dry-erase paints. In this way, you can keep your surface constantly looking good and working perfectly. Spray a little of the eco-friendly cleaner on any stained spots you may notice and wipe the surface down with a microfiber cloth or towel. Then give it another quick wipe-down with a damp cloth. Finally, dry it off with a microfiber cloth, and you’ll be ready to write and draw again on your newly refurbished surface.


![Giant Leaps Forward Require Big Spaces. [Leap Year Sale Event!]](https://www.remarkablecoating.com/wp-content/uploads/2016/02/Giant-Leaps-ForwardRequire-Big-Spaces-440x264.jpg)


![30% Off St Patrick’s Day Sale! [Details Inside]](https://www.remarkablecoating.com/wp-content/uploads/2016/03/Glorious-1-440x264.png)

![Drive Your Organization Into Openness and Watch it Expand [20% Off Whiteboard Paint]](https://www.remarkablecoating.com/wp-content/uploads/2016/04/Drive-Your-Organization-Into-Openness-and-Watch-It-Expand.-1-440x264.jpg)


![ReMARKable’s Winter Sale is Here! [25% Off + Free Shipping]](https://www.remarkablecoating.com/wp-content/uploads/2018/01/Red-Tag-Winter-Fashion-Facebook-Post-1-440x264.png)


![ReMARKable Summer Sale 2018 [28% Off Whiteboard Paint]](https://www.remarkablecoating.com/wp-content/uploads/2018/06/Blue-Simple-Line-Beach-Facebook-Post-1-440x264.png)


0 Comments