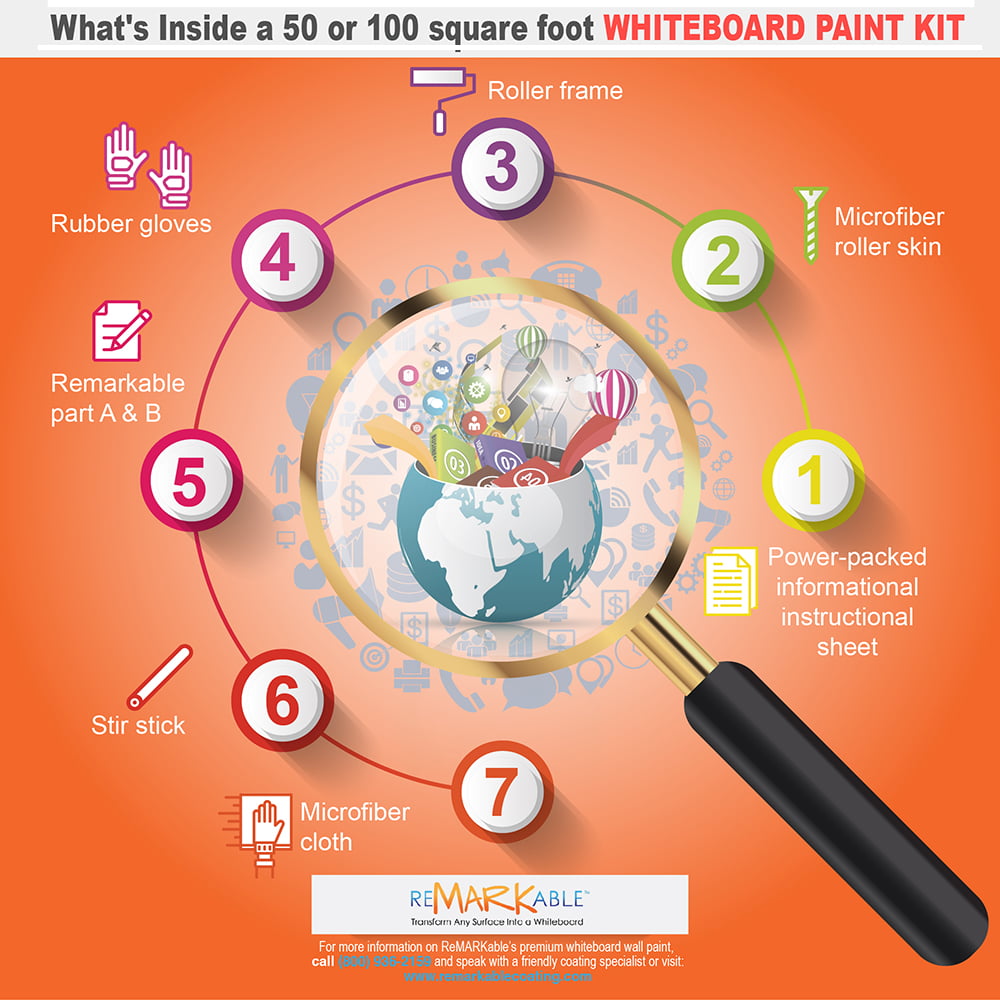
What’s inside a 50- or 100-Square-Foot Whiteboard Paint Kit?
Power-Packed Informational Instruction Sheet
You can be assured that premium ReMARKable whiteboard paint is the highest quality product among all the coatings of its kind on the market today. And the easy-to-understand manufacturer’s instructions that come with each coating kit give you all the information you’ll need to achieve a successful installation. However, it’s essential that you carefully adhere to the instructions, or else you may encounter serious issues with the installation, functionality, durability, and lifespan of the whiteboard surface. If the directions on surface prep, application, use, and maintenance are carefully followed, and the product still fails to function as advertised, you’ll receive a full refund of the cost, including shipping.
Microfiber Roller Skin
Microfiber fabrics are by far the best materials to use on paint roller sleeves, as they hold much more paint or coating than conventional woven pile sleeves, retain liquids well so that splattering is minimized, and produce a smooth, lustrous finish once a coating has cured. For these reasons, high-grade microfiber roller sleeves are included with all of our coating kits and are the only type of sleeves recommended for use with premium whiteboard paint. Using the sleeve supplied with the kit will help to ensure that your application is successful, as the sleeve can hold sufficient amounts of coating to produce the appropriate layer required for a proper whiteboard surface. Microfiber releases the least amount of lint in to the final finish. We still recommend removing excess lint from roller nap by wrapping the roller in 2” masking tape, then remove the tape and the excess lint will be removed with the tape.
Roller Frame
The ReMARKable Signature Micro Fiber Roller with Handle/Frame that’s included with each coating kit provides a dynamic duo of tools for the proper application of top-quality whiteboard coatings. The frame is finely manufactured and easy to use, has a comfortable handle, and is designed to hold a full-sized nine-inch roller cover. Thus, the roller frame perfectly complements the dimensions and high quality of the accompanying microfiber sleeve.
The detailed application instructions that come with each whiteboard paint kit describe how to correctly use the roller sleeve and frame; for example, when applying the whiteboard coating, a key part of correct rolling technique is to softly twist the roller from side to side as you do your application, leading with the heel of the roller at all times, while you apply light frontward pressure in the area of the heel. Moreover, it is critical not to press down too hard when rolling on the coating. Use only a modest degree of pressure on the roller, as excessive force will produce a bead or “rope” along its edge, while inadequate pressure can make your arm tired. Following these kinds of guidelines will help you to produce a flawless whiteboard coated surface that will endure many years of trouble-free service when appropriately used and maintained.
Rubber Gloves
The main purpose of rubber gloves is to protect the hands while doing tasks that involve chemicals or other harsh materials. Although premium whiteboard paint is eco-friendly, non-toxic, virtually odorless, non-irritating, and washes off with warm water, each coating kit comes with a pair of rubber gloves in case they’re needed. Wearing the gloves while mixing and applying the coating and during the clean-up process helps to limit the need for a lot of hand cleaning after you finish your application and eliminates the possibility of physical reactions to the chemicals in the coating for people with extremely sensitive skin.
ReMARKable Whiteboard Paint Parts A and B
Parts A and B of the premium whiteboard coating are included in two pre-measured, clearly marked containers so that you can mix them in the proper ratio of two parts B to one part A and end up with a serviceable coating mix to apply to your surface. The ratio for the 50-square-foot kit is 6 ounces of Part A to 12 ounces of Part B, and for the 100-square-foot kit, it is 12 ounces of Part A to 24 ounces of Part B. Although the containers have the right quantities of Parts A and B to produce the appropriate blend for the amount of square footage shown on the packaging, if you plan to cover a different-sized surface, for example, 40 square feet with a 50-square-foot kit, you should avoid “eyeballing” the quantities you’ll need and instead use containers with precise volume markings. In this way, you can guarantee that you’ll create a mix containing the precise ratio of coating parts required to cover your area.
Remember that after combining Parts A and B of the coating, the resulting mixture will have a “pot life” of approximately 40 to 45 minutes, during which time the coating remains fluid and can be applied to your surface without causing issues. After that period, the coating will start to congeal and become unusable, so it’s important to plan ahead and make sure you have allotted enough minutes to finish your entire coating project within the time frame of the pot life.
Stir Stick
A stir stick is provided with each coating kit because slow, careful stirring by hand is the only method you should use to mix Parts A and B of the high-end whiteboard coating. Many other types of multi-part coatings can be blended with a power mixer or an electric drill with a mixing attachment. However, if this technique is tried with the premium whiteboard coating, extensive bubbling will occur in the mixture. This will, in turn, result in a finished whiteboard wall that’s riddled with tiny holes where dry erase marker ink can easily settle and be hard to remove without using a cleaning agent and much elbow grease. So, to save a lot of time and energy and create an attractive and highly functional whiteboard coated surface, be sure to make proper use of your stir stick, using a slow, steady motion when combining the two parts of the coating. This is important because, as with a power mixer, an overly vigorous mixing action by hand can produce bubbling in your mixture and ultimately compromise the quality of the finished whiteboard surface.
Microfiber Cloth
Due to the extremely fine fibers used in their manufacture, microfiber fabrics have the capacity to grasp the tiniest bits of dirt, grime, and dry erase marker ink, allowing you to achieve a pristine writing and drawing surface each time you clean. For this reason, a high-grade microfiber cloth is included in each premium whiteboard paint kit to remind you that microfiber is the only type of material that’s appropriate for erasing and maintaining your finished whiteboard wall. Attempting to use other types of cleaning tools such as dry ink erasers, chalkboard erasers, or fabrics made of cotton or polyester will do a poor job of eliminating all the ink and other foreign material from your whiteboard coated wall, leaving you with a less than desirable surface covered with streaks and gray areas.
Thus, it’s essential that you use only a good-quality dampened microfiber cloth to clean and keep up your whiteboard coated surface because, as mentioned, microfiber materials are incredibly effective at capturing the most minute dry-erase ink and dirt particles. In fact, microfiber materials are specifically constructed to eliminate dust, lint, and other types of debris at a microscopic level, with studies showing that when used for cleaning, microfiber removes 99% of all bacteria from a surface. Moreover, microfiber’s electrostatic properties provide it with a powerful ability to hold onto dust for an indefinite period of time. And another benefit is that microfiber cloths can be washed and used repeatedly until they wear out.
Finally, when microfiber is used regularly to erase and maintain a whiteboard coated wall, the surface becomes much simpler to write on and erase than it would be if a standard dry ink eraser or a cloth made of heavier fibers like cotton, nylon, or polyester were used.


![Giant Leaps Forward Require Big Spaces. [Leap Year Sale Event!]](https://www.remarkablecoating.com/wp-content/uploads/2016/02/Giant-Leaps-ForwardRequire-Big-Spaces-440x264.jpg)


![30% Off St Patrick’s Day Sale! [Details Inside]](https://www.remarkablecoating.com/wp-content/uploads/2016/03/Glorious-1-440x264.png)

![Drive Your Organization Into Openness and Watch it Expand [20% Off Whiteboard Paint]](https://www.remarkablecoating.com/wp-content/uploads/2016/04/Drive-Your-Organization-Into-Openness-and-Watch-It-Expand.-1-440x264.jpg)


![ReMARKable’s Winter Sale is Here! [25% Off + Free Shipping]](https://www.remarkablecoating.com/wp-content/uploads/2018/01/Red-Tag-Winter-Fashion-Facebook-Post-1-440x264.png)


![ReMARKable Summer Sale 2018 [28% Off Whiteboard Paint]](https://www.remarkablecoating.com/wp-content/uploads/2018/06/Blue-Simple-Line-Beach-Facebook-Post-1-440x264.png)


0 Comments