
How to Apply Whiteboard Paint Without Mistakes
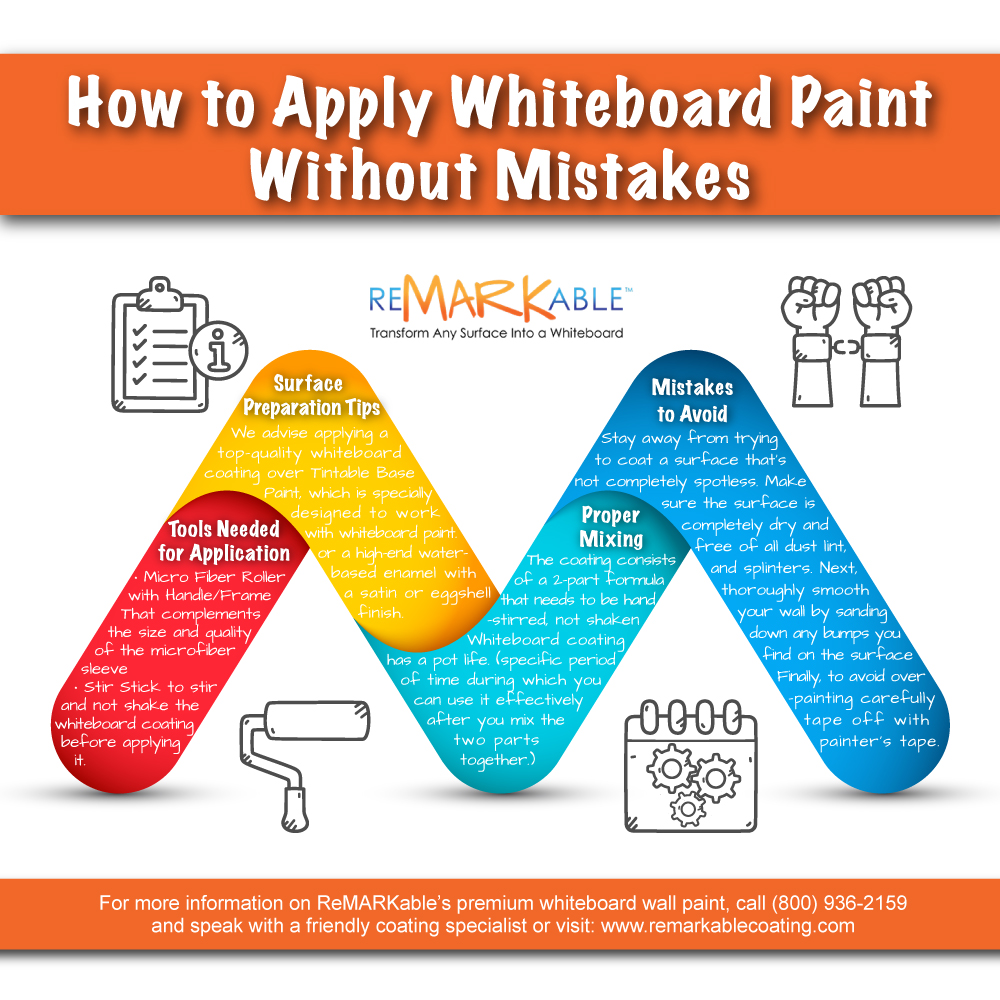
If you’re wondering how to apply whiteboard paint to create a flawless, trouble-free, and durable writing surface, this blog post will help. Correctly applying the whiteboard coating is essential to achieving a top-grade finish. Below are some tips for error-free application of the coating to produce the best dry erase walls. Details include the required tools, correct surface preparation, proper mixing technique, and more.
1. Tools You Will Need for Whiteboard Paint Application
Roller and Frame
The ReMARKable Signature Micro Fiber Roller with Handle/Frame is ideal to use for correctly applying the whiteboard coating. The frame is well-made, features a comfortable handle, and is designed to carry a nine-inch roller cover. Thus, the roller frame perfectly complements the size and quality of the attached microfiber sleeve.
Stir Stick
It’s essential to stir, not shake, the whiteboard coating before applying it, so a stir stick is included in all ReMARKable Paint kits. Proper mixing of parts A and B of the whiteboard coating (described below) will give you the greatest chance of creating a smooth, durable, and attractive writing surface.
After you add part A to part B, it’s important to completely but gently mix the two parts with the stir stick. Remember, the correct mixing of multi-part coatings, such as our premium paint, is critical, as the two parts are formulated to react in a specific way with each other when blended.
2. Whiteboard Wall Paint Surface Preparation Tips
We highly recommend applying our top-quality whiteboard coating over ReMARKableTintable Base Paint, a proprietary product specially designed to work with our whiteboard paint. You may also apply the coating on top of a high-quality water-based enamel with a satin or eggshell finish. However, avoid using base paints that contain additives such as rheology modifiers, antimicrobial agents, and certain other chemicals. Details about the additives you should avoid are presented under the question, “How do I prepare my surface before applying ReMARKable?” in the FAQ section of our website.
If you’re unsure about what type of paint is currently on your walls, it’s best to avoid guesswork and instead use our Tintable Base Paint as the base coat under the whiteboard coating. In this way, you can be sure that your coated surface will be free from problems caused by adverse chemical reactions with inappropriate base coats. Because, as mentioned above, our base paint is specially designed to work in synch with our premium whiteboard paint, and will thus ensure a trouble-free application.
3. Mixing Whiteboard Paint Properly
Both the clear and white varieties of premium whiteboard coating differ from conventional paint, such as interior or exterior house paint. First, the coating consists of a two-part formula that must be carefully hand-mixed, stirred, and applied according to the instructions provided with your paint kit. Second, the whiteboard coating has a so-called “pot life,” a specific period during which you can use it effectively after you mix the two parts together. Third, the blended coating should not be shaken as is done with conventional paint, as shaking will cause bubbling. This, in turn, will lead to small pits on the finished surface and problems with writing, erasing, and long-term care after the coating has cured.
4. How to Apply – Step-by-Step
Preparing your roller
When applying dry erase paint, it’s best to use a top-quality microfiber paint roller cover with a 3/8- or 1/4-inch nap. The roller cover and handle that come with most of our kits are ideal to use. The smaller the nap on a roller cover, the finer the type of surface that it’s able to produce. And the 3/8 inch nap on the ReMARKable roller cover is ideal for creating a smooth, flawless writing surface.
Before applying the coating, de-lint the roller sleeve by wrapping it with masking tape in a spiral pattern from one end to the other. After you’ve covered the whole sleeve, carefully remove the tape, thus eliminating any excess lint that might have been present.
If you skip this step, even the smallest amount of microfiber lint can affect the appearance, writability, and erasability of your whiteboard surface after curing. Also, remember to complete the de-linting process before you start to mix parts A and B of the whiteboard coating.
Mixing parts A and B
Each kit contains parts A and B of the whiteboard coating in two separate, pre-measured, plainly marked containers. This feature enables you to combine the two in a ratio of two parts B to one part A, yielding a functional mixture suitable for application. Mixing the two parts for three to four minutes right before application is a crucial step to follow. Then, after combining parts A and B, you’ll have a 40- to 45-minute time frame in which to apply the coating before the mixture starts to congeal and become unusable.
Application Procedure
While applying the coating, one of the key aspects of proper rolling technique is to always lead with the paint roller’s heel, while exerting a slight forward pressure toward the heel. Also, ensure a wet edge on the coating by cutting in with a two-inch sponge paintbrush as you progress along the wall. This type of brush works exceptionally well for cutting in the floor, ceiling, and corners of your room as you coat the walls segment by segment.
To begin applying the dry erase paint, cut in the first segment of your wall and apply a medium to heavy coat of the paint vertically on that segment from ceiling to floor. Then cut in another section of the wall, install another medium to heavy coat, and so forth from corner to corner, overlapping about a fourth of a roller width each time, until you finish coating the whole wall.
5. Dry Time vs. Cure Time
Premium dry erase paint has a 48-hour curing time, which is significantly faster than the cure times of other coatings on the market. This time represents the typical waiting period before the surface is ready for writing and erasing. The relative humidity in the room should be below 50% during the curing process.
The quick curing time of ReMARKable whiteboard coating is a significant benefit. It allows office staff, household members, or others in the area to avoid exposure to fumes within a short time frame. Thus, they can feel comfortable that their work or household activities will not be affected as they operate after the whiteboard paint is applied.
6. Mistakes to Avoid
To produce the best dry erase painted walls in your home, office, or other venue, it is essential to avoid certain key slip-ups when applying the whiteboard coating. For example, stay away from trying to coat a surface that’s not completely spotless. To do so, thoroughly clean the wall. A meticulous wipe down with a moistened microfiber cloth is usually all that’s required. However, if the surface is really dirty, clean it with a microfiber cloth dampened with water and an eco-friendly detergent or whiteboard cleaner.
Then double-check to make sure that your surface is completely dry and free of all foreign matter, such as dust particles, lint, and splinters. Additionally, use spackling compound to repair any imperfections, such as cracks, nail holes, and low spots. Next, thoroughly smooth your wall by sanding down any bumps you find on the surface with 180- to 240-grit sandpaper, depending on the amount of unevenness.
Finally, to avoid over-painting, ensure that the whole area you’re applying ReMARKable to is carefully taped off with painter’s tape. Before starting the taping process, carefully wipe down the moldings, light fixtures, and other places where the tape will be applied. A thorough wipe down with a dampened microfiber cloth is usually all that’s necessary, after which you should allow the areas to dry before tape application.
If you follow these tips for applying the whiteboard paint, you’ll be sure to produce the best dry erase walls that are guaranteed to last for ten years or more, with normal use and regular maintenance.


![Giant Leaps Forward Require Big Spaces. [Leap Year Sale Event!]](https://www.remarkablecoating.com/wp-content/uploads/2016/02/Giant-Leaps-ForwardRequire-Big-Spaces-440x264.jpg)


![30% Off St Patrick’s Day Sale! [Details Inside]](https://www.remarkablecoating.com/wp-content/uploads/2016/03/Glorious-1-440x264.png)

![Drive Your Organization Into Openness and Watch it Expand [20% Off Whiteboard Paint]](https://www.remarkablecoating.com/wp-content/uploads/2016/04/Drive-Your-Organization-Into-Openness-and-Watch-It-Expand.-1-440x264.jpg)


![ReMARKable’s Winter Sale is Here! [25% Off + Free Shipping]](https://www.remarkablecoating.com/wp-content/uploads/2018/01/Red-Tag-Winter-Fashion-Facebook-Post-1-440x264.png)


![ReMARKable Summer Sale 2018 [28% Off Whiteboard Paint]](https://www.remarkablecoating.com/wp-content/uploads/2018/06/Blue-Simple-Line-Beach-Facebook-Post-1-440x264.png)


0 Comments