
Whiteboard Paint Preparation Guide
The biggest question in customers’ minds when they go to install whiteboard paint is “How do I do proper prep work?“. Whiteboard paint failures, such as peeling, cracking, and poor erasing, are almost never due to the paint itself but to the 90% of work done before opening the can. One of the most critical steps to successfully applying whiteboard paint is creating a completely smooth, dust-free surface beforehand. You’ll need to make absolutely sure that your wall is as even and clean as possible before you start your application.
In this article, we’ll show you that when you use the whiteboard paint installation guide below, which is based on the whiteboard paint prep standards in ReMARKable’s 10-Year Guarantee, you can avoid every common mistake people make in applying dry erase paint. If you follow the instructions closely, you’re guaranteed to achieve an attractive, easy-to-use, and durable writing surface that will give you many years of dependable service.
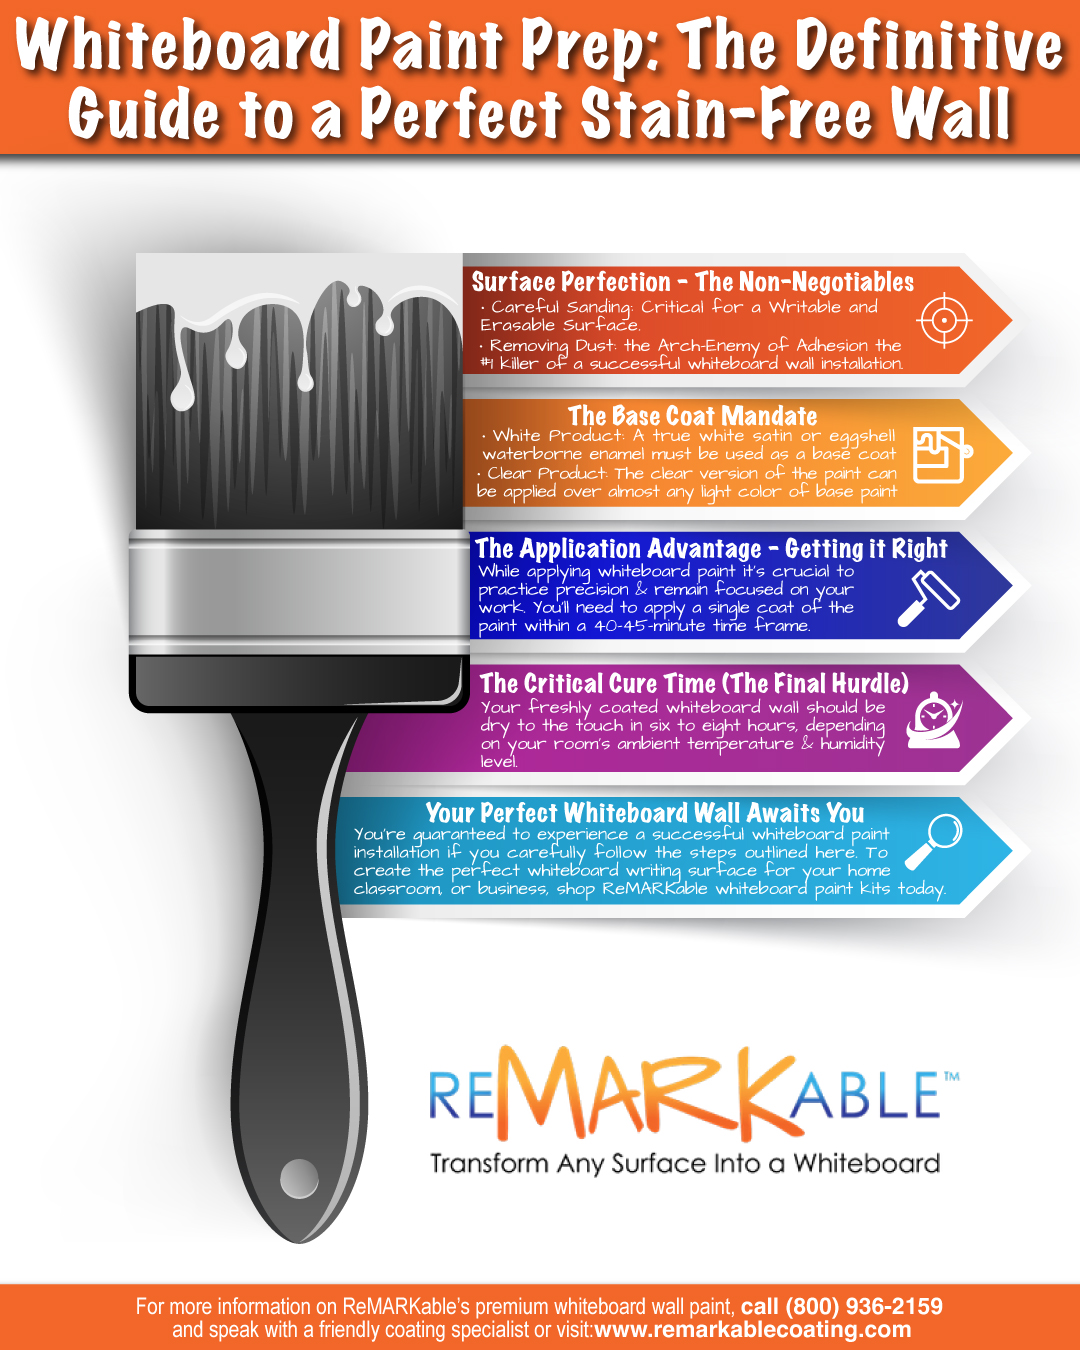
1. Surface Perfection – The Non-Negotiables
To achieve a perfect substrate for applying your premium whiteboard paint, you will need to follow a few key steps in surface prep for whiteboard wall, none of which can be compromised or avoided.
Careful Sanding: Critical for a Writable and Erasable Surface
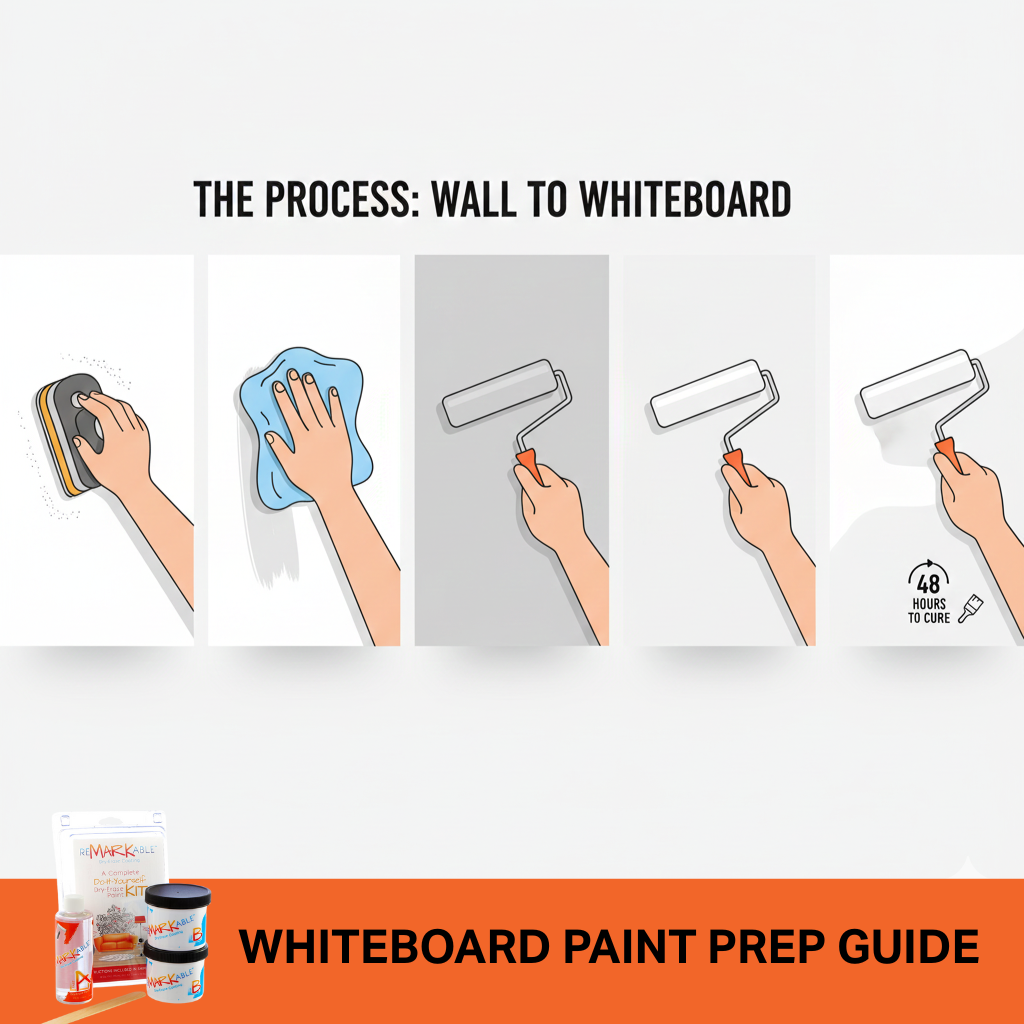
Thoroughly sanding your entire wall is essential to ensuring that your finished whiteboard surface will be smooth enough for easy writing and erasing. After you carefully inspect the wall, if its smoothness is questionable, fill in any dents, holes, and cuts you see with spackling compound. Once the spackling compound dries, carefully sand the wall with 220-grit sandpaper.
When you make sure that your surface is completely smooth and unblemished before starting to paint, you won’t have areas where dry erase marker ink can collect in the low places. This will cause minute spots to show up on your whiteboard surface that will be hard to erase. This will compromise the surface’s appearance and usefulness, so you’ll need to re-sand and apply a second coat.
Removing Dust: the Arch-Enemy of Adhesion
Dust is the number one killer of a successful whiteboard wall installation. So, after you’ve sanded the surface and made sure it’s completely smooth, thoroughly clean it with a microfiber cloth dampened with water or alcohol. Meticulous cleaning of your surface after sanding is critical, as dust is the arch-enemy of effective adhesion, leading to lifting and peeling of the coating after it dries.
2. The Whiteboard Paint Base Coat Mandate (Critical for the White Paint Finish)
In addition to making your surface perfectly smooth and clean, it is vital to install a primer followed by a base coat. To save time and effort, you can simply apply a single coat of ReMARKable Tintable Base Paint. This product contains a primer and base coat rolled into one, so it eliminates some extra work and expense for you. ReMARKable Tintable Base Paint is our proprietary product, and is specially formulated to work in perfect combination with our whiteboard paint products.
Choosing the Right Foundation: Your Primer and Base Coat
If you opt to apply a separate primer and base coat, you’ll have to start by coating your surface with a high-quality white primer. If you plan to cover a dark-colored wall with dry erase paint, you’ll need to prime it with a white primer first.
Once the primer is applied and allowed to dry according to the manufacturer’s instructions, you will need to apply a coat of satin or eggshell water-based enamel. The enamel should contain no additives such as antimicrobial agents and flow modifiers. These chemicals can cause harmful reactions with the whiteboard paint, leading to bubbling, peeling, and other effects that make the finished surface hard to write on and to properly erase. After applying the base coat, wait 24 hours before installing the whiteboard paint.
During the whiteboard paint prep process, please check these essential requirements for applying the proper base coat:
- White Product: A true white satin or eggshell waterborne enamel must be used as a base coat for the white version of the paint.
- Clear Product: The clear version of the paint can be applied over almost any light-colored base paint, but the surface still needs to be properly sanded, cleaned, and primed beforehand.
- Drying: As mentioned above, a key part of whiteboard paint prep is that the base coat must be left to dry for at least 24 hours. This will avoid problems with chemical interactions that might occur between the base coat and the top coat of whiteboard paint.
3. The Application Advantage – Getting it Right
While applying whiteboard paint, it’s crucial to practice precision and remain focused on your work. You’ll need to apply a single coat of the paint within a 40-45-minute time frame. So, remember to keep yourself as attentive as possible to the task at hand without giving in to distractions. After mixing parts A and B of the coating, you’ll need to make effective use of the 40-to-45-minute window, as the mixture will begin to congeal and become unusable after this period.
Flawless Application: Leveraging ReMARKable’s One-Coat Advantage
- Mixing: Be sure to use the proper mixing technique as described in the manufacturer’s instructions that come with each whiteboard paint kit. If you fail to stick to this method, you’ll produce an uneven surface that’s unwritable and unattractive, and will need to be replaced.
- Application Thickness: Applying too much or too little whiteboard paint will create irregularities on the finished surface that make dry erase markings look jagged or patchy. The correct thickness of paint to apply is described in the instructions.
- Competitive Differentiator: ReMARKable Whiteboard Paint has an advantage over many competing dry erase paint brands in that it requires only a one-coat application.
- Non-epoxy formulation: When you apply the paint, you prevent whiteboard paint yellowing because, unlike the hazardous epoxy-based formulas of other manufacturers, ReMARKable has a waterborne makeup. Thus, it’s a non-toxic dry erase coating that can be installed in children’s rooms, healthcare facilities, nursing homes, and other areas where safety may be an issue. It’s also environmentally friendly as it contains virtually none of the polluting volatile organic compounds (VOCs) found in epoxy-based whiteboard paints.
4. The Critical Cure Time (The Final Hurdle)
From Wet Paint to Writing Wall: The Crucial 48-Hour Cure – Your freshly coated whiteboard wall should be dry to the touch in 6 to 8 hours, depending on your room’s ambient temperature and humidity. However, you’ll need to wait at least 48 hours before starting to use the wall so that the paint can cure completely and you will avoid any problems with writing and erasing. Trying to write on the surface before the curing process is complete will compromise the paint’s durability and appearance.
This brief curing time is a key feature that sets ReMARKable Whiteboard Paint apart from most competitors, whose products require 72 hours to 7 days to cure fully. In contrast, your ReMARKable wall is ready to write on in just 48 hours.
FAQs:
1. What does whiteboard paint prep actually involve?
Whiteboard paint prep includes sanding the wall until perfectly smooth, cleaning off dust, applying a proper primer or base coat, and ensuring the surface is fully dry before installation.
2. Why is sanding so important in whiteboard paint prep?
Sanding ensures the wall is smooth enough for the coating to adhere properly. Any bumps or texture will trap ink and make erasing difficult.
3. Do I need a specific primer for whiteboard paint prep?
Yes. You must use a high-quality white primer or a compatible tintable base paint. Primers with additives can react poorly with dry erase coatings.
4. Can I skip the base coat during whiteboard paint prep?
No. The base coat ensures even color, prevents bubbling, and strengthens adhesion. Skipping it often leads to peeling or uneven marker performance.
5. How long should I let the wall dry during whiteboard paint prep?
Allow the base coat to dry for at least 24 hours before applying whiteboard paint. This prevents chemical interactions that can ruin the final surface.
6. What’s the biggest mistake people make during whiteboard paint prep?
Leaving behind dust after sanding. Dust stops the coating from bonding properly and is the #1 cause of peeling and poor erasability.
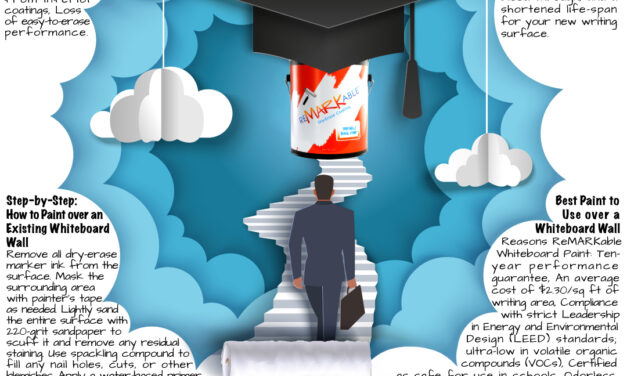
Your Perfect Whiteboard Wall Awaits You
You’re guaranteed to experience a successful whiteboard paint application if you carefully follow the steps outlined in this article. To create the perfect whiteboard writing surface for your home, classroom, or business, shop all ReMARKable whiteboard paint kits and bundles today. Properly installed whiteboard walls in a home, classroom, office, or other venue can lead to greater inspiration and interaction among workers, students, and household members alike.
Before you start your project, please call our knowledgeable, friendly customer care team of whiteboard paint specialists at (800) 936-2159. They’ll be able to answer any questions you may have and give you highly personalized support. Then you’ll be well on your way to creating the perfect writing surface to suit your needs.
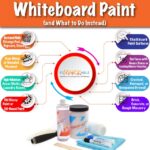
For a simple step-by-step instructions on how to transform any smooth surface into a ReMARKable dry erase whiteboard, check the image below:


![Giant Leaps Forward Require Big Spaces. [Leap Year Sale Event!]](https://www.remarkablecoating.com/wp-content/uploads/2016/02/Giant-Leaps-ForwardRequire-Big-Spaces-440x264.jpg)


![30% Off St Patrick’s Day Sale! [Details Inside]](https://www.remarkablecoating.com/wp-content/uploads/2016/03/Glorious-1-440x264.png)

![Drive Your Organization Into Openness and Watch it Expand [20% Off Whiteboard Paint]](https://www.remarkablecoating.com/wp-content/uploads/2016/04/Drive-Your-Organization-Into-Openness-and-Watch-It-Expand.-1-440x264.jpg)


![ReMARKable’s Winter Sale is Here! [25% Off + Free Shipping]](https://www.remarkablecoating.com/wp-content/uploads/2018/01/Red-Tag-Winter-Fashion-Facebook-Post-1-440x264.png)


![ReMARKable Summer Sale 2018 [28% Off Whiteboard Paint]](https://www.remarkablecoating.com/wp-content/uploads/2018/06/Blue-Simple-Line-Beach-Facebook-Post-1-440x264.png)


0 Comments